Section 01
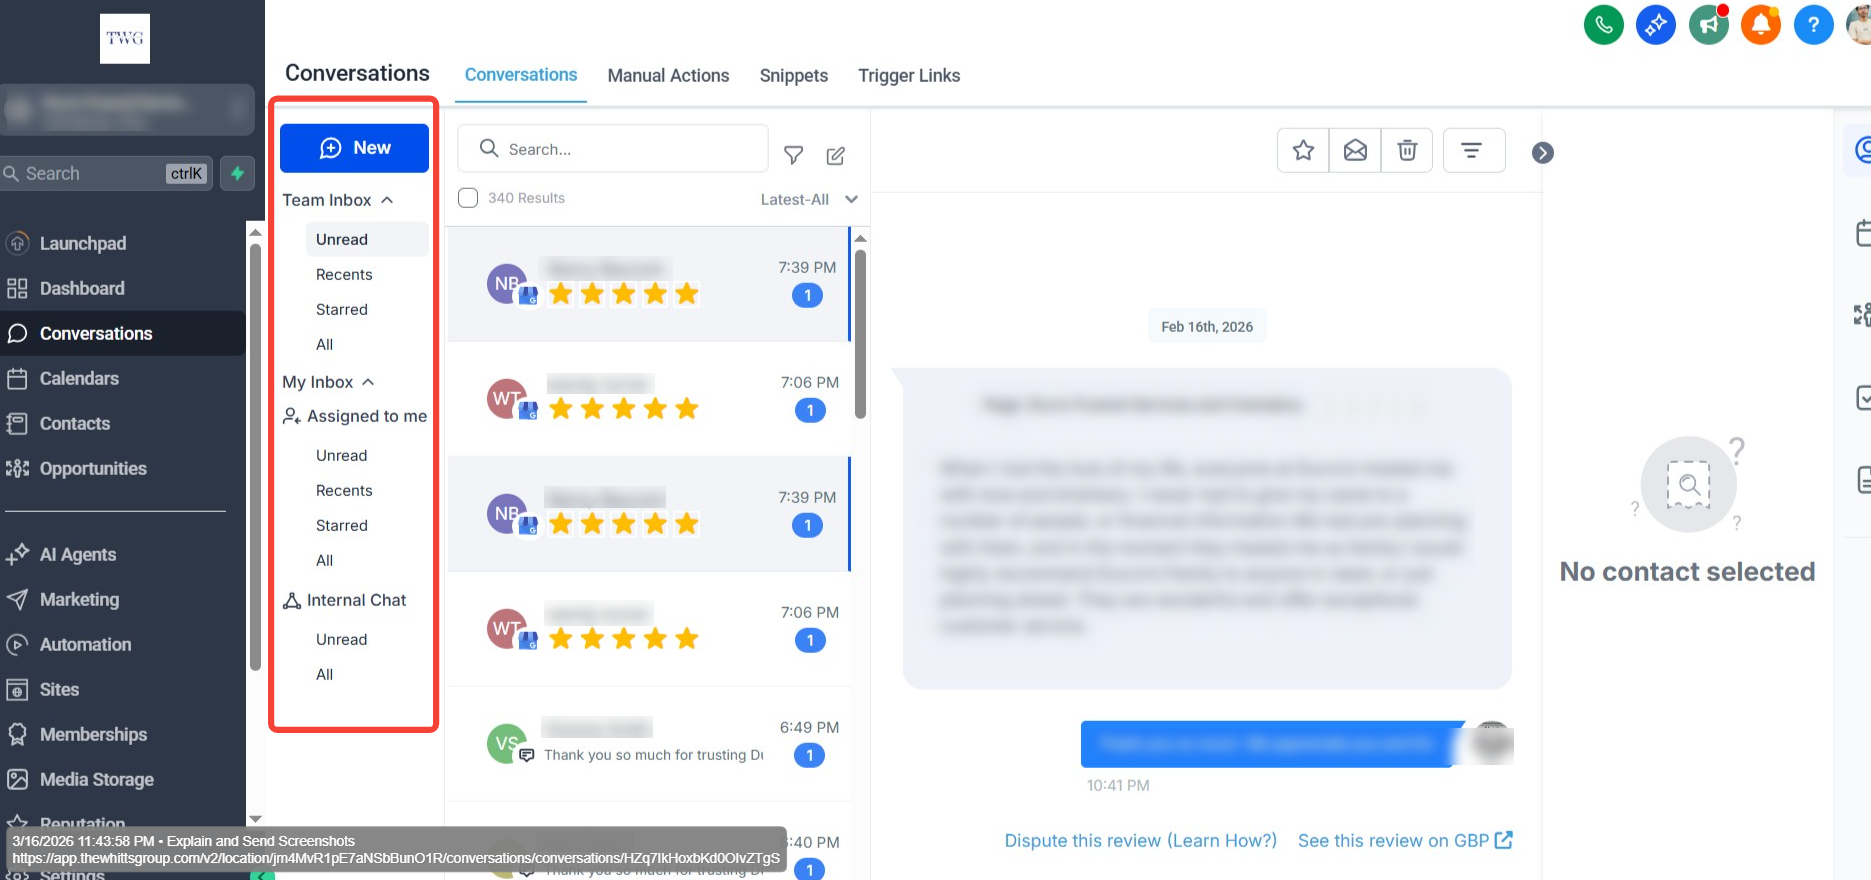
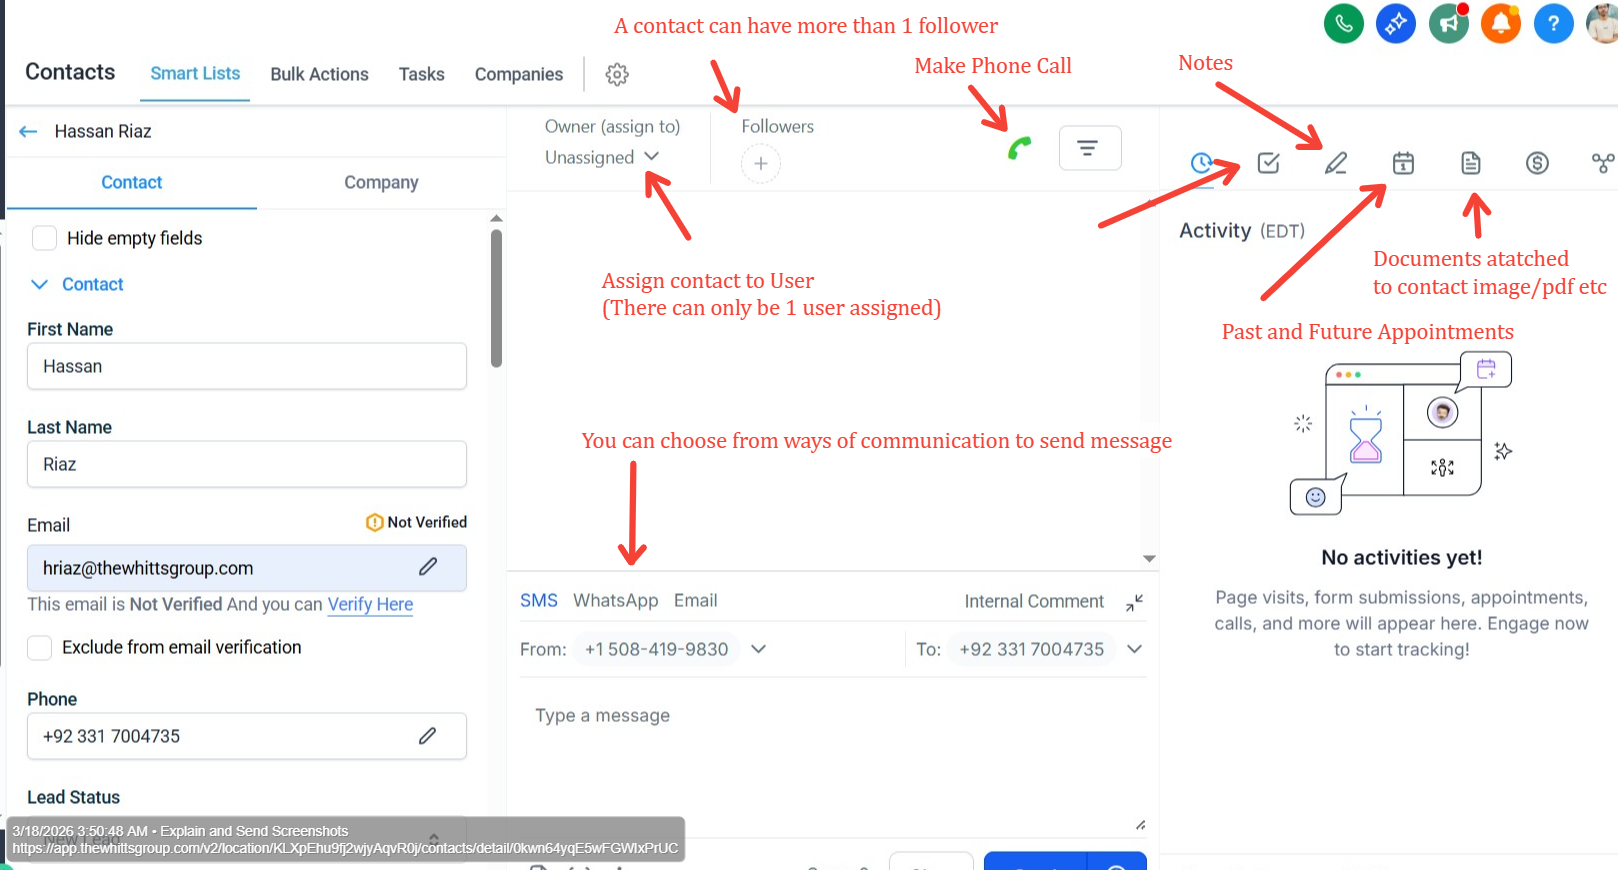
Inbox Panel
The Inbox Panel controls which set of conversations you're viewing — personal, team, or internal chat — so you can switch context quickly without changing pages.
- My Inbox: Conversations assigned to you or followed by you.
- Team Inbox: All conversations within the account (requires full data access).
- Internal Chat: Private, team-only discussions separate from customer threads.
Access Notes:
- Accounts with Assigned Data Access see My Inbox and Internal Chat only (Team Inbox is not available).
- Users with full access permissions can view and manage all three inboxes.
Section 02
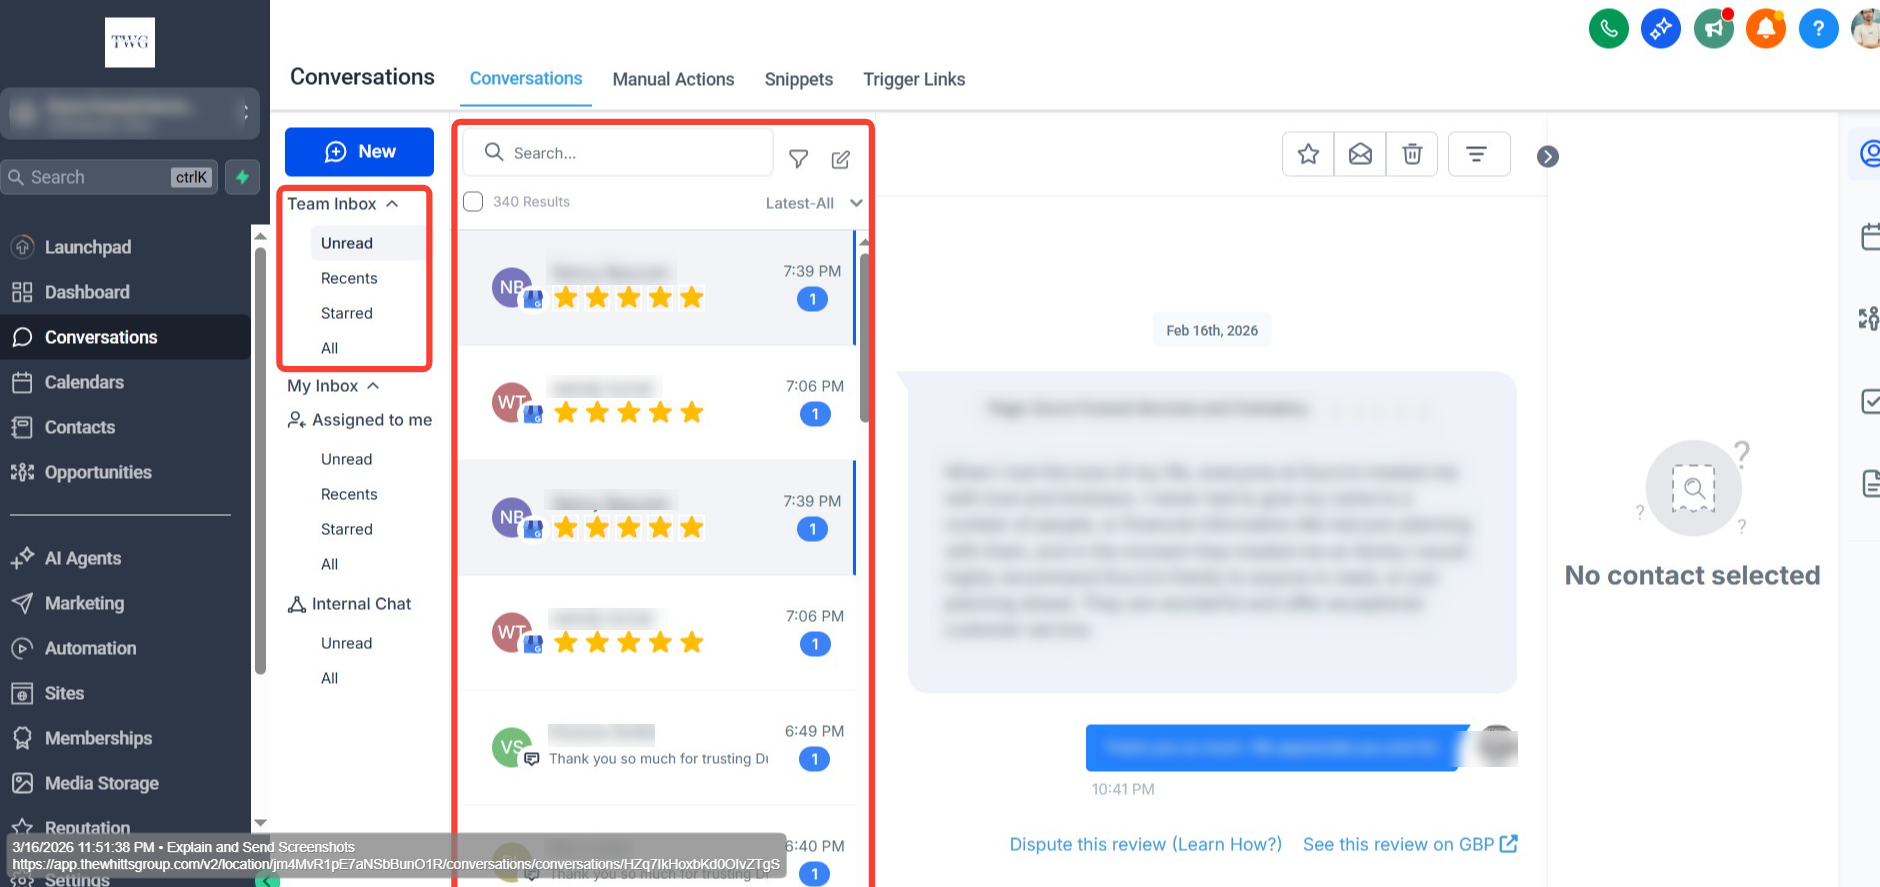
Chat List Panel
The Chat List Panel is the second column in the Conversations layout. It displays a list of all conversations based on the inbox, folder, or filter you've selected from the Inbox Panel. The Chat List Panel shows threads matching your current inbox, folder, or saved view so you can scan, select, and take bulk actions quickly.
- Check the select box at the top to enable bulk actions: Mark as Read/Unread, Star/Unstar, Delete.
- Sort by newest or oldest activity.
- Use the Filter icon for channel, owner, and date filters — supports AND/OR combinations.
Section 03
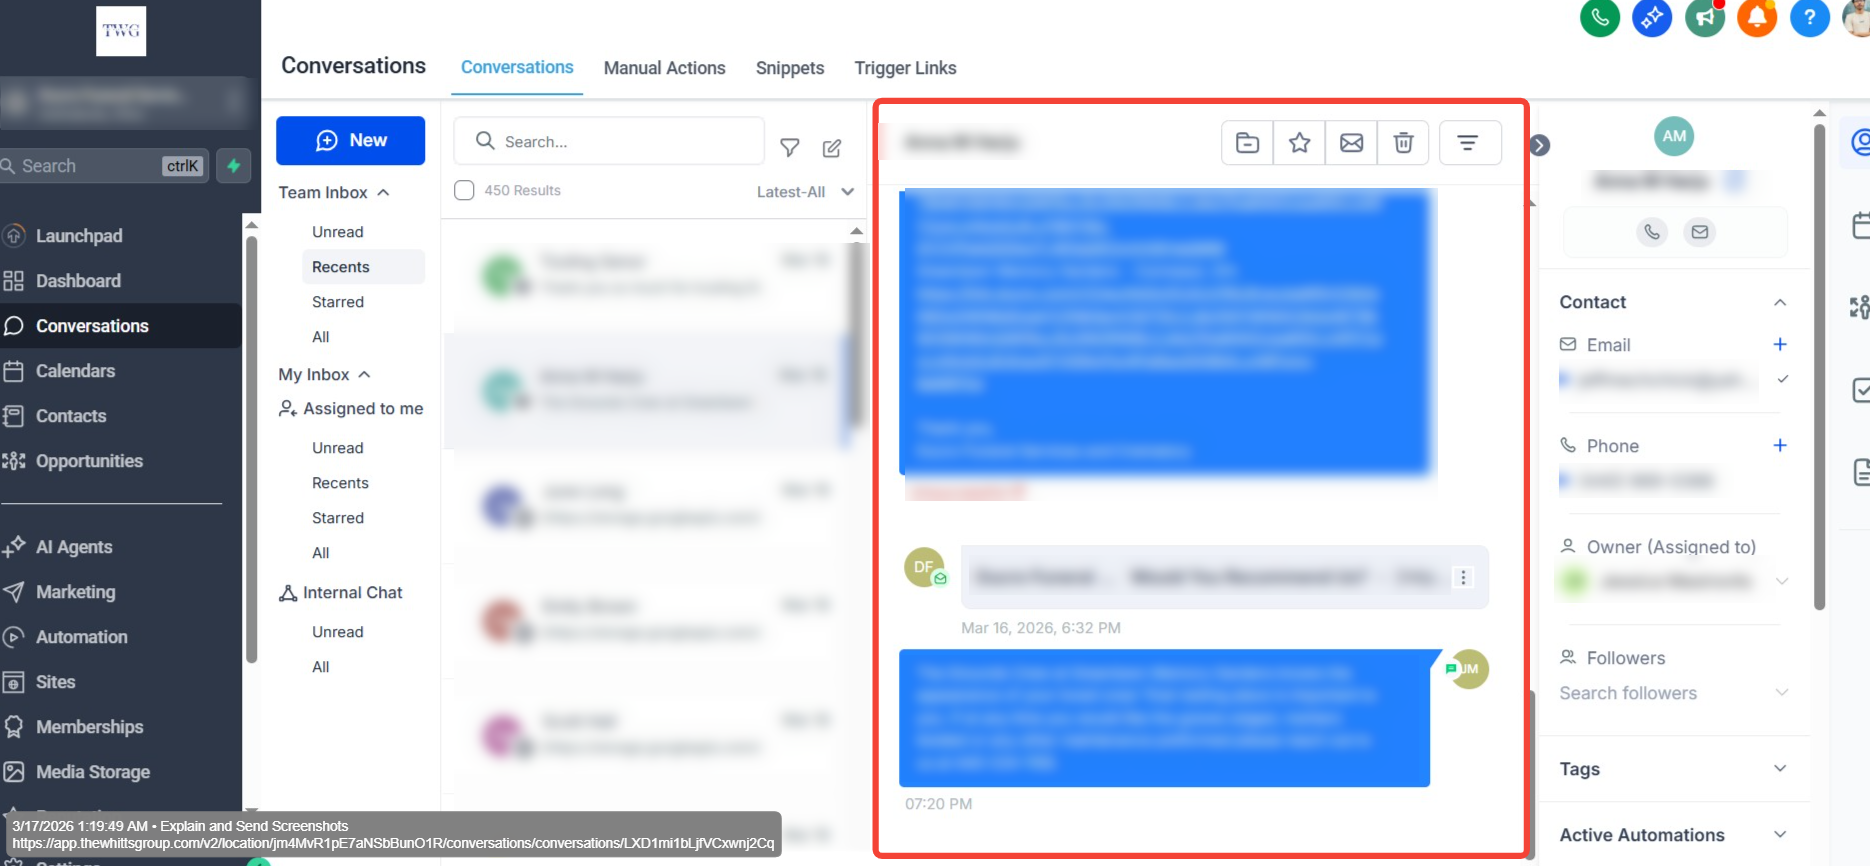
Message History Panel
The Message History Panel is your main reading and reply area. It supports multi-channel timelines, quick replies, and message-type filtering to find context fast.
- Read the full history across Email, SMS, WhatsApp, Facebook/Instagram messages, and Internal Comments.
- Filter the visible timeline to focus on specific items (see the filtering section below).
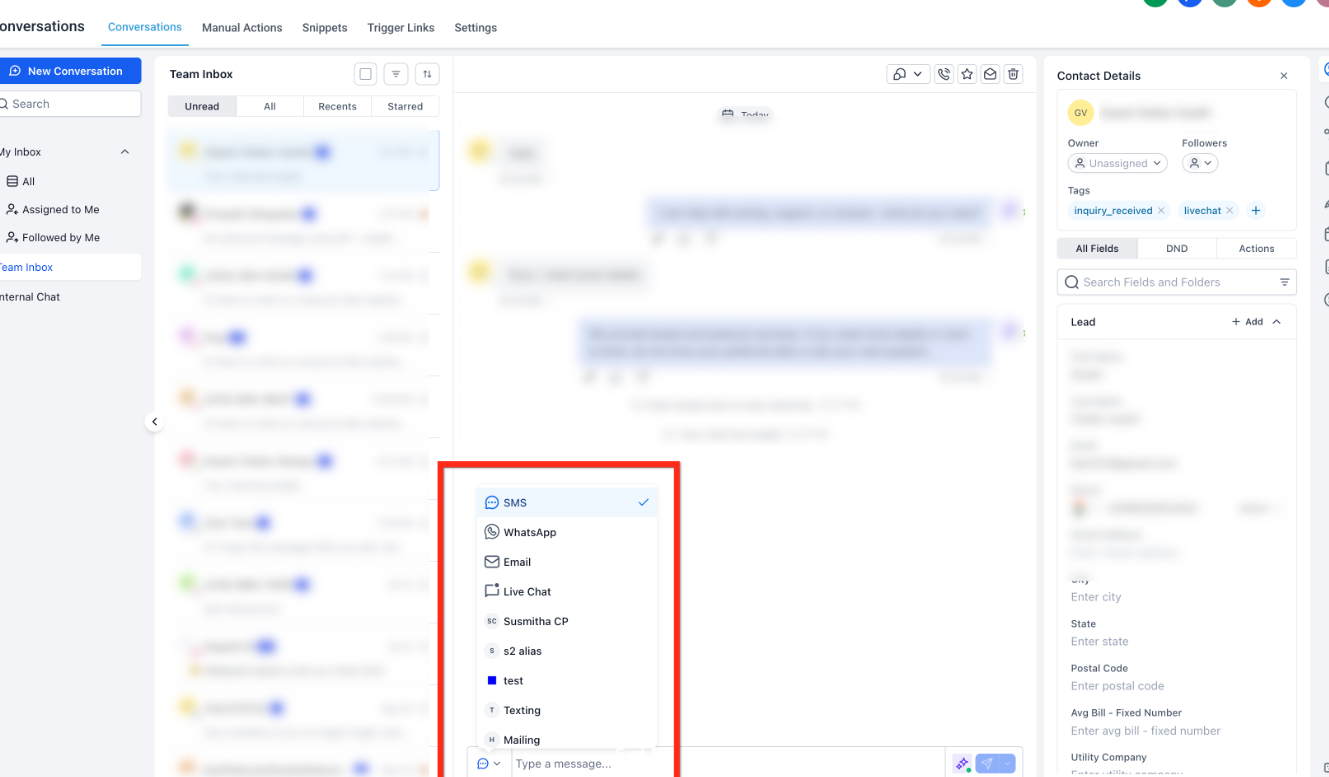
Switching Between Channels
Choose the best channel for each reply without leaving the thread — ideal for moving a conversation from SMS to email, or adding internal notes.
- Open the channel selector in the composer to switch between available channels.
- Channel selection persists on collapse/expand: If you collapse and reopen the composer within the same conversation, TWG CRM remembers the last channel you selected so you can continue where you left off.
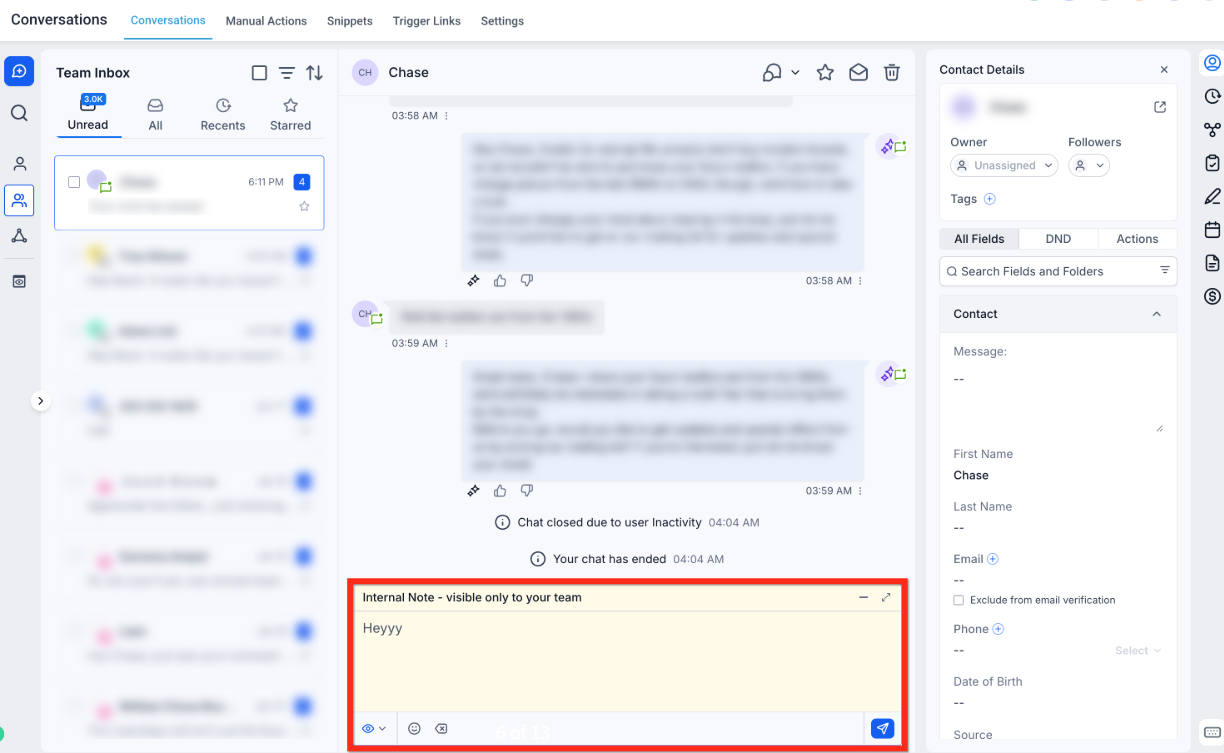
- Select Internal Comment to add a private note (the customer will not be notified).
- Internal comment drafts persist across channel switches, composer collapse/expand, and conversation changes.
Section 04
Message Composer
The composer provides the tools to write clearly, attach files, and send through the correct channel — all from the bottom of the conversation.
- Text formatting and an Inline Reply Composer that opens directly below the active message, keeping context visible while replying.
- Full-screen mode for long replies.
- File attachments and links.
- Paste files or images directly from your clipboard into the composer to attach them quickly (Ctrl + V on Windows, Cmd + V on Mac).
- Quick send using the send icon on the right — replies send via the selected channel in the composer.
Section 05
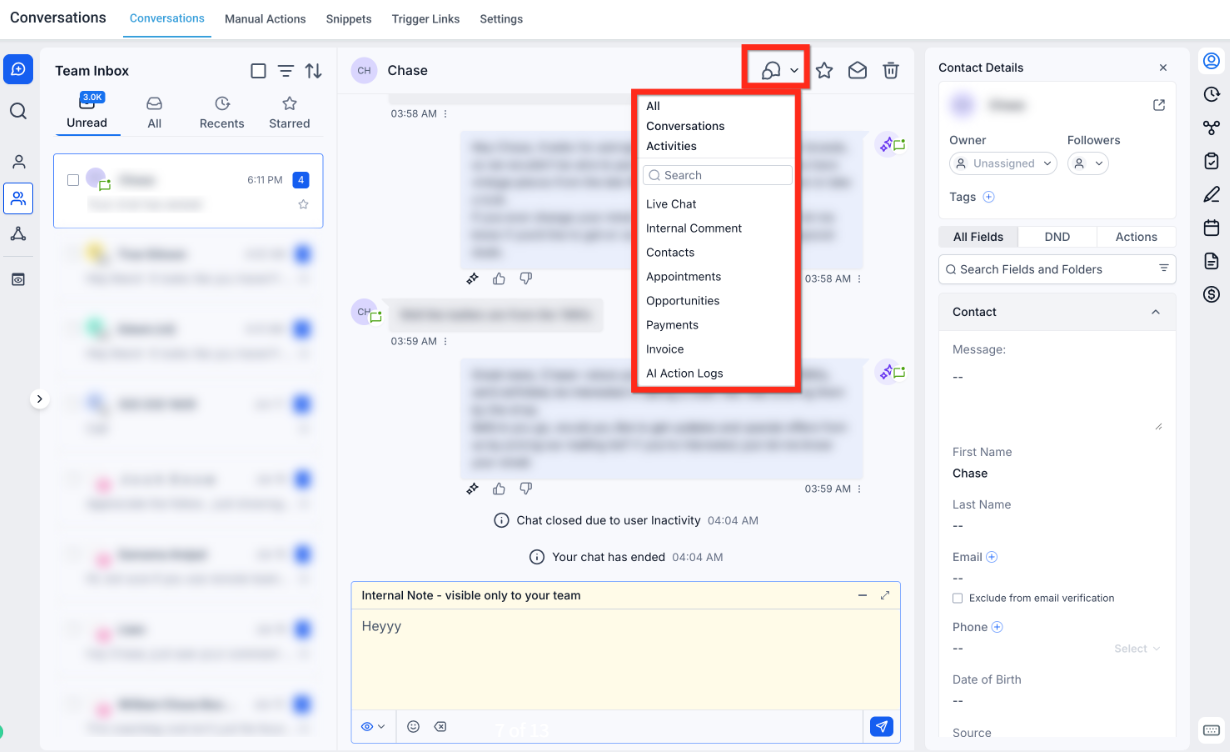
Filtering Messages Within a Conversation
Timeline filters help you isolate specific parts of a long thread — like only emails, only internal notes, or only activities — so you can find context quickly.
Use the message filter at the top-right of the timeline to show:
- All Messages
- Conversations (direct exchanges with the contact)
- Activities (appointments, updates, etc.)
- Email / Internal Comment / Contacts / Opportunities / Payments / Invoices / AI Action Logs
Use the search bar within the filter menu to locate message or activity types faster.
Section 06
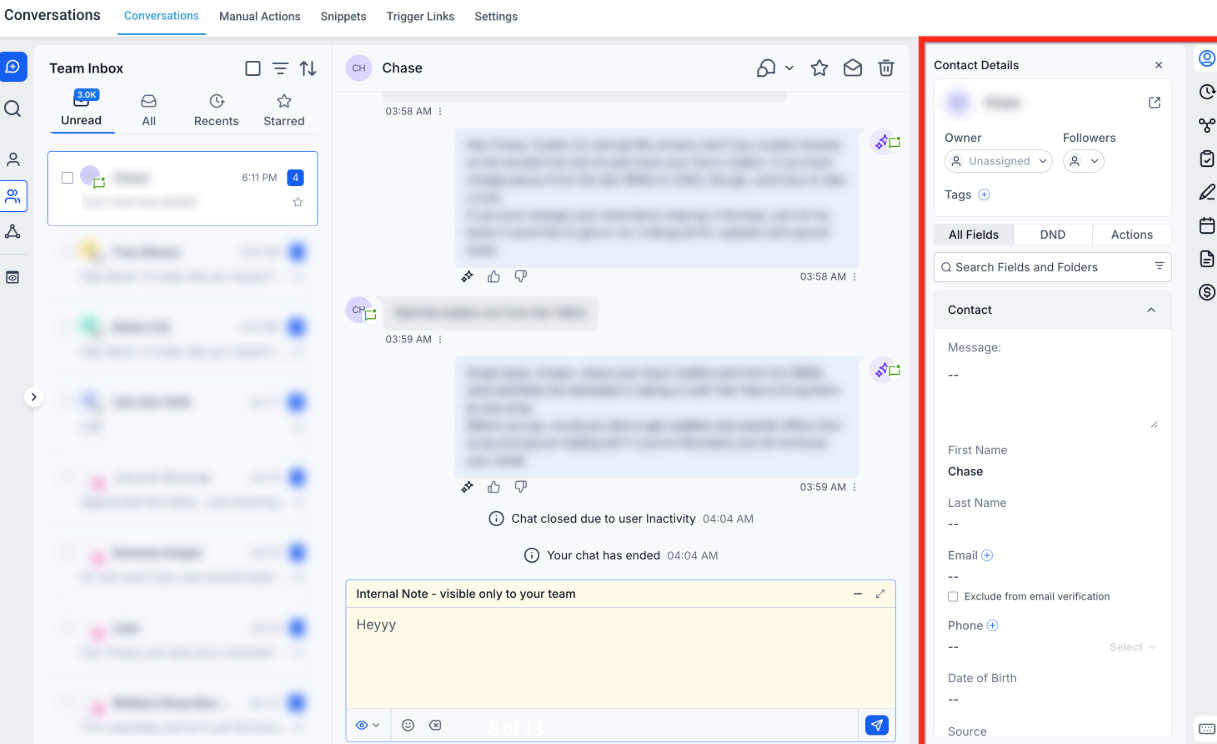
Right Panel
The Right Panel centralizes contact context so you can view and edit details, files, payments, and related records without leaving the conversation. Everything that was available on the Contacts page — including custom fields, folders, and actions — is now integrated into this panel, giving you full control and visibility while chatting with a customer.
What you can do from the Right Panel:
- View and edit contact fields, custom fields, folders, tags, and owner.
- Create or view opportunities, appointments, invoices, and payments.
- Switch tabs such as Contact, Activities, Associations, Documents, and Payments.
Section 01
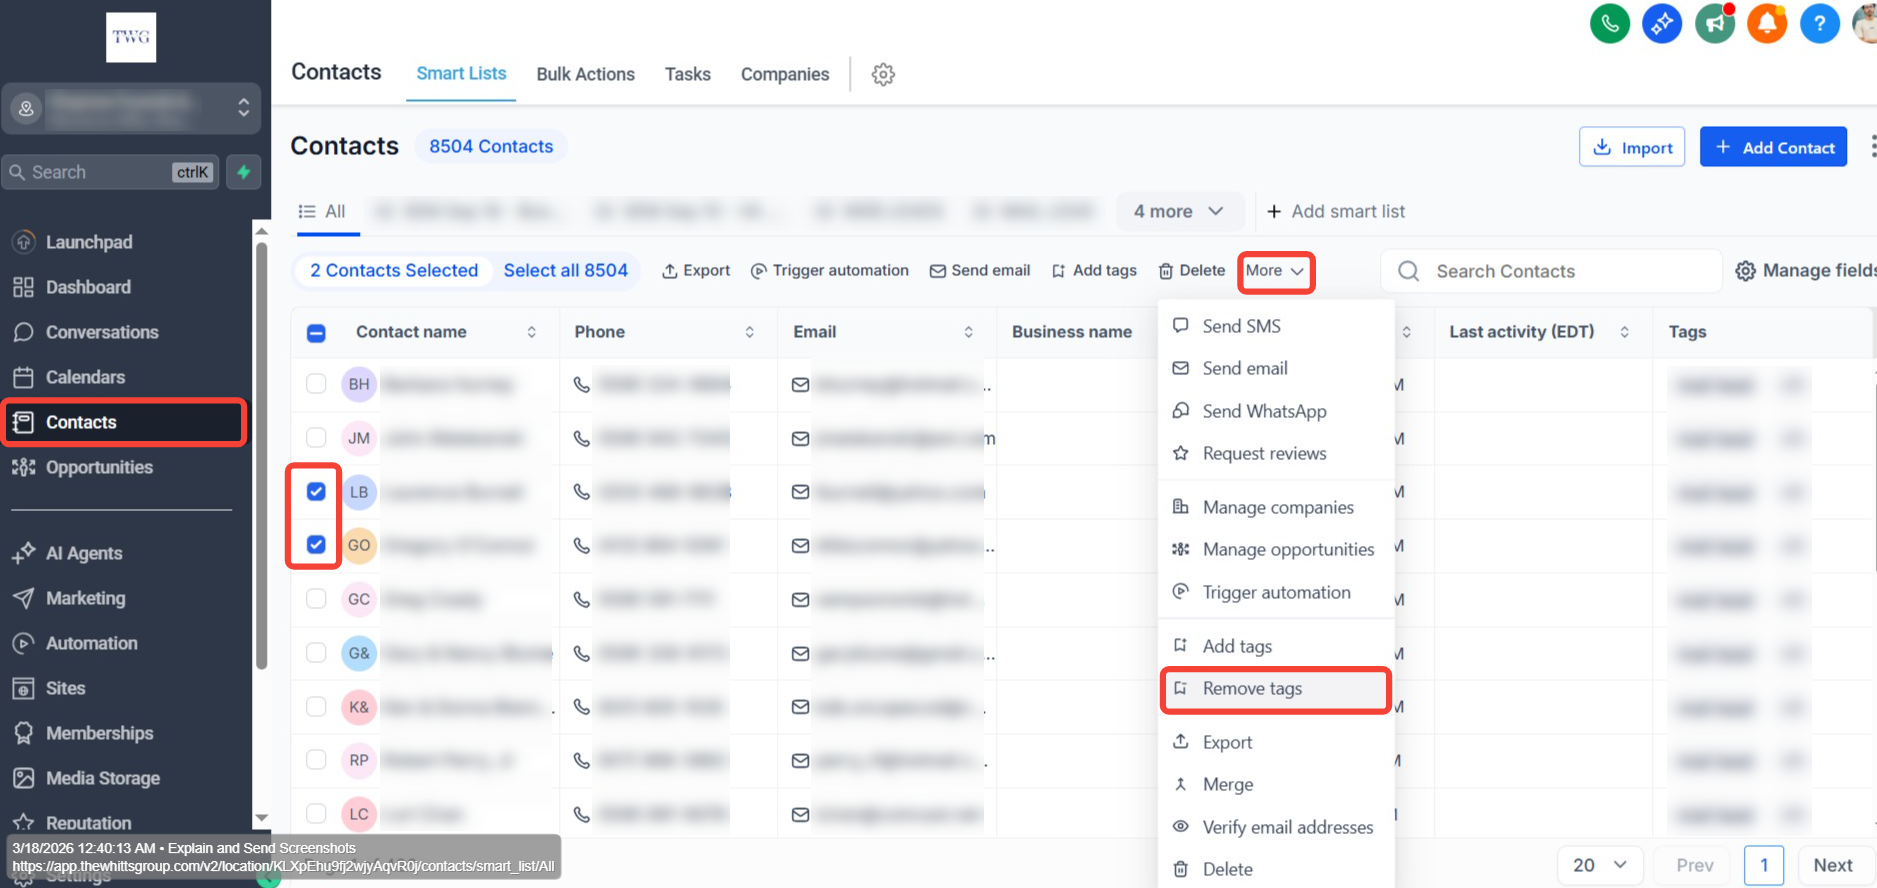
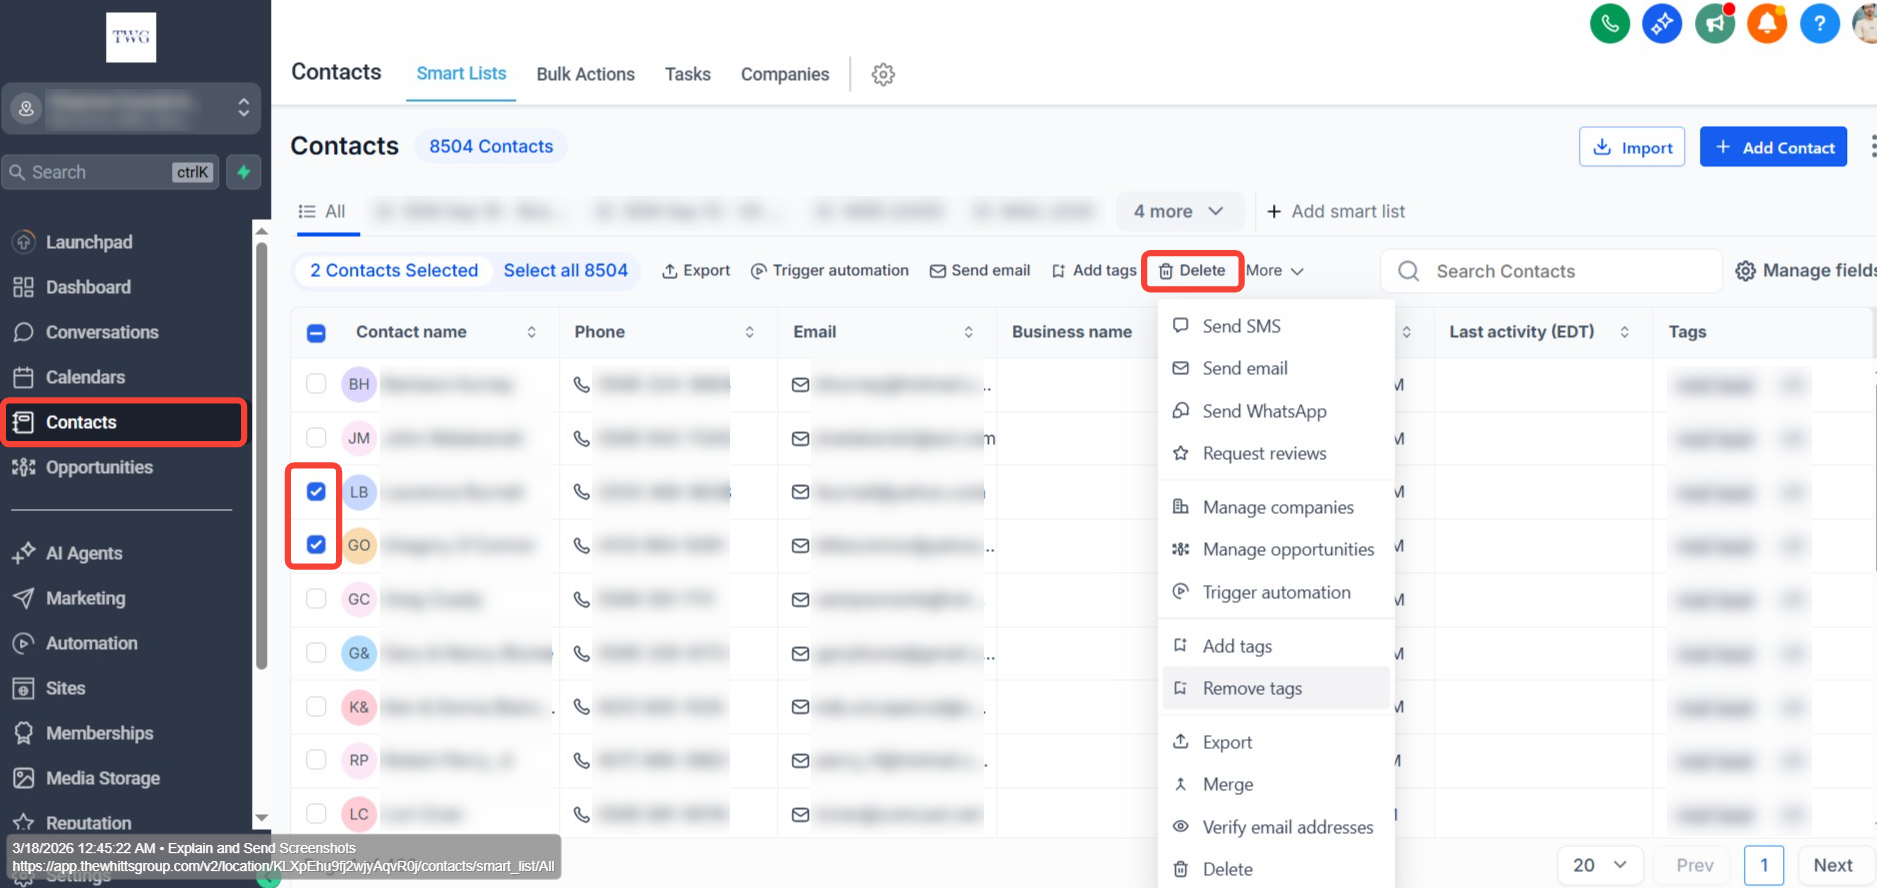
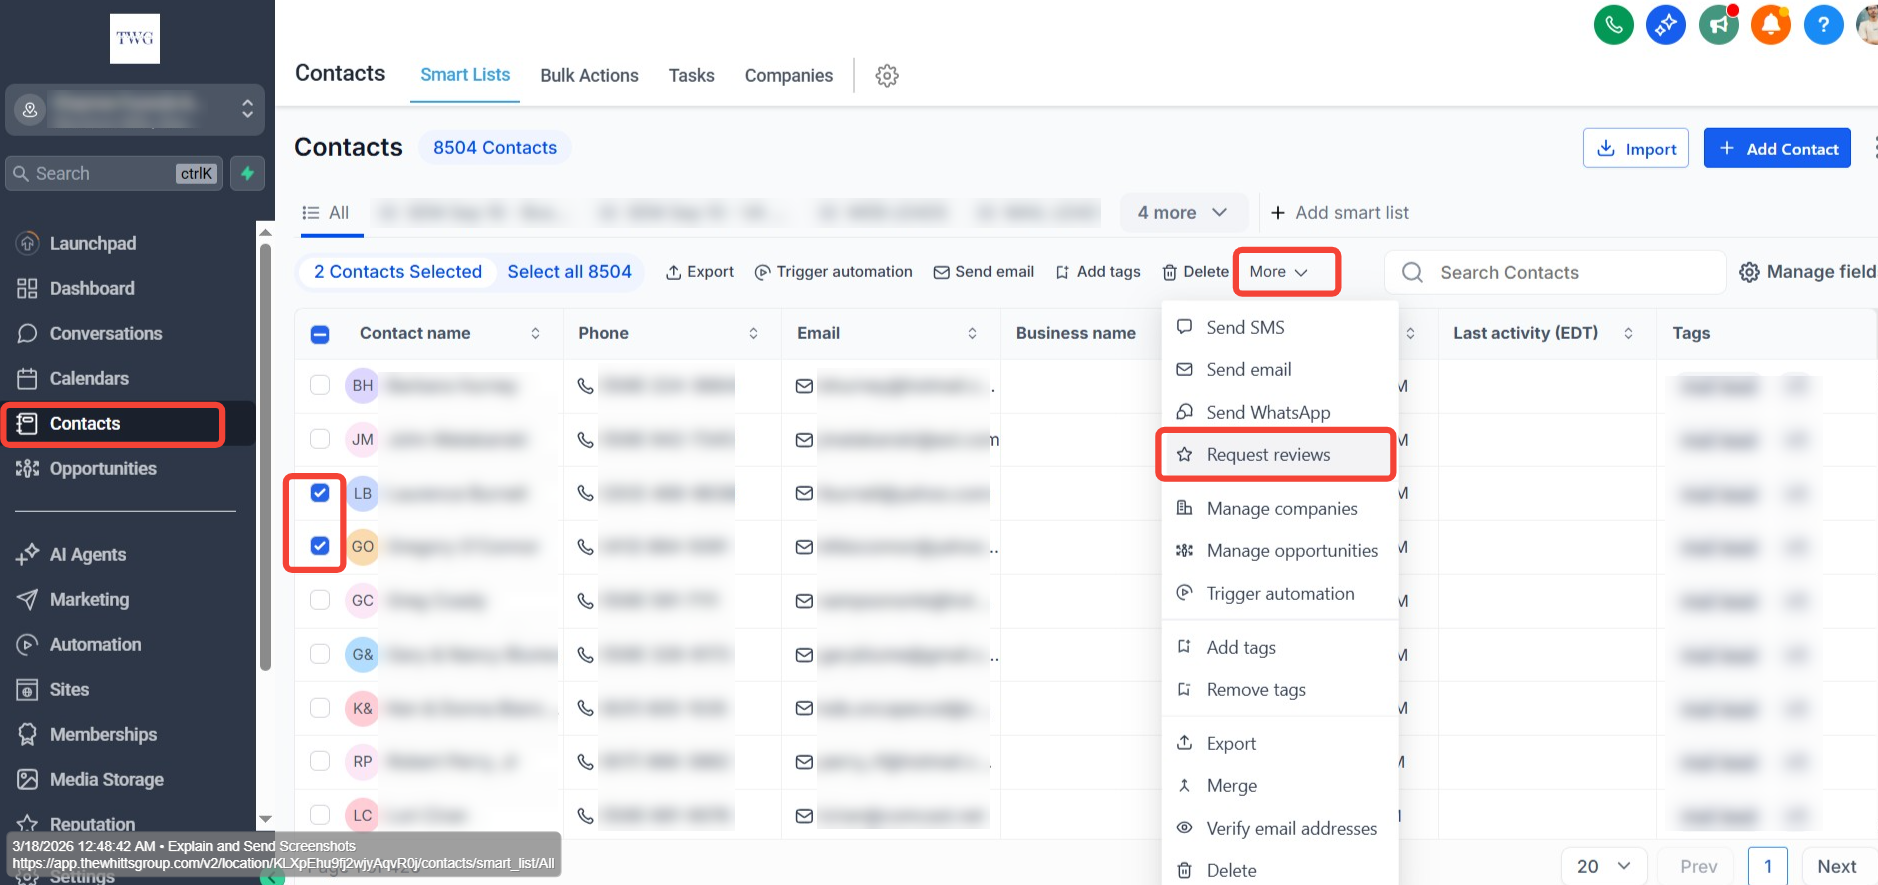
Bulk Actions
- Adding Contact Tags to Multiple Contacts
- Removing Contact Tags from Multiple Contacts
- Deleting one or more contacts at once
- Requesting Reviews from Multiple Contacts
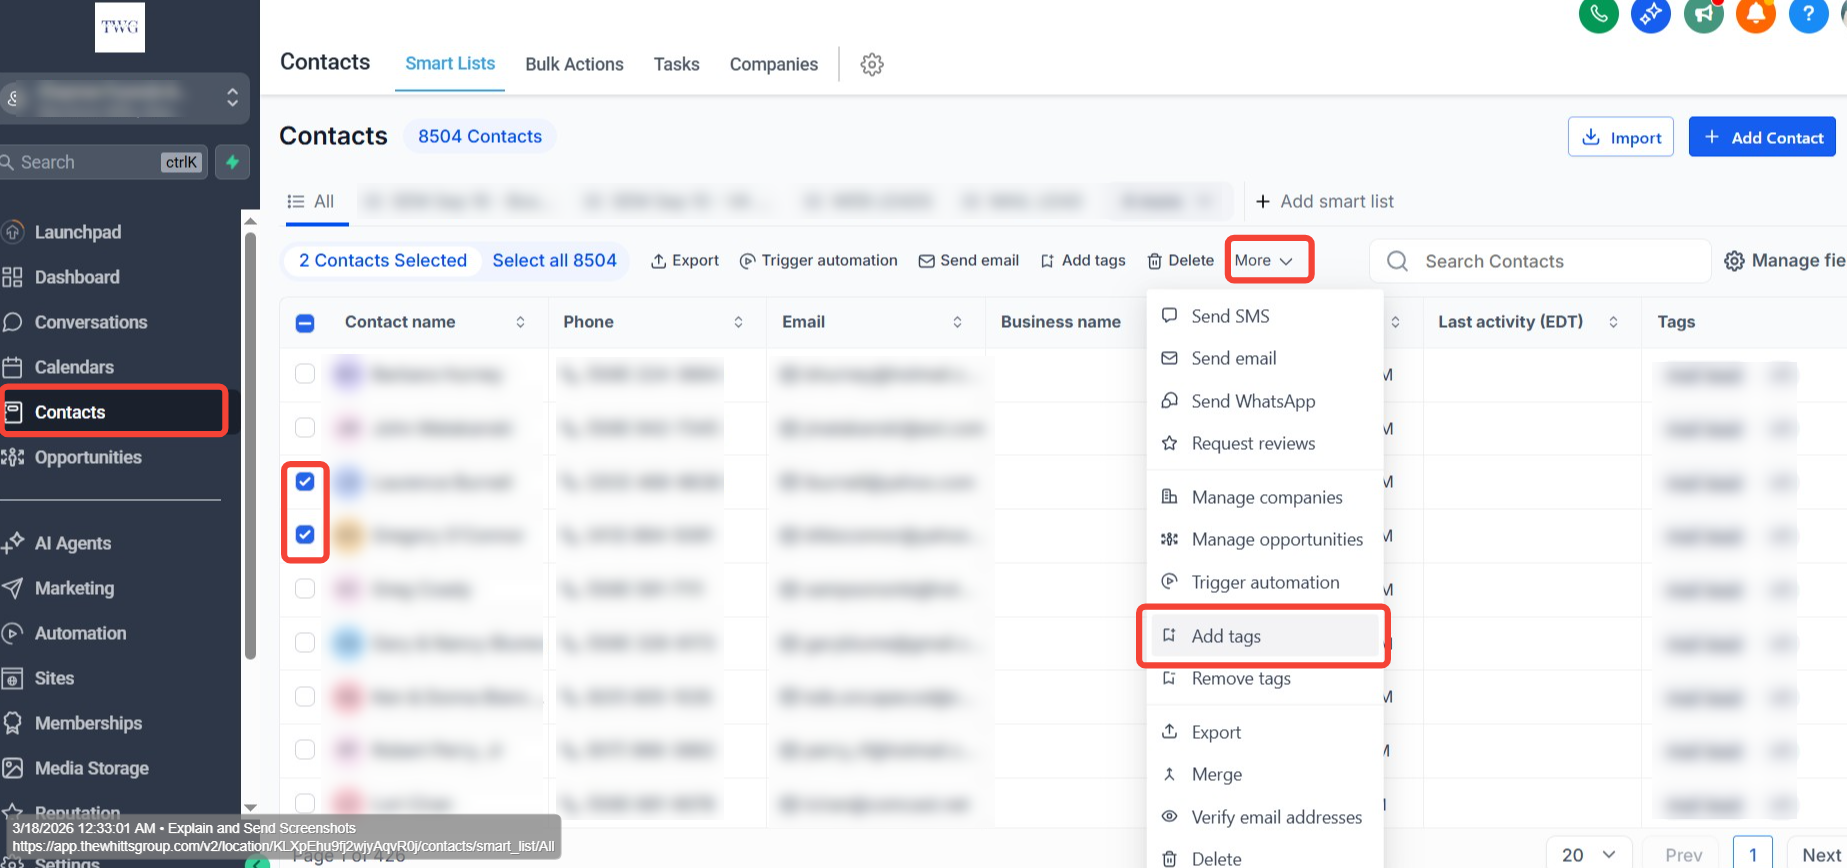
Adding Tags to Multiple Contacts
Adding tags in bulk allows you to label and organize large sets of contacts efficiently. Tags help categorize contacts based on shared traits, behaviors, or stages in the customer journey. This feature is essential for segmenting audiences, triggering automations, and managing CRM workflows at scale.
Key Benefits:
Save time by tagging multiple contacts in one action
Improve segmentation for more targeted communications
Trigger workflows based on tag-based conditions
Track campaign membership or progress with ease
Maintain clean and organized contact records
Removing Tags from Multiple Contacts
Removing tags in bulk allows you to clean up or reorganize contact data quickly. This is especially helpful when contact segmentation needs to be updated, campaigns have ended, or irrelevant tags are cluttering your CRM. Rather than editing each contact individually, bulk removal ensures swift and consistent updates.
Key Benefits:
Save time by removing tags from many contacts in one go
Eliminate outdated or incorrect tags that impact automations
Maintain a well-organized contact tagging structure
Reduce confusion by clearing unused or overlapping labels
Support accurate reporting by removing invalid groupings
Deleting One or More Contacts at Once
Deleting contacts in bulk allows you to permanently remove one or multiple contact records from your CRM in a single action. This is useful when cleaning up duplicate entries, removing inactive or irrelevant contacts, or maintaining a healthy and accurate database. Rather than deleting each contact one by one, bulk deletion ensures fast and consistent removal at scale.
Key Benefits:
Save time by removing multiple contacts in one action
Eliminate duplicate or invalid records that skew reporting
Keep your contact list focused on active, relevant leads
Reduce database bloat for better CRM performance
Ensure cleaner segmentation by removing outdated entries
Requesting Reviews from Multiple Contacts
Requesting reviews in bulk allows you to send review requests to multiple contacts simultaneously in a single action. This is especially useful for businesses looking to build their online reputation, gather customer feedback, or follow up after a service or purchase. Rather than reaching out to each contact individually, bulk review requests save time while ensuring consistent and timely outreach at scale.
Key Benefits:
Save time by sending review requests to many contacts at once
Increase the volume of reviews to strengthen your online presence
Ensure consistent messaging across all review request outreach
Follow up with customers at the right time after a purchase or service
Boost visibility on review platforms through higher response rates
Section 02
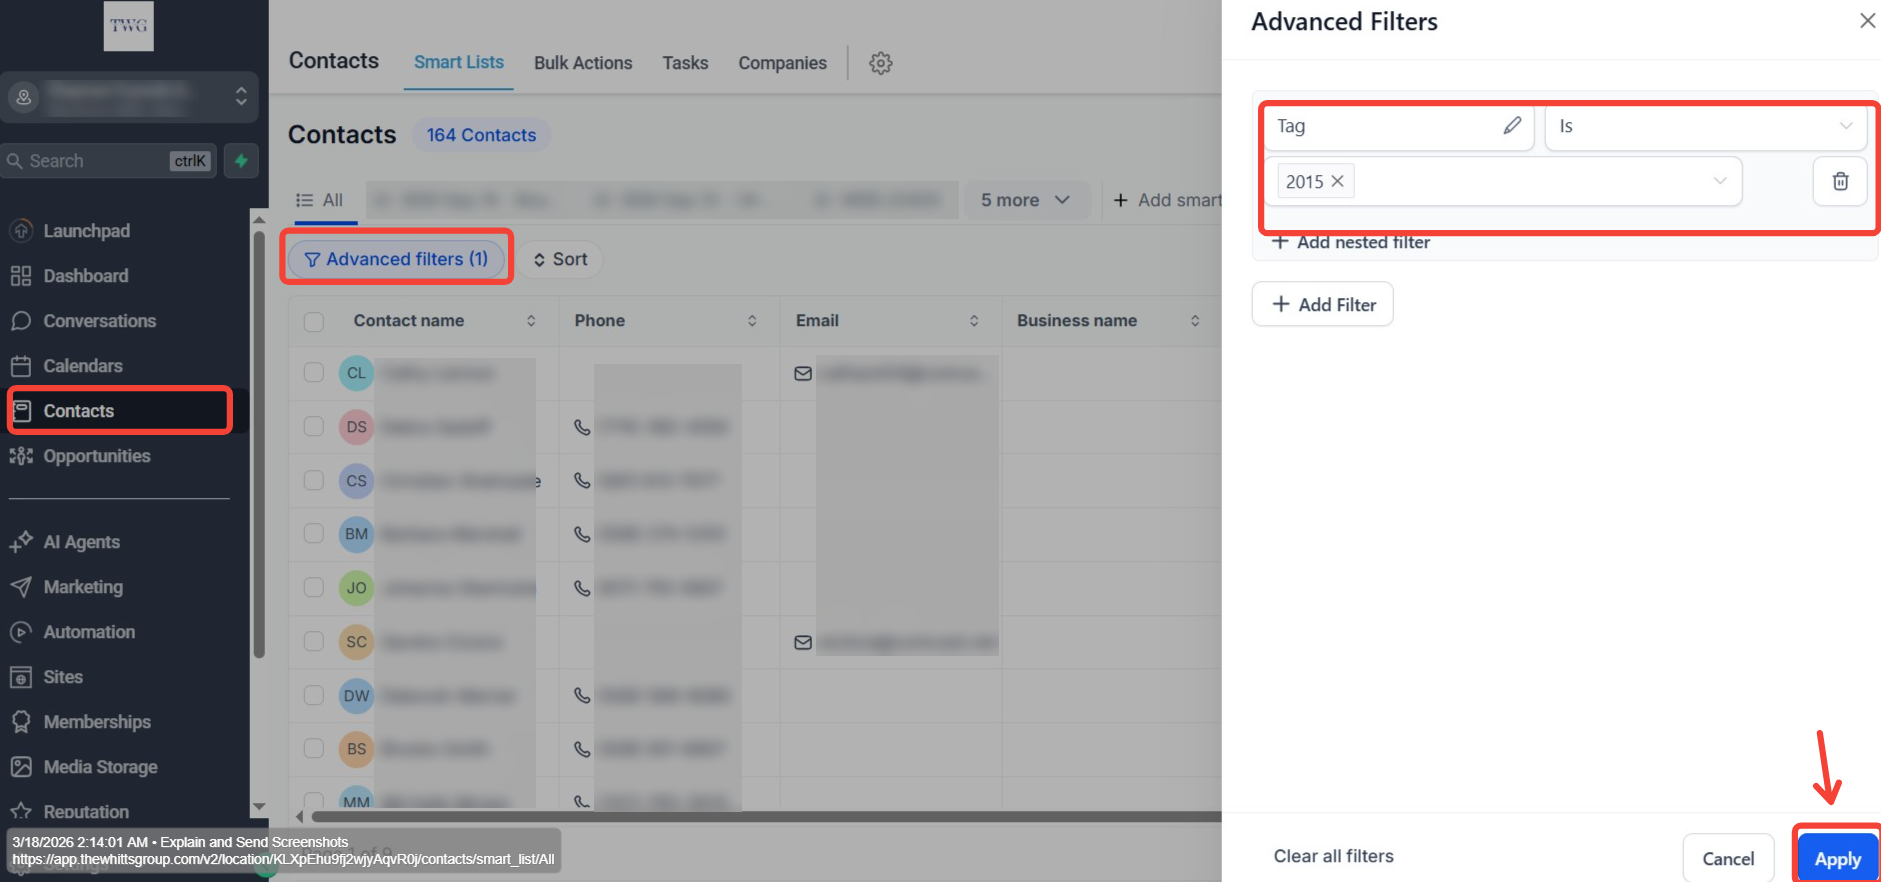
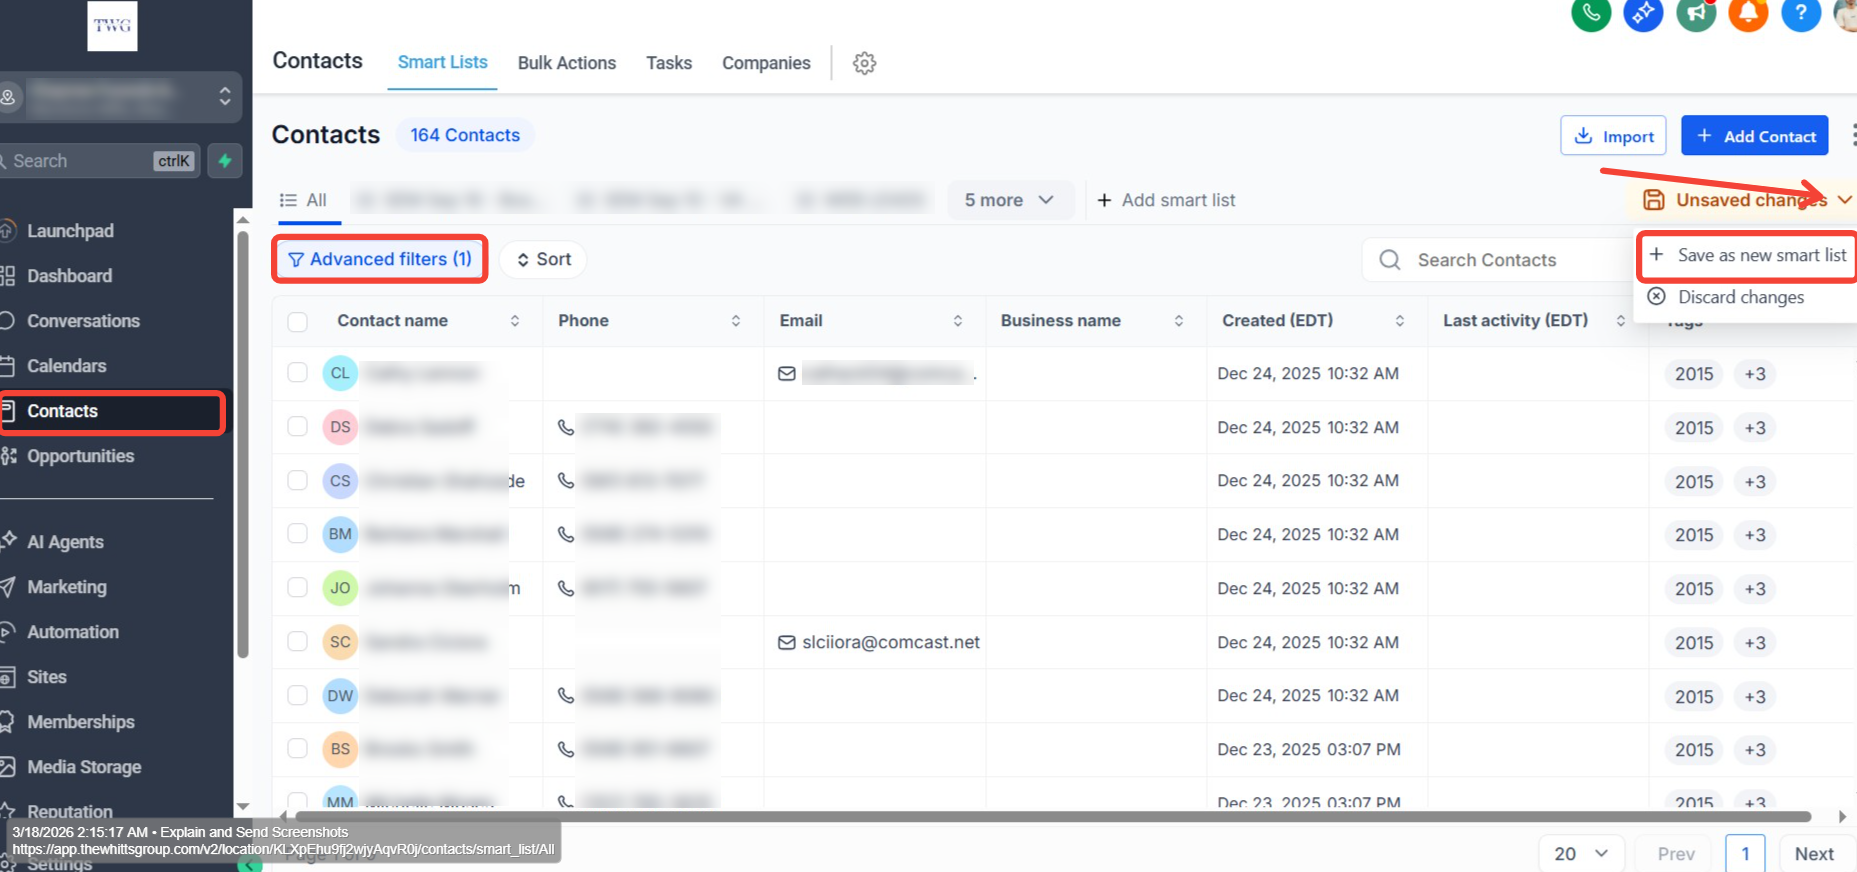
Smart Lists
Smart Lists in TWG CRM are dynamic, filter-based contact views that update automatically in real time. Instead of manually sorting through your entire contact database, Smart Lists allow you to define a set of filters or conditions once, and the system continuously adjusts the list as contact data changes. When a contact meets the specified criteria, they are added to the list automatically — and removed just as quickly when they no longer qualify.
Smart Lists are essential for keeping your CRM organized, your outreach targeted, and your automations running on the right contacts at all times.
Key Benefits:
Save time with dynamic lists that update automatically without any manual effort
Segment contacts precisely based on tags, pipeline stages, custom fields, and more
Power automations and workflows by ensuring the right contacts are always included
Keep your CRM clean and organized with real-time, accurate contact groupings
Improve campaign targeting by sending to lists that reflect current contact data
- 1
Select your desired Tag in the Advanced Filters section.
- 2
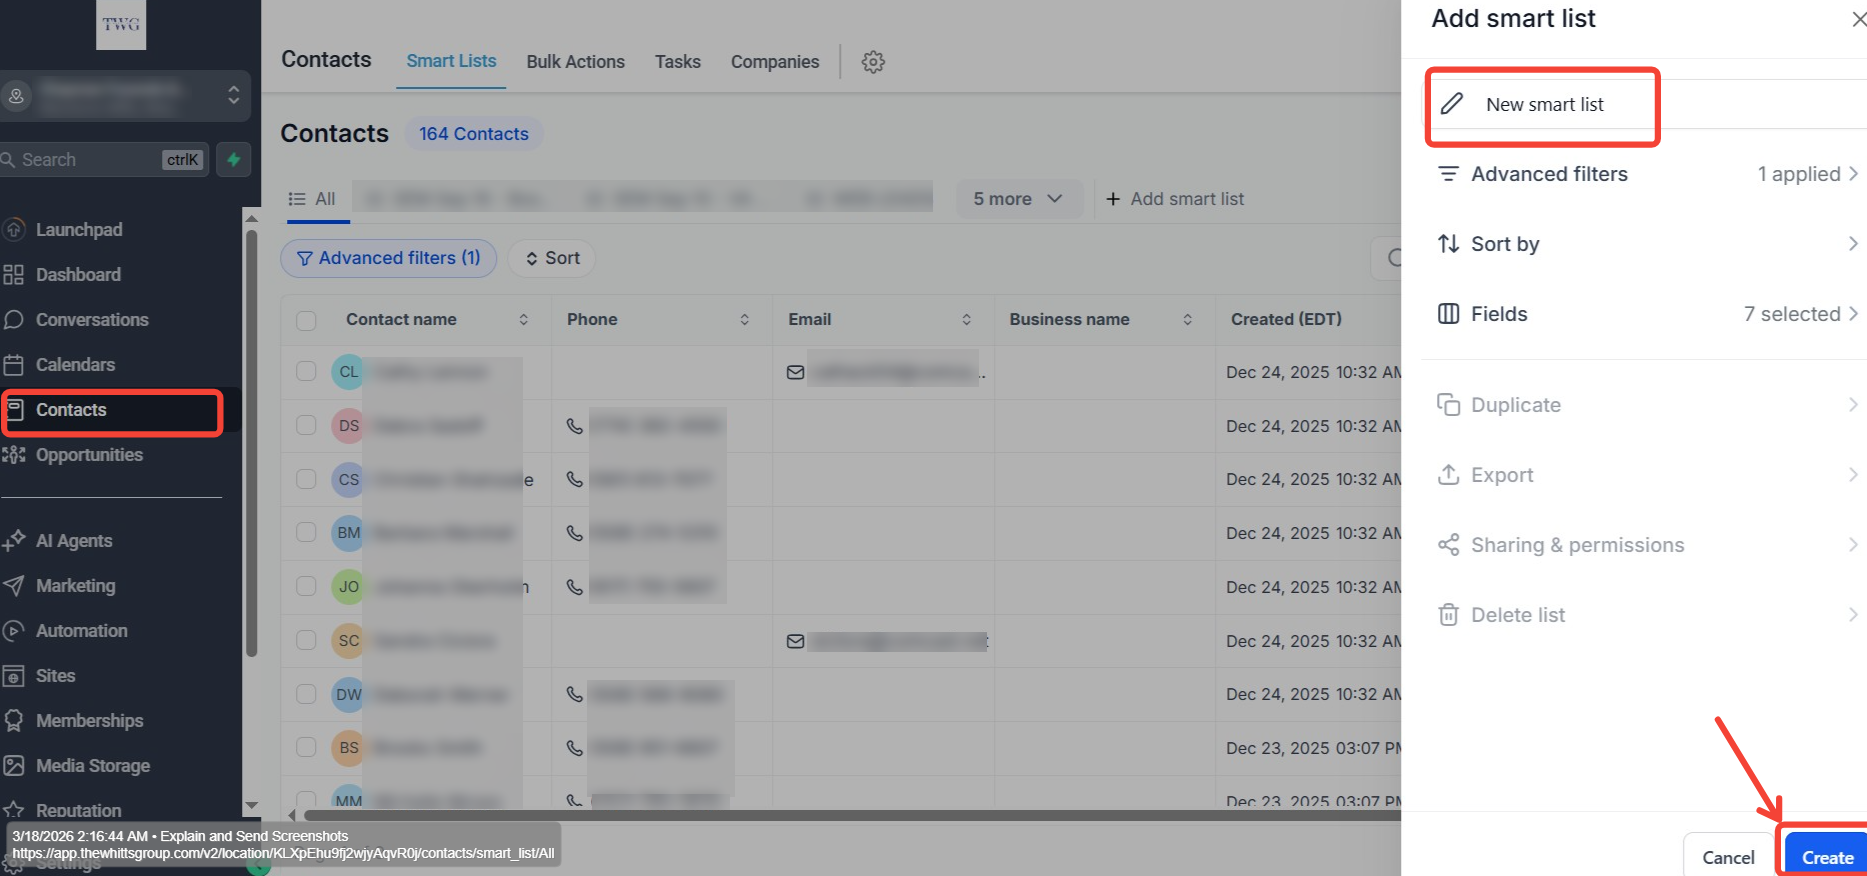
After applying the filter, click the "Unsaved Changes" drop-down and select "Save as New Smart List".
- 3
Give your Smart List a name for easy reference and click Create.
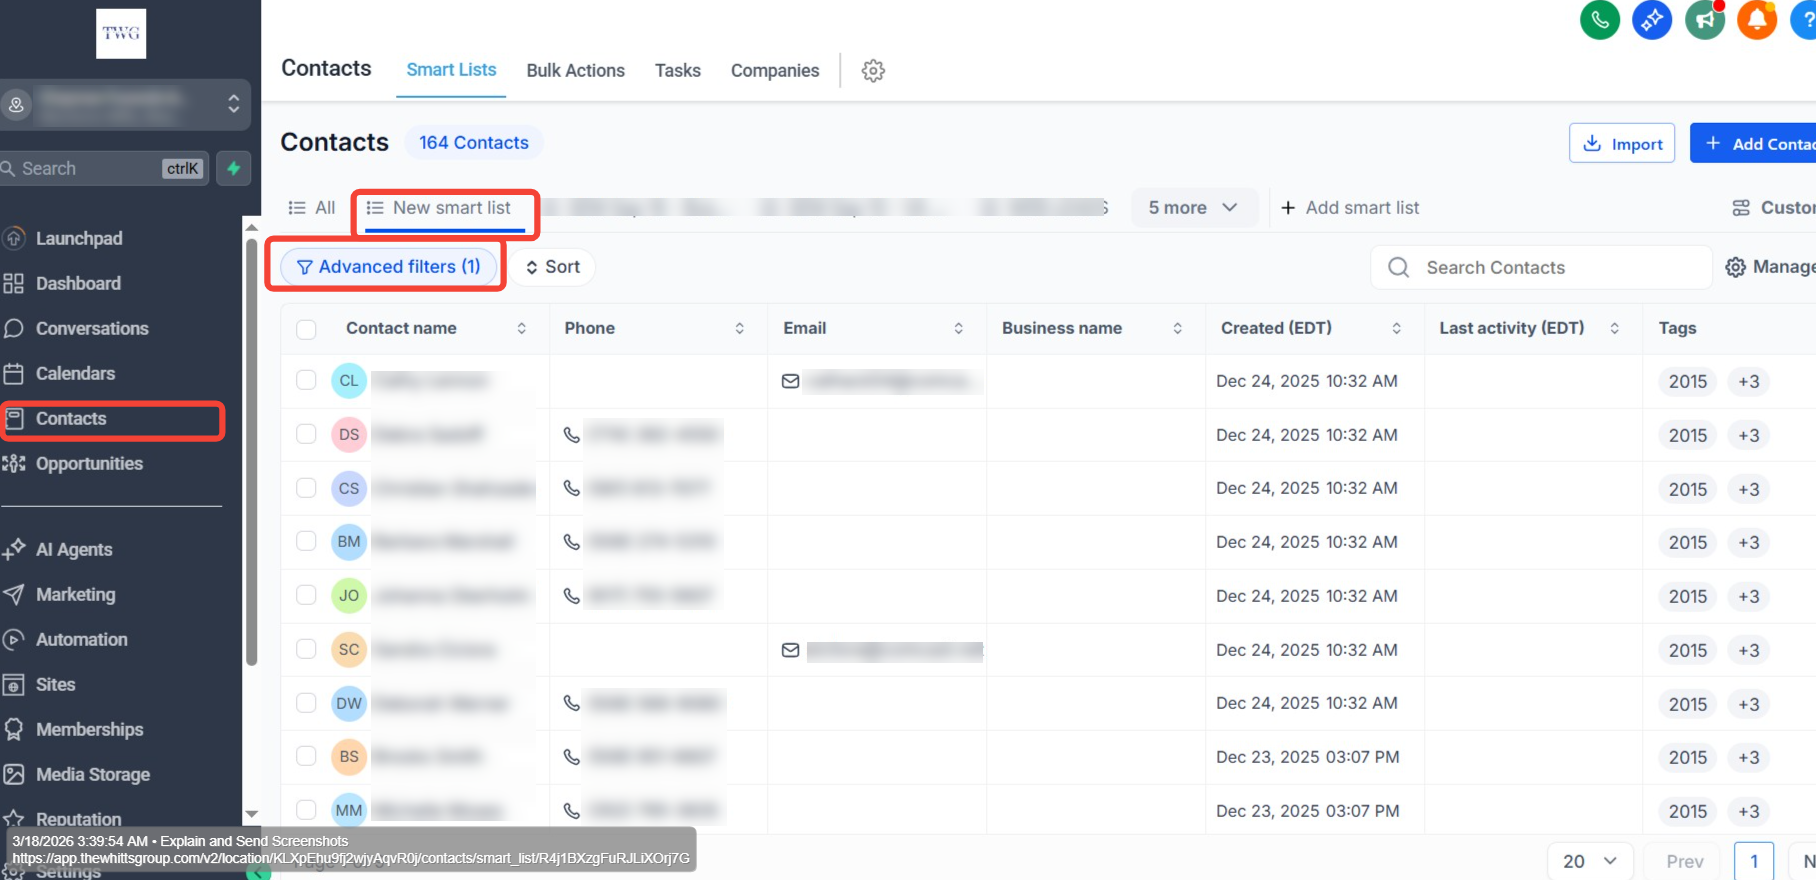
- 4
Your saved Smart List will now appear at the top of the list for quick access.
Section 03
Add Contact
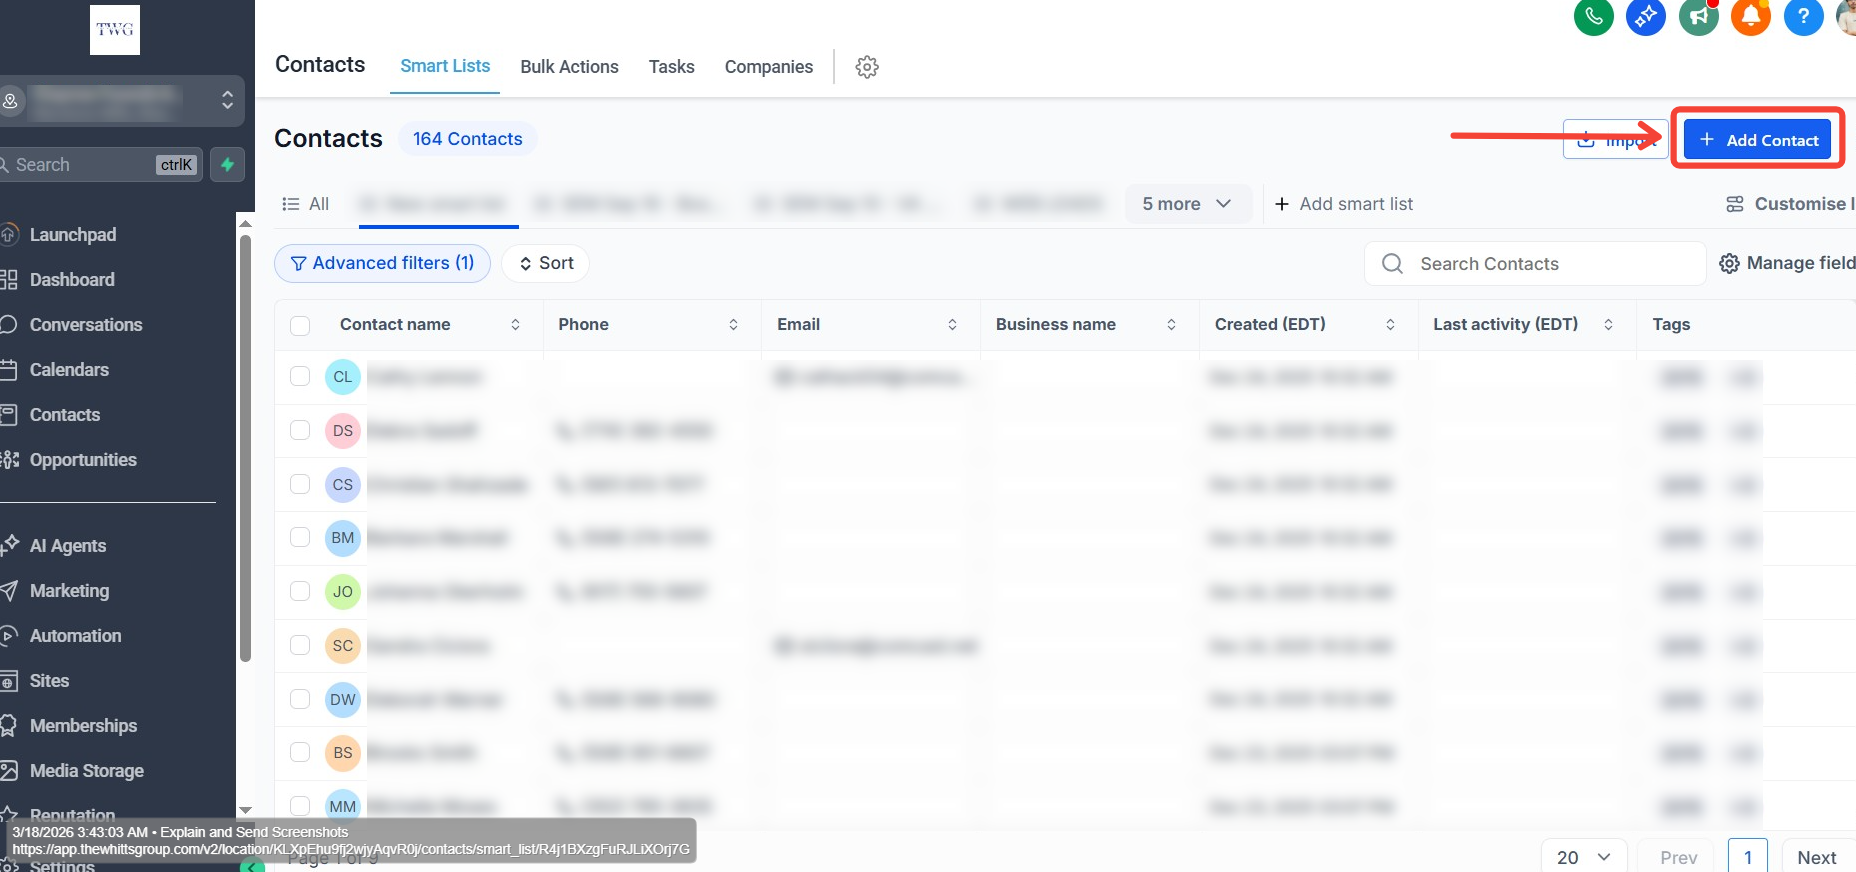
How to add a contact manually:
- 1
On the top right, click on "Add Contact".
- 2
Enter the Full Name, Email, Phone, Lead Source, and Lead Status, then click Save .
Contact Profile and key points:
Overview
What Are Calendars in TWG CRM?
Calendars in TWG CRM are a built-in scheduling and appointment management system that allows you to accept bookings, manage availability, and automate follow-ups — all from within your CRM. Whether you're booking one-on-one calls, team meetings, group sessions, or classes, TWG CRM calendars are designed to replace manual scheduling entirely. They connect directly to your contacts, pipelines, and automations, turning every appointment into a working part of your business process.
Key Benefits:
- Eliminate back-and-forth scheduling — Share a booking link and let contacts choose a time that works for them automatically.
- Reduce no-shows — Automated SMS and email reminders go out before every appointment without any manual effort.
- Sync with Google & Outlook — Two-way calendar sync ensures your availability is always accurate and double bookings are prevented.
- Trigger automations — Every booking can automatically kick off a workflow, such as sending a confirmation, adding a tag, or moving a contact through your pipeline.
- Embed anywhere — Place your calendar widget on your website, landing page, or funnel so prospects can book the moment they're ready.
- Customize availability — Set weekly working hours, block off holidays, and control how far in advance clients can book.
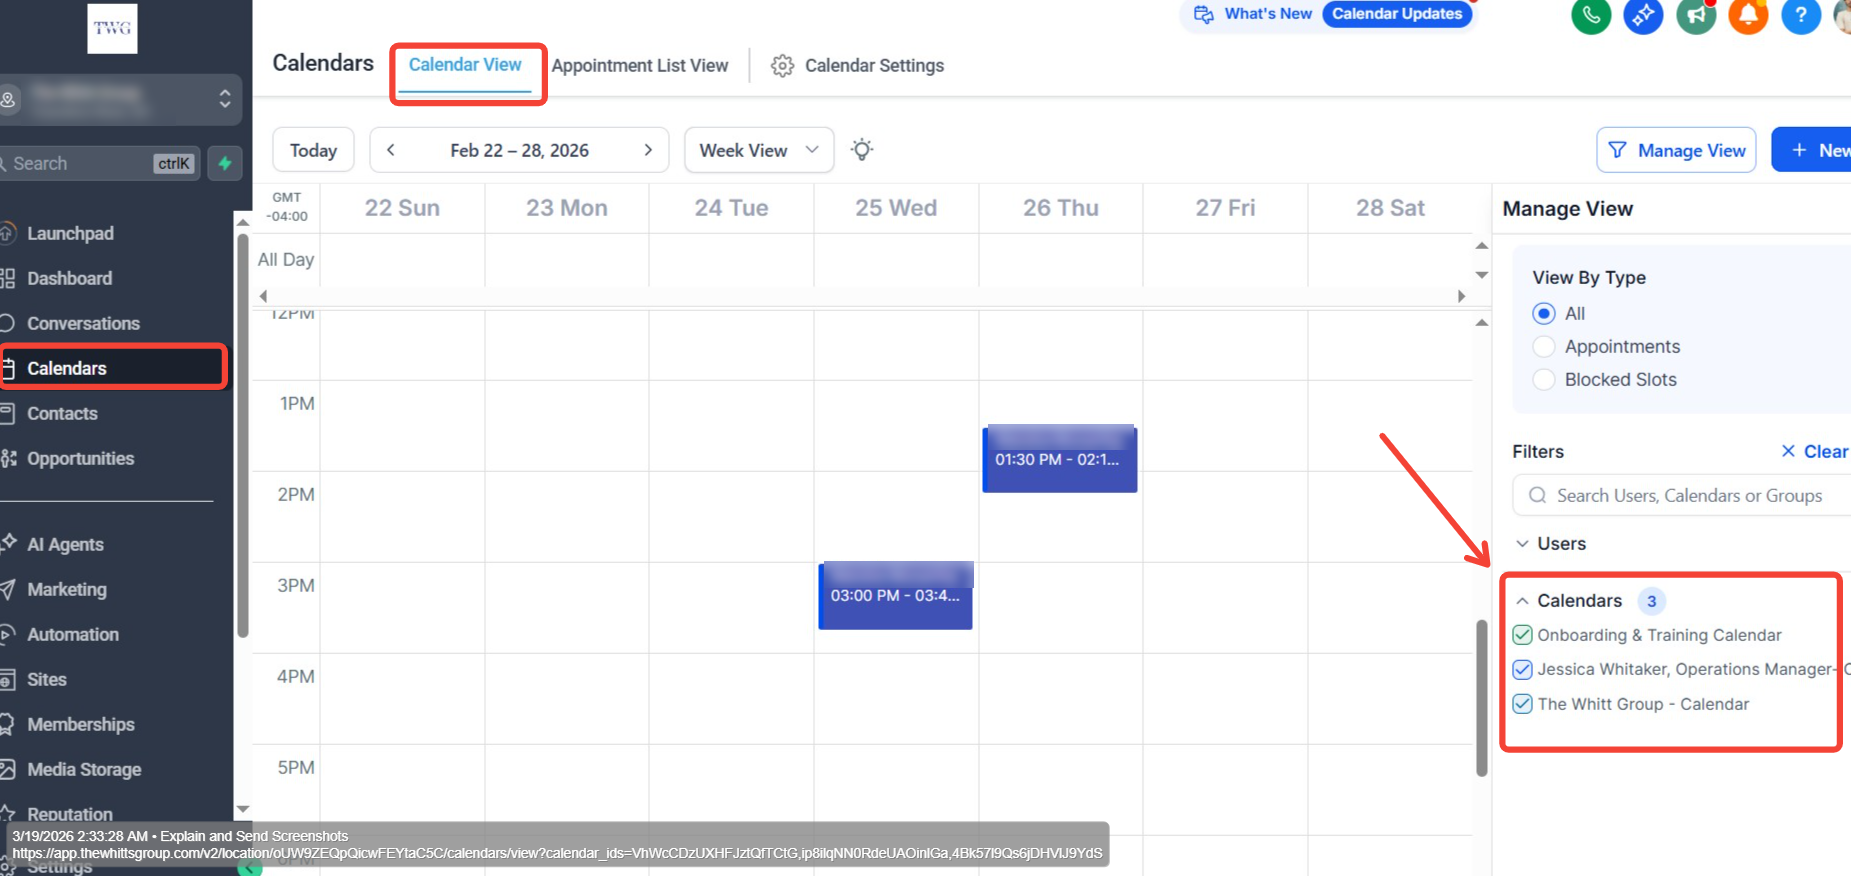
You can view appointments on the calendar view by navigating to Calendars → Calendar View. You can switch between users to see appointments booked with each respective user, and you can also switch between Day, Week, or Month view.
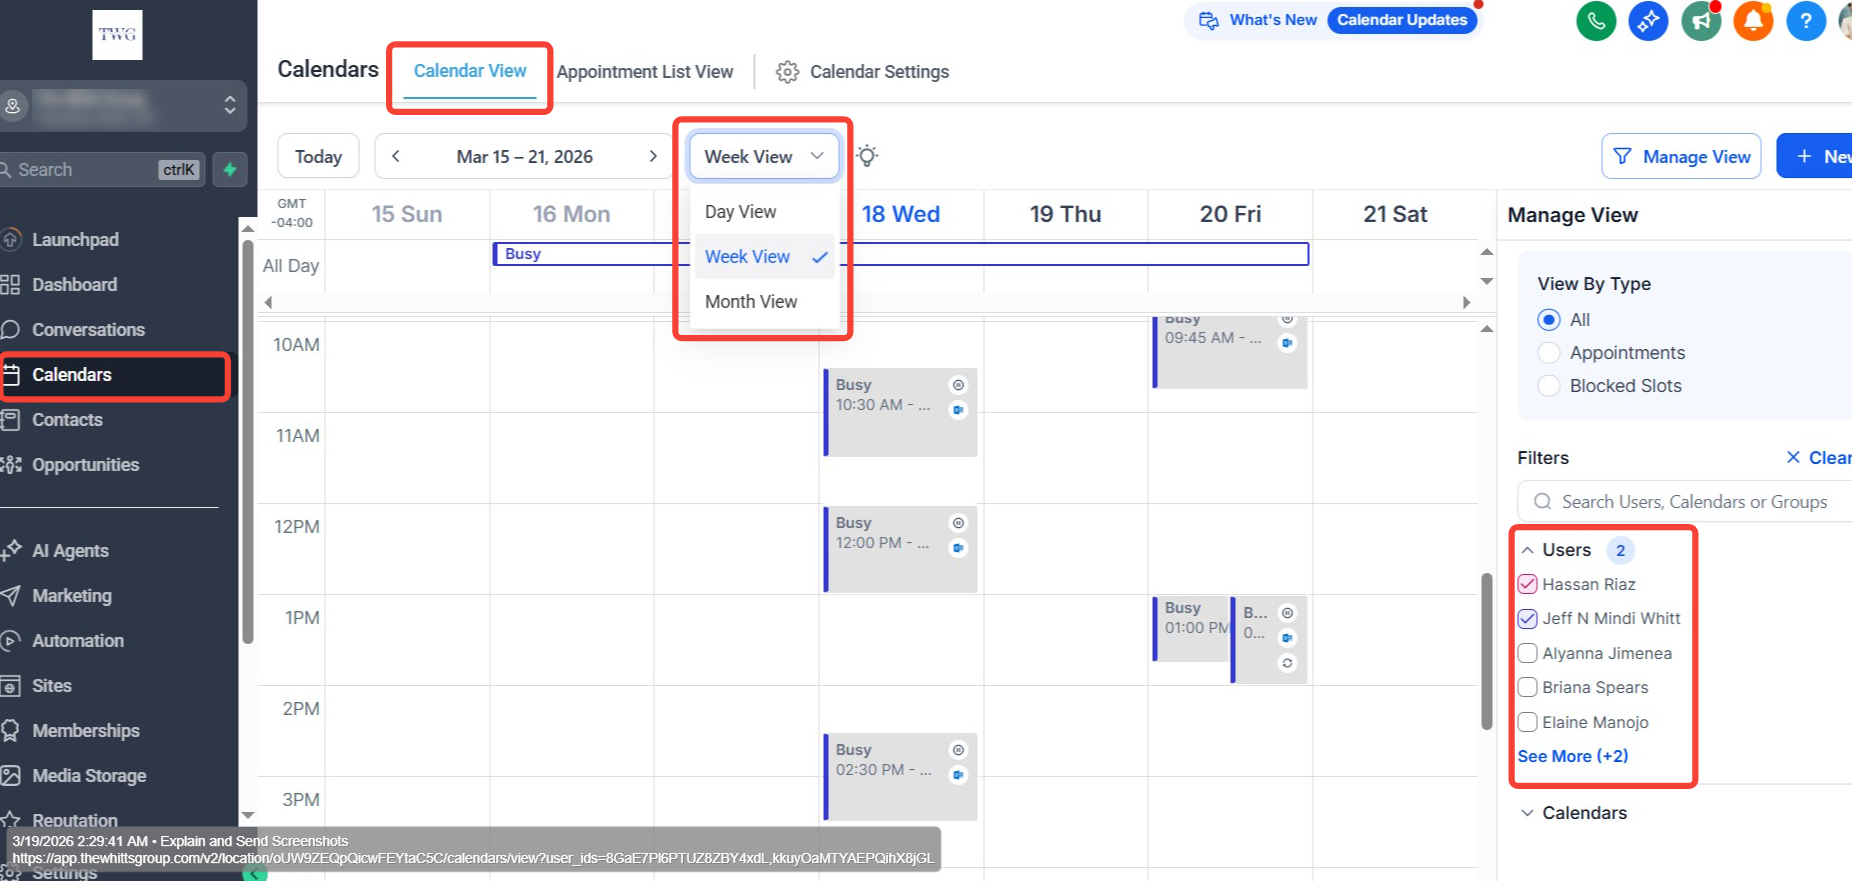
You can also switch between calendars to see how many appointments are booked on each calendar.
Section 01
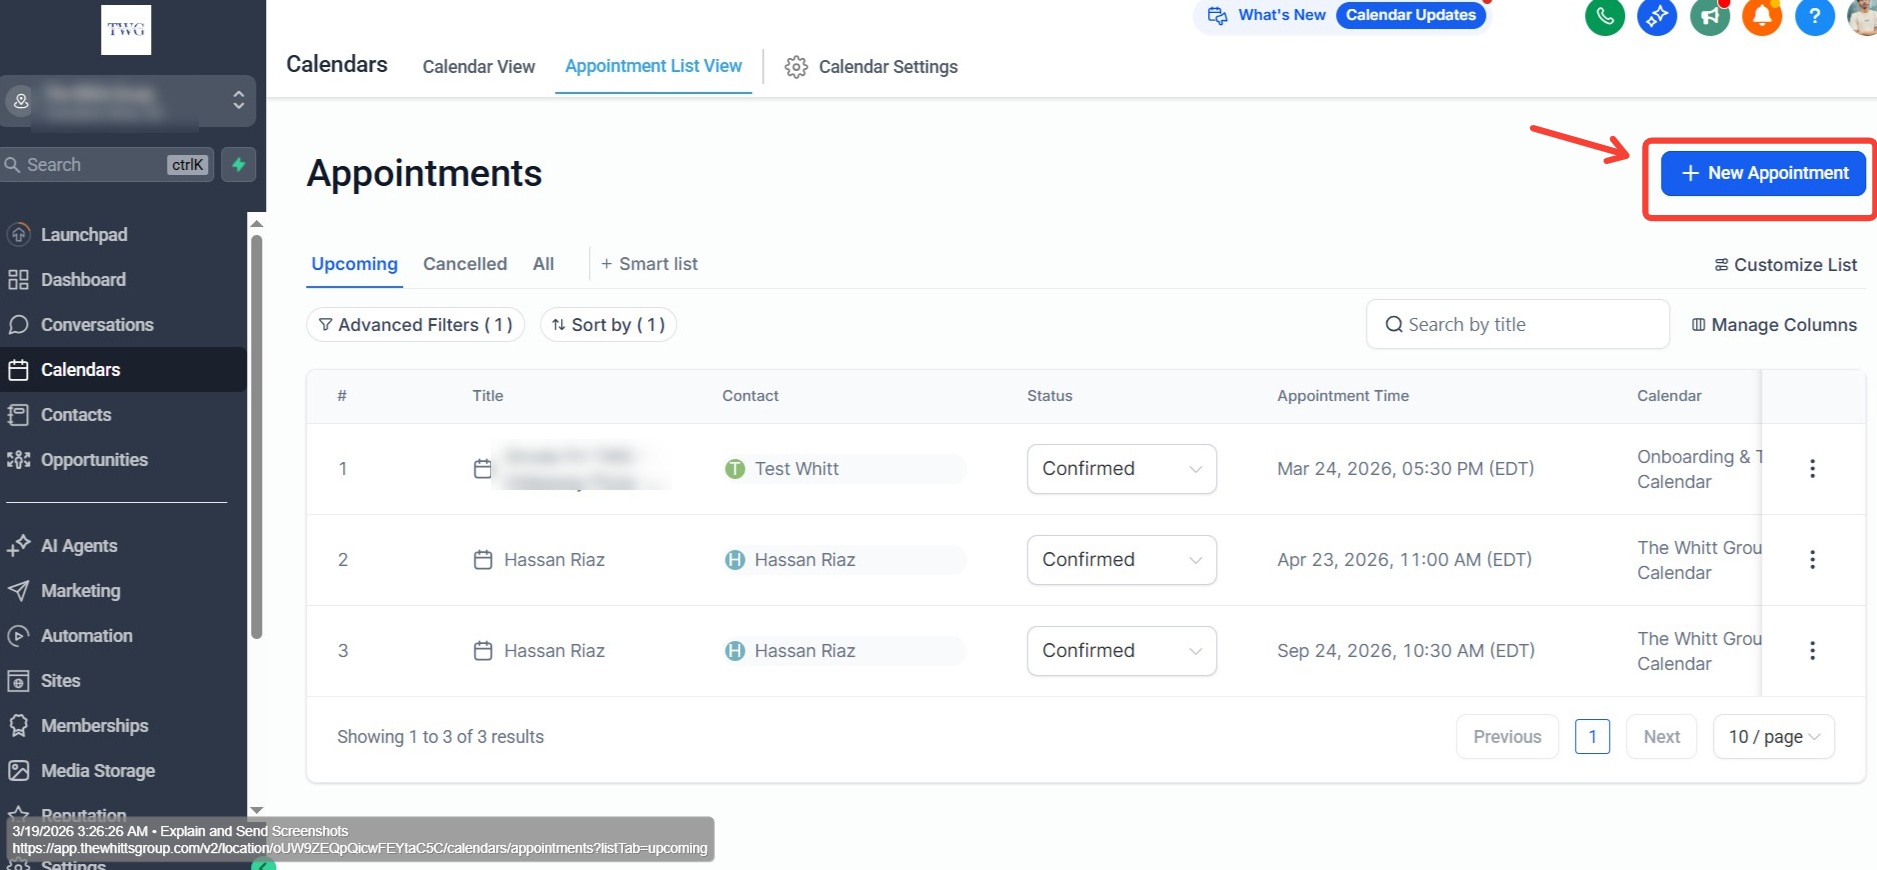
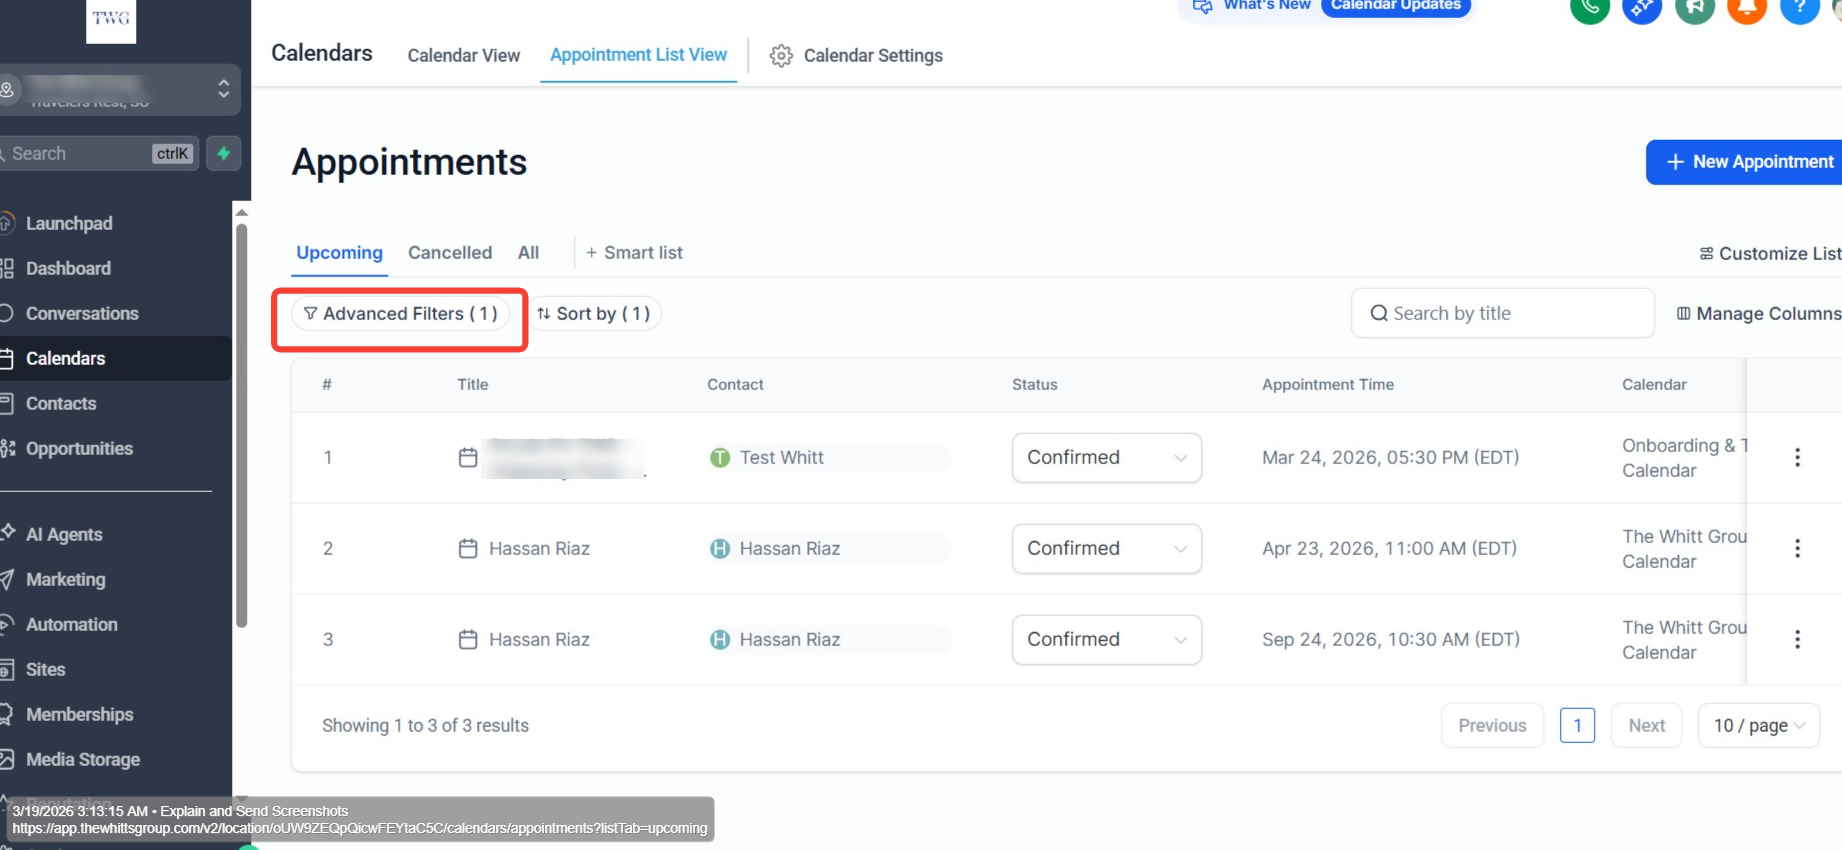
Appointment List View Tab
The Appointment List View Tab is a dedicated section within the Calendars feature that displays all your scheduled appointments in a structured, easy-to-read list format. Rather than viewing appointments on a traditional calendar grid, the List View presents every booking in a clean, organized table — making it simple to scan, search, filter, and manage appointments across all calendars in one place. This view is especially useful for teams handling a high volume of bookings who need a quick and clear overview of upcoming and past appointments.
Key Benefits:
- Get a clear, organized overview of all appointments in one place without navigating a calendar grid.
- Filter and search appointments by date, contact, calendar, or status for quick access.
- Track appointment statuses such as confirmed, cancelled, or no-show at a glance.
- Manage high volumes of bookings more efficiently with a structured list format.
- Take quick actions on appointments such as rescheduling, cancelling, or following up directly from the list.
Quick Features of this tab:
- Upcoming: A filter is auto-applied to this tab, showing upcoming appointments. You can remove the filter by clicking Advanced Filter.
- Cancelled: A list of all cancelled appointments.
- All: This is where you can see every appointment regardless of status.
Section 02
Creating a New Appointment from the Calendars Tab
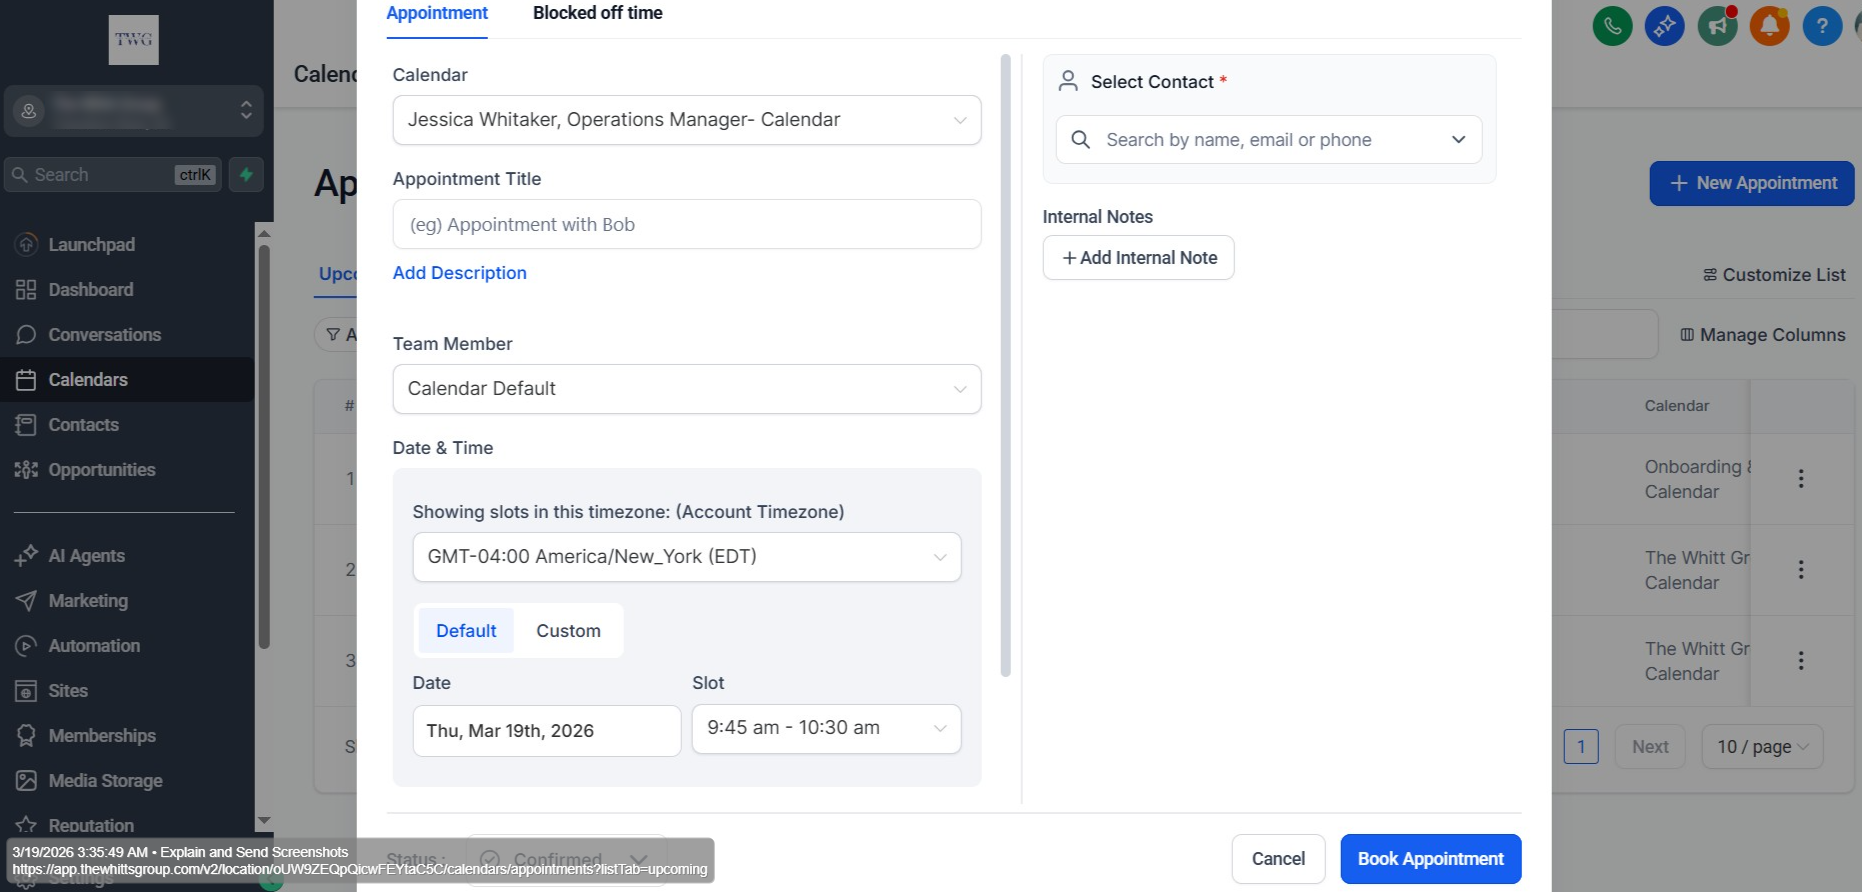
- 1
Click on "+ New Appointment".
On the booking interface:
- Select the calendar you want to book on.
- Give the appointment a Title.
- Add a Description.
- For Team Member, select a team member or leave it as calendar default.
- Select the Date, Time, and Time Zone.
- Define the Meeting Location.
- Select the contact you want to book the appointment with, then click "Book Appointment".
This will trigger a workflow for a confirmation message, reminders, tags, and will create an opportunity in your pipeline automatically.
Section 03
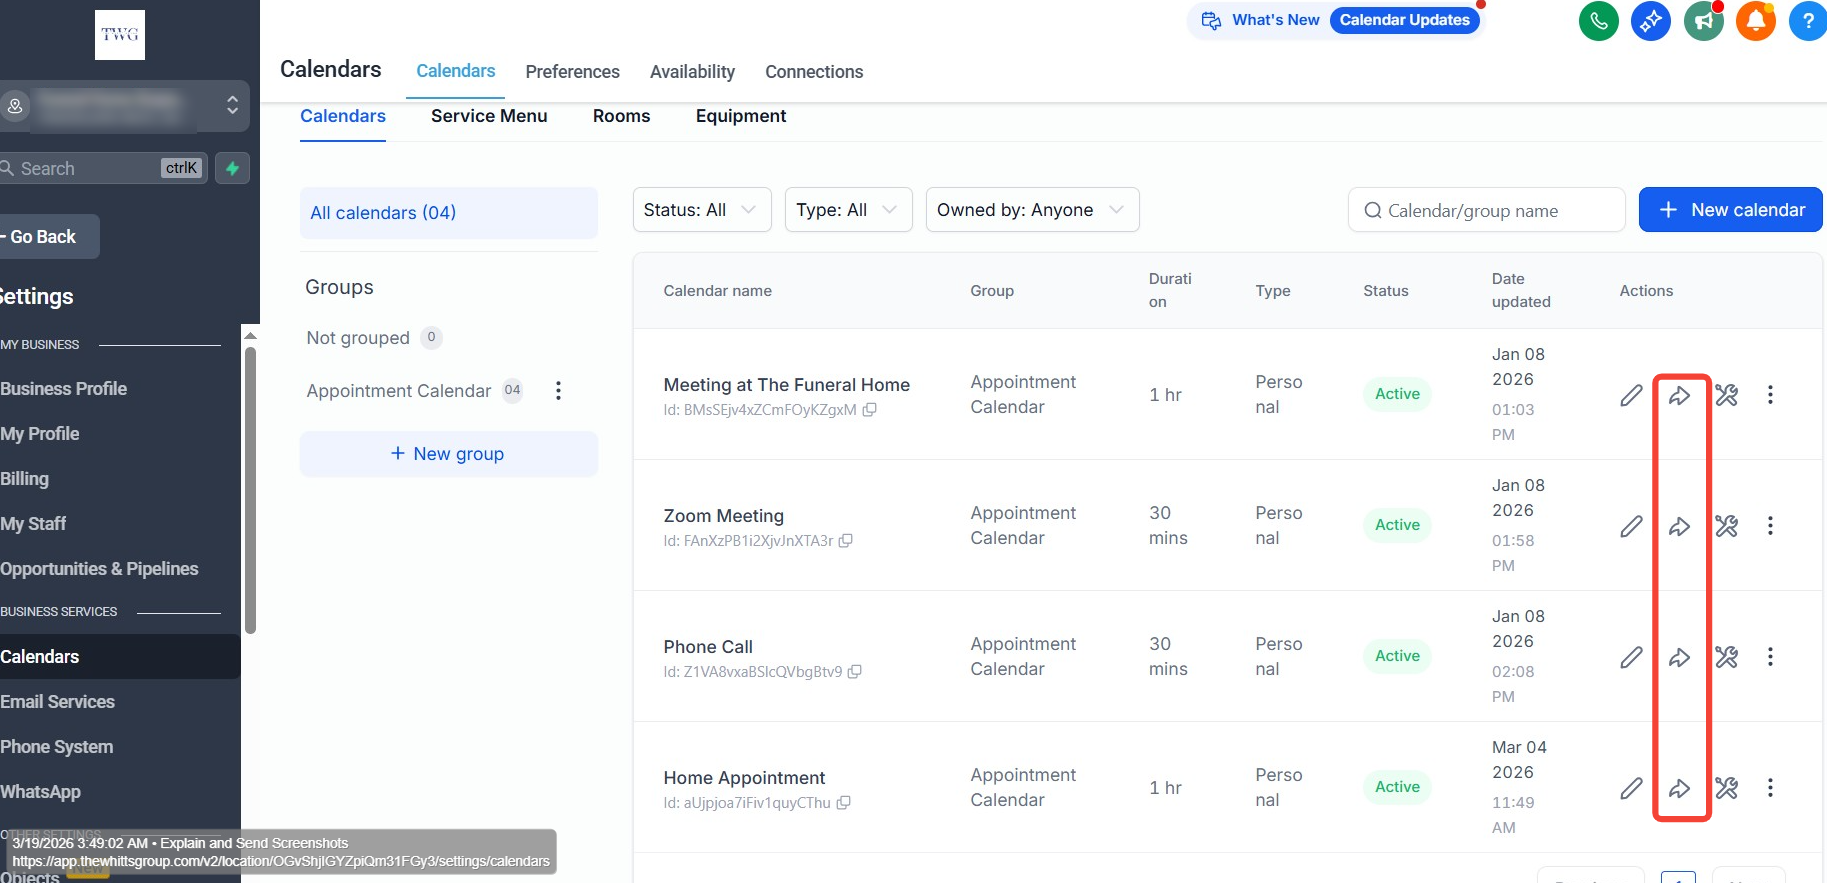
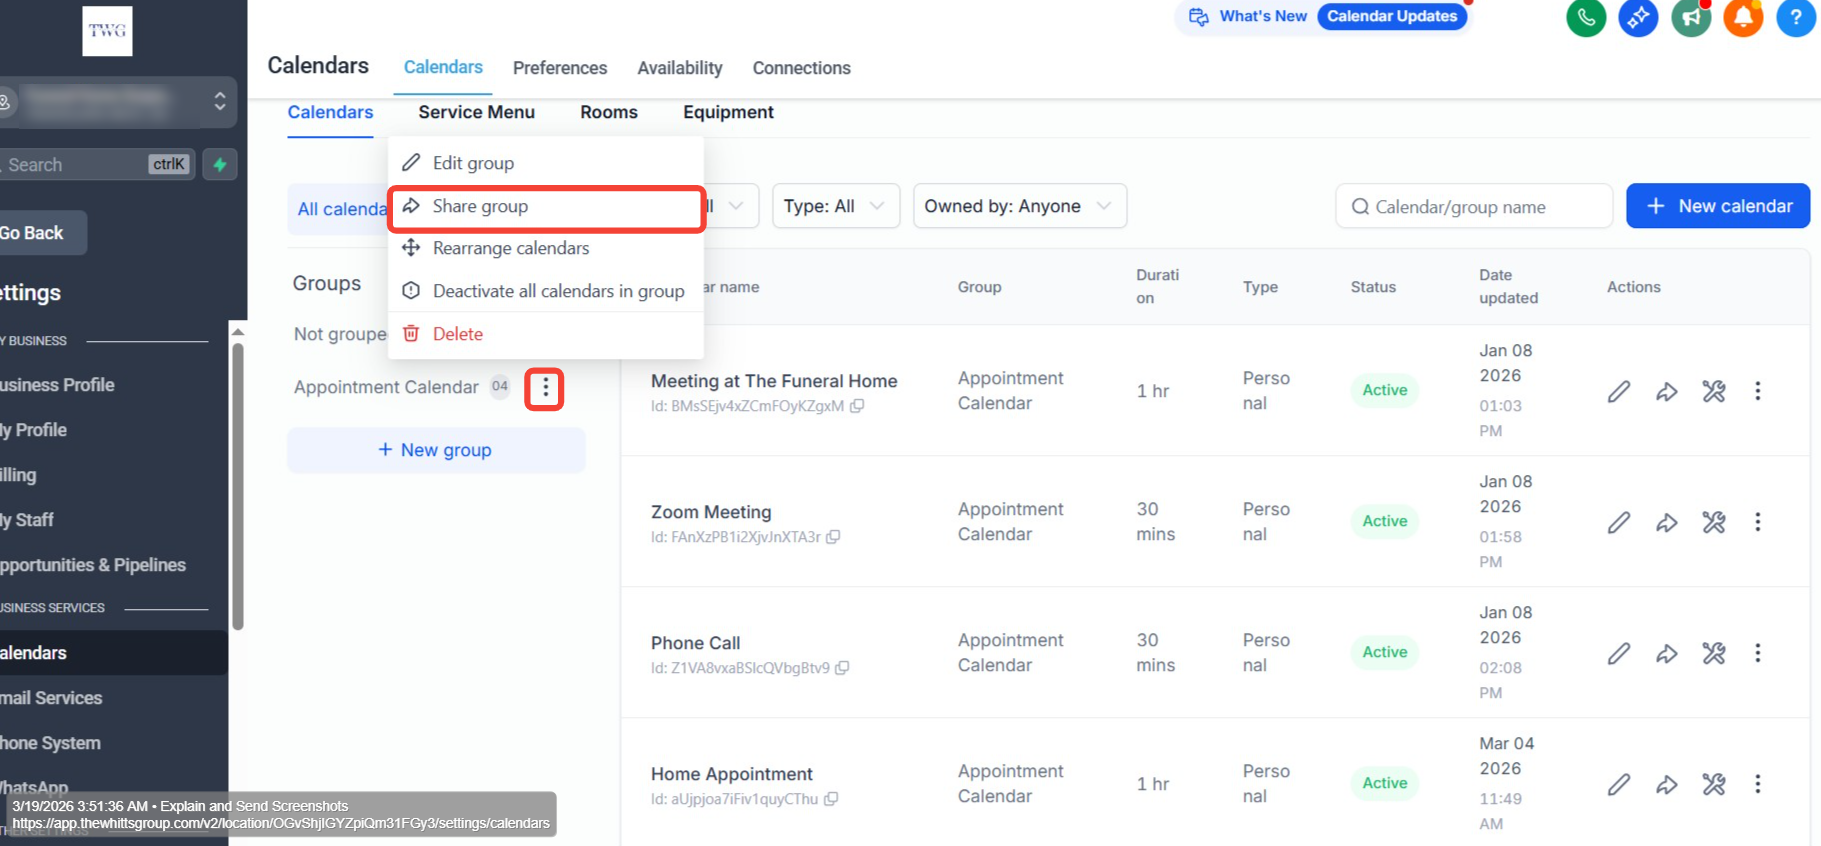
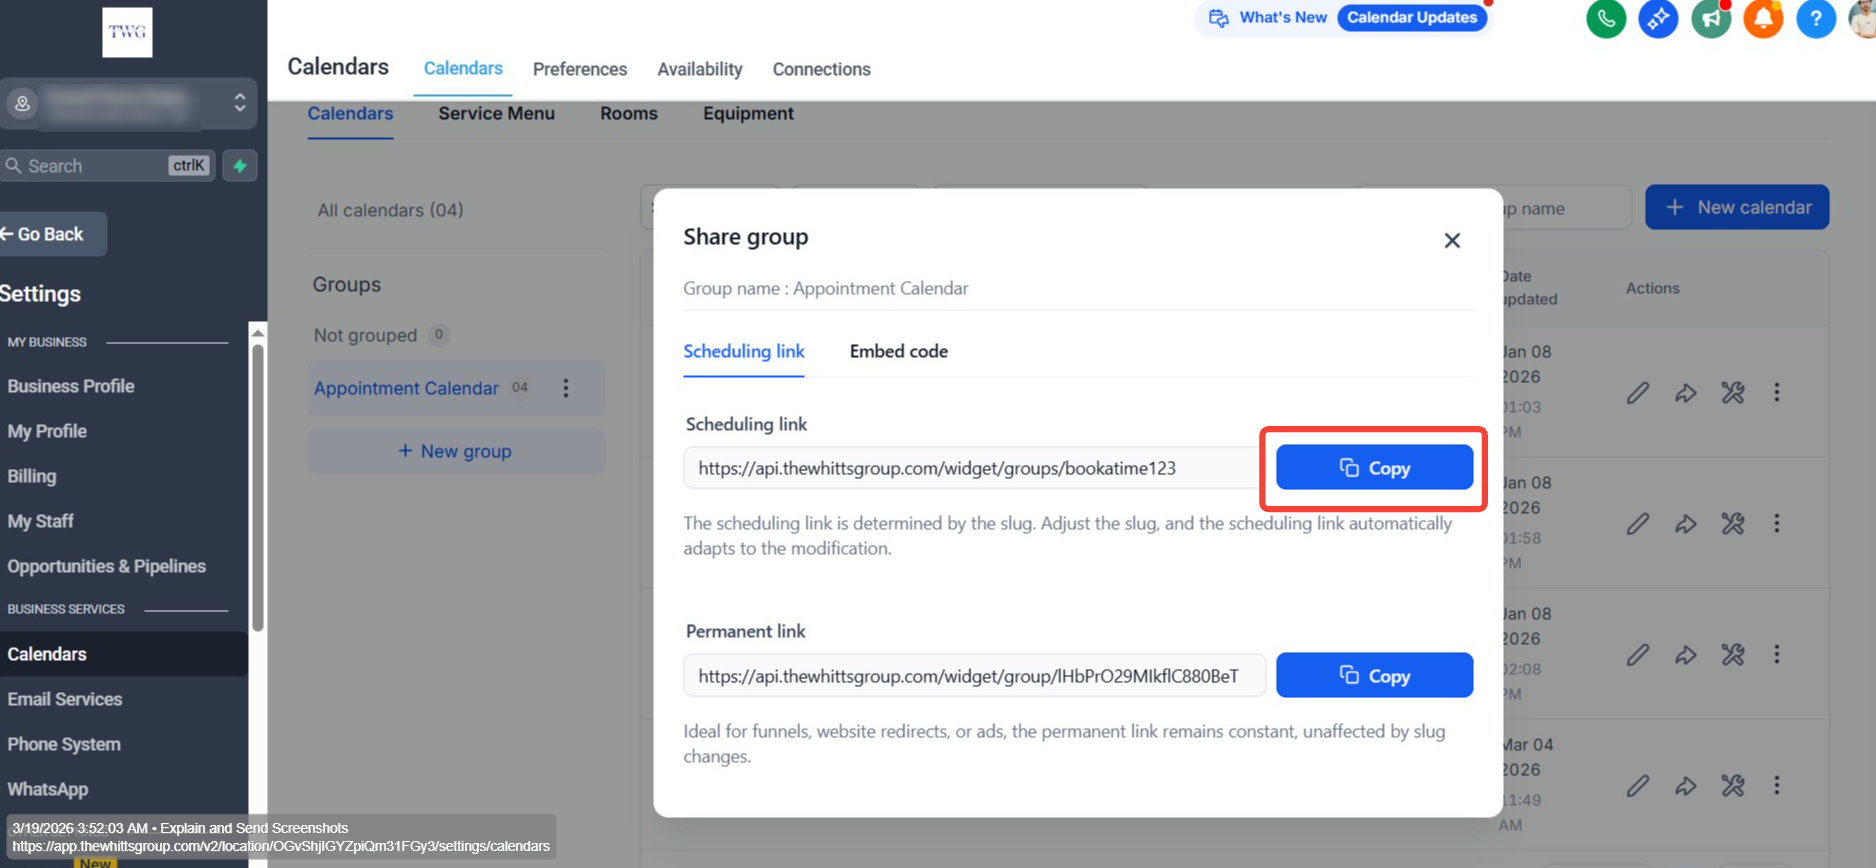
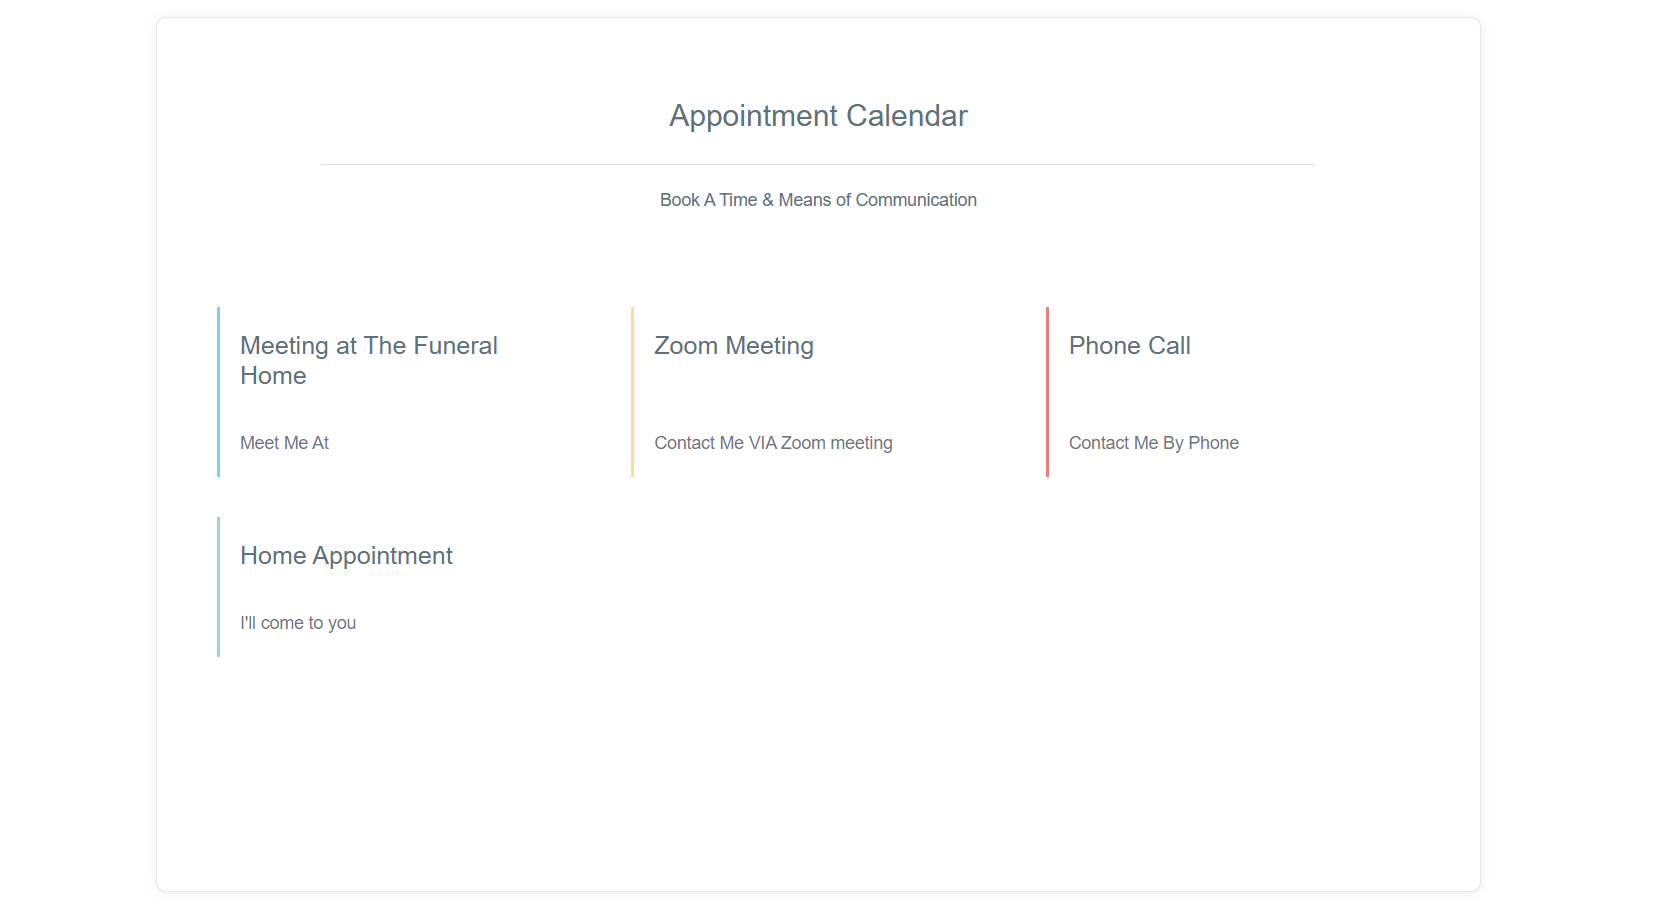
Calendar Settings & Booking Link
In the calendar settings, you can share the calendar booking link with families so they can go ahead and book a meeting.
We have a group calendar created which includes all 4 calendars in 1, allowing the user to select from their preferred meeting source.
Overview
What Are Pipelines?
Pipelines are visual workflow tools that show the progress of leads, deals, or customers from start to finish. Each opportunity moves through defined stages, helping teams understand what actions are needed and where items may be getting stuck.
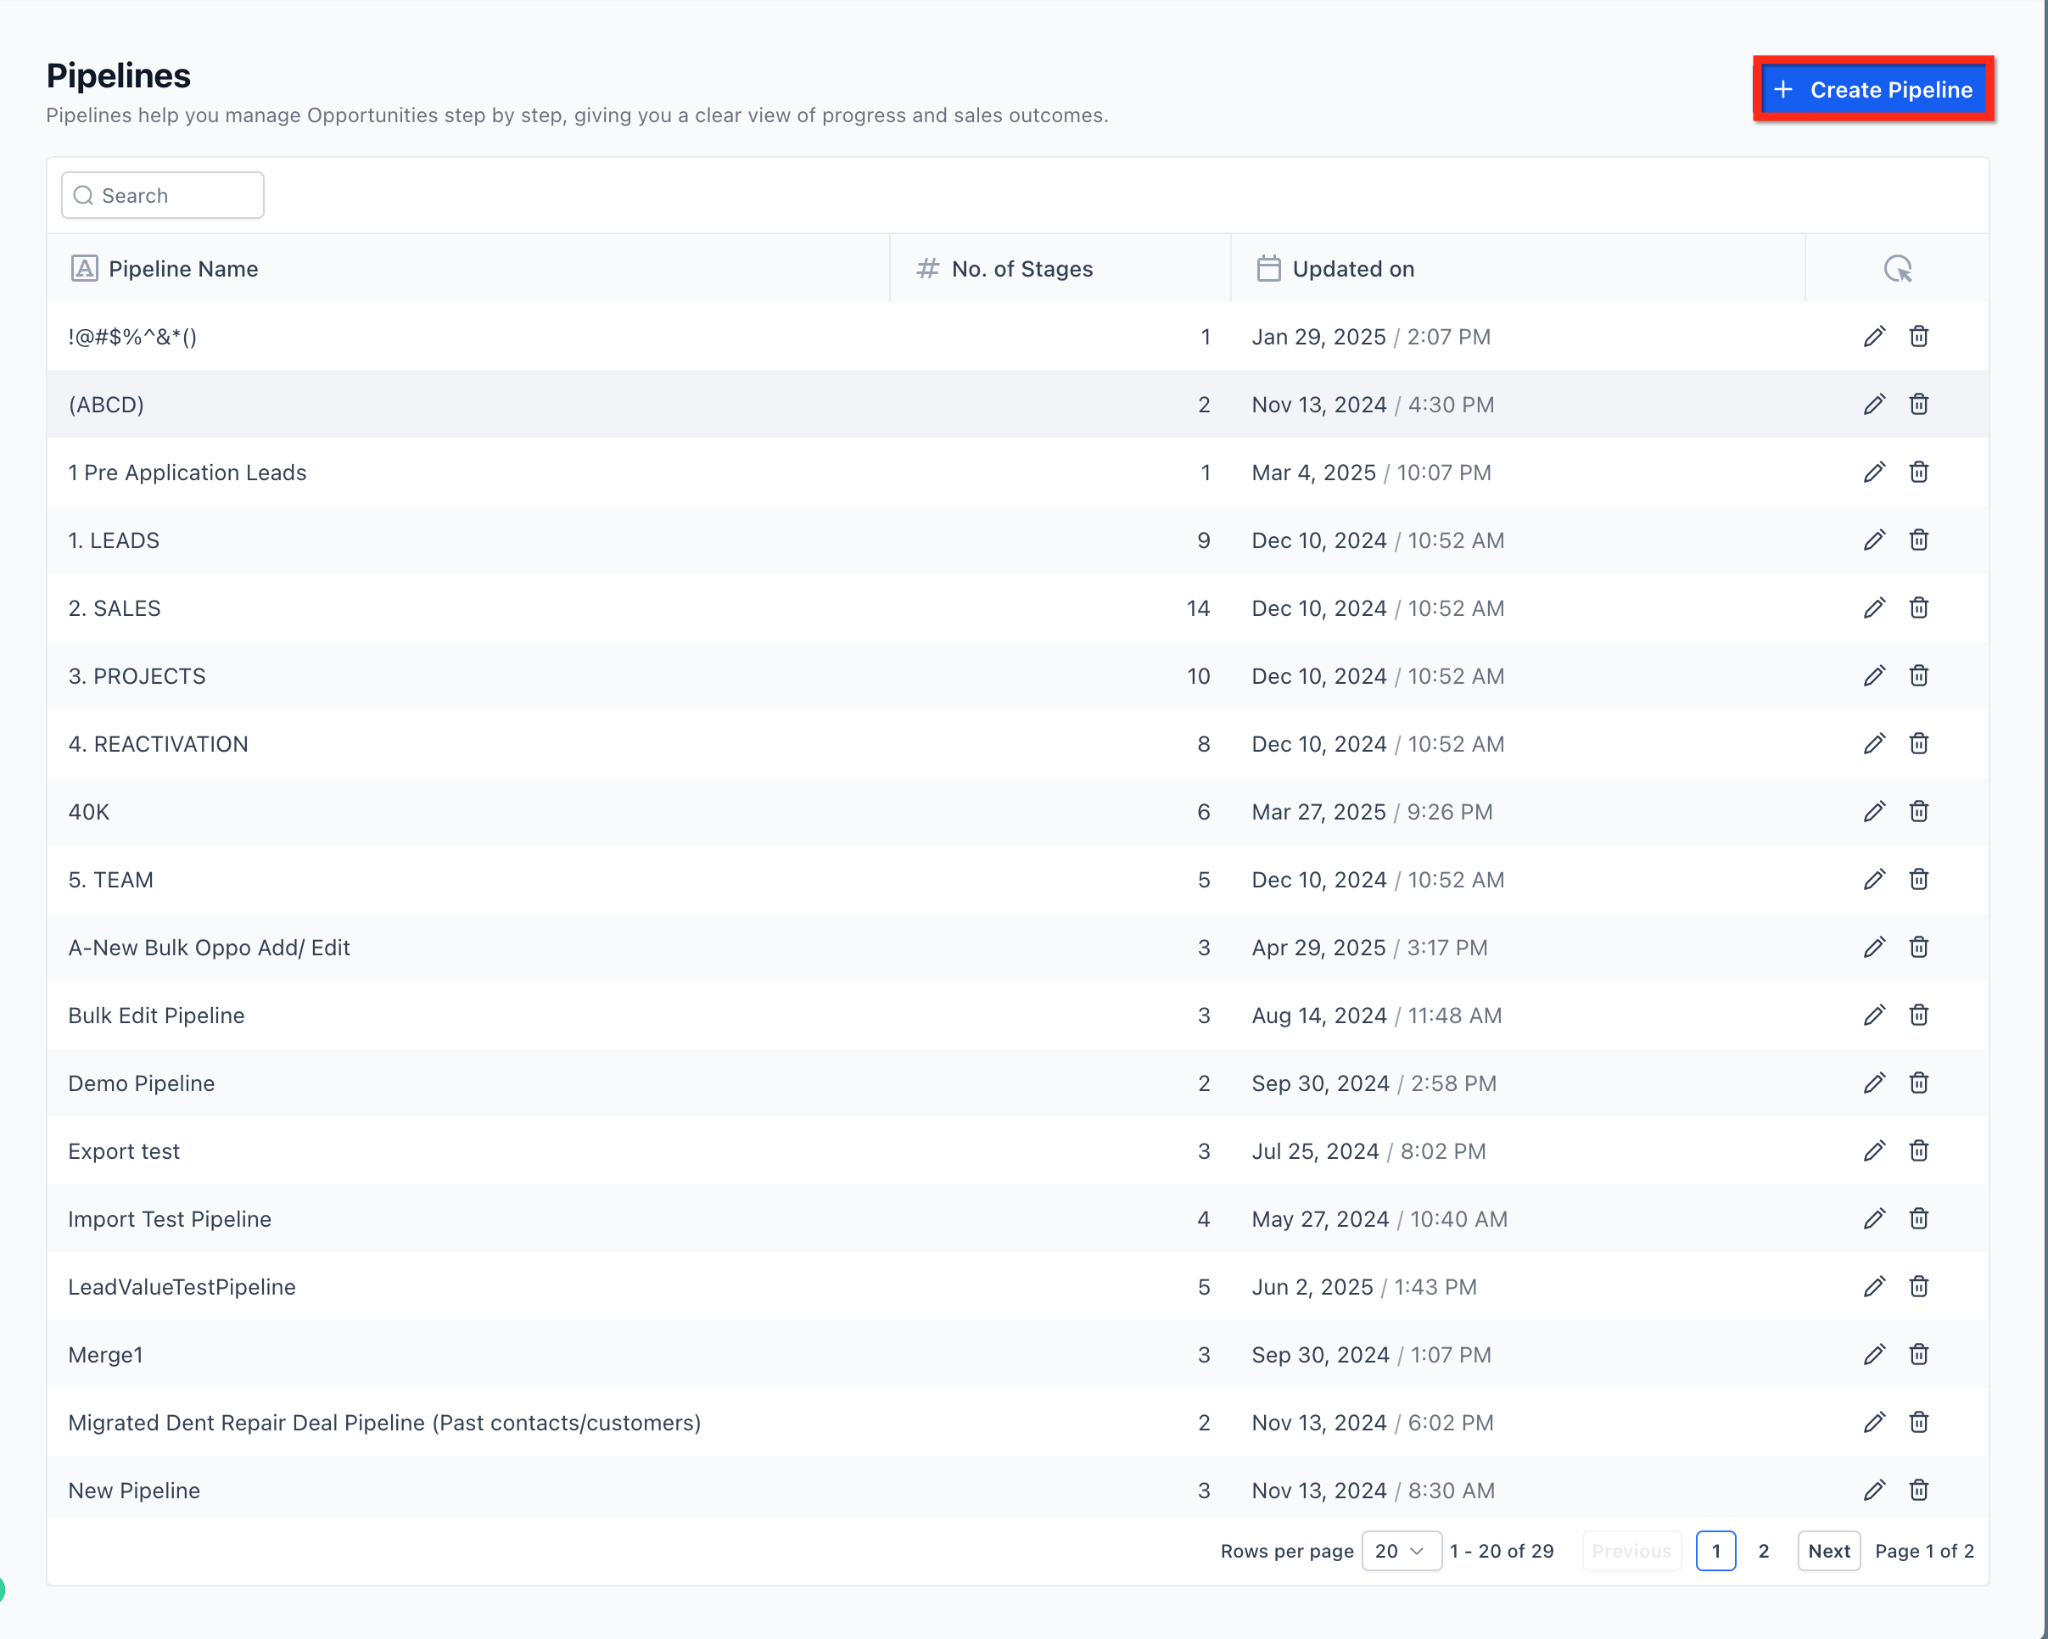
You can access Pipelines from: Sub-account → Opportunities → Pipelines
This view displays all pipelines in the sub-account, along with the number of stages in each pipeline and the last updated timestamp.
Why Pipelines Matter:
- Improve Visibility — Instantly see where every opportunity stands in your process.
- Maintain Consistency — Standardize how leads or clients move through your workflow.
- Increase Efficiency — Automate follow-ups, reminders, and task assignments based on stage changes.
- Track Performance — Monitor conversion rates, identify bottlenecks, and measure overall pipeline health.
Section 01
Pipeline Stages
A pipeline is made up of stages, with each stage representing a step in your sales or customer journey. Opportunities move from left to right as they progress through the pipeline. Stages should be clearly defined and action-oriented so users know exactly when an opportunity should move forward.
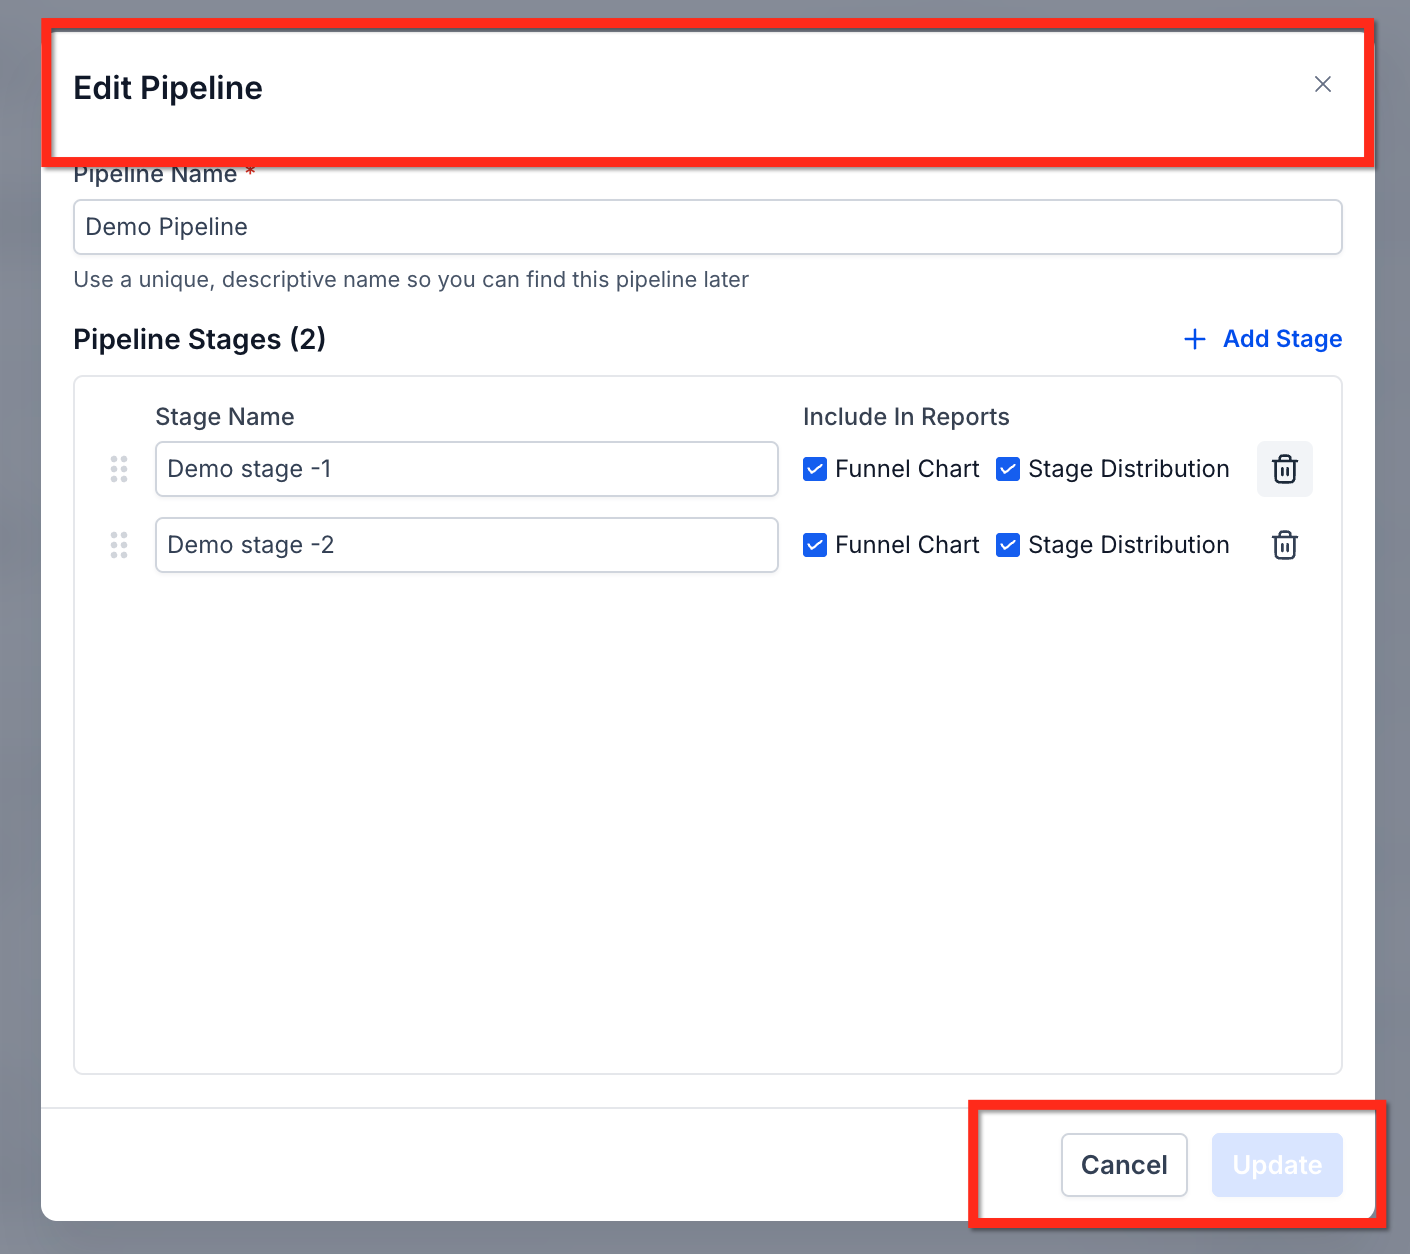
Editing a Pipeline and Its Stages
From this screen, you can rename stages, reorder them, control reporting visibility, add new stages, or delete existing ones.
Deleting a Pipeline Stage
When deleting a pipeline stage, you can now move all existing opportunities to another stage instead of losing them.
How it works:
- 1
Navigate to Opportunities → Pipelines.
- 2
Open the pipeline you want to edit.
- 3
Click the delete icon next to the stage.
- 4
Select a destination stage to move existing opportunities.
- 5
Confirm the deletion. All opportunities from the deleted stage are automatically transferred to the selected stage.
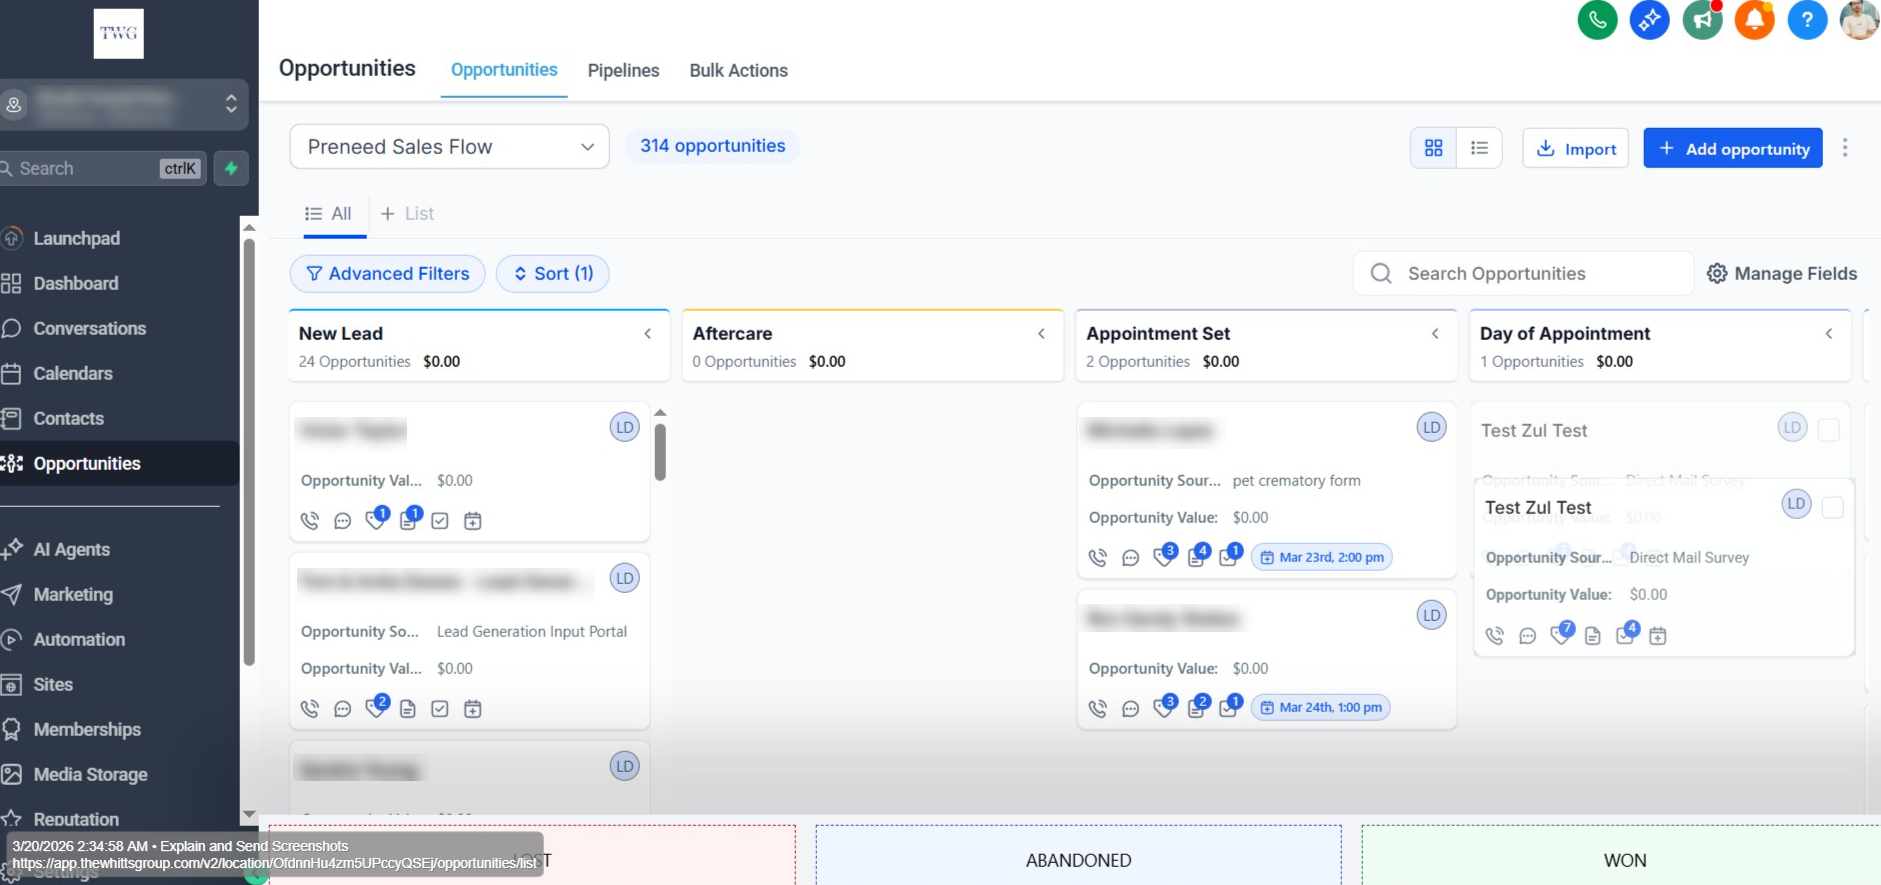
Example Pipeline Stages — Preneed Sales Flow
New Lead
Aftercare
Appointment Set
Day of Appointment
Missed Appointment
Pending / Follow Up
Not Yet Ready to Fund Follow Up
Funded Complete — Ask for Review
Previously Funded
Grief Support
Long Term Nurture
Funded No Review
Funded Elsewhere
Overview
What Are Opportunities?
Opportunities are records that represent a potential sale or deal at any point in your pipeline — from a brand-new lead to a signed contract. Each opportunity stores the prospect's contact information, deal value, and historical notes, ensuring everyone on your team has context and can take action quickly. Opportunities move through stages inside a pipeline, reflecting real-world progress toward a win.
Key Benefits:
- Centralized Tracking: All notes, tasks, and communications live on the opportunity card, eliminating data silos.
- Stage-Based Forecasting: Predict revenue by looking at how many deals sit in each stage and their expected values.
- Automation Triggers: Fire workflows when an opportunity is created, moves stages, or changes status — saving hours of manual work.
- Team Collaboration: Assign owners and tag teammates for seamless handoffs.
Section 01
Opportunity Status
There are four default opportunity statuses. An opportunity can be in one of the four statuses, and you can use these to prepare filters.
Open
Won
Lost
Abandoned
- Open: Opportunities actively being pursued and still in progress — potential deals not yet won, lost, or abandoned, and still viable for conversion.
- Won: The opportunity has been successfully converted into a sale or deal. Applied when the lead has made a purchase or signed a contract.
- Lost: Deals that have been unsuccessfully concluded — applied when the lead decides not to move forward or chooses a competitor's offering.
- Abandoned: The opportunity has been neglected or disregarded with no further action or follow-up planned. Effectively removed from active consideration.
Overview
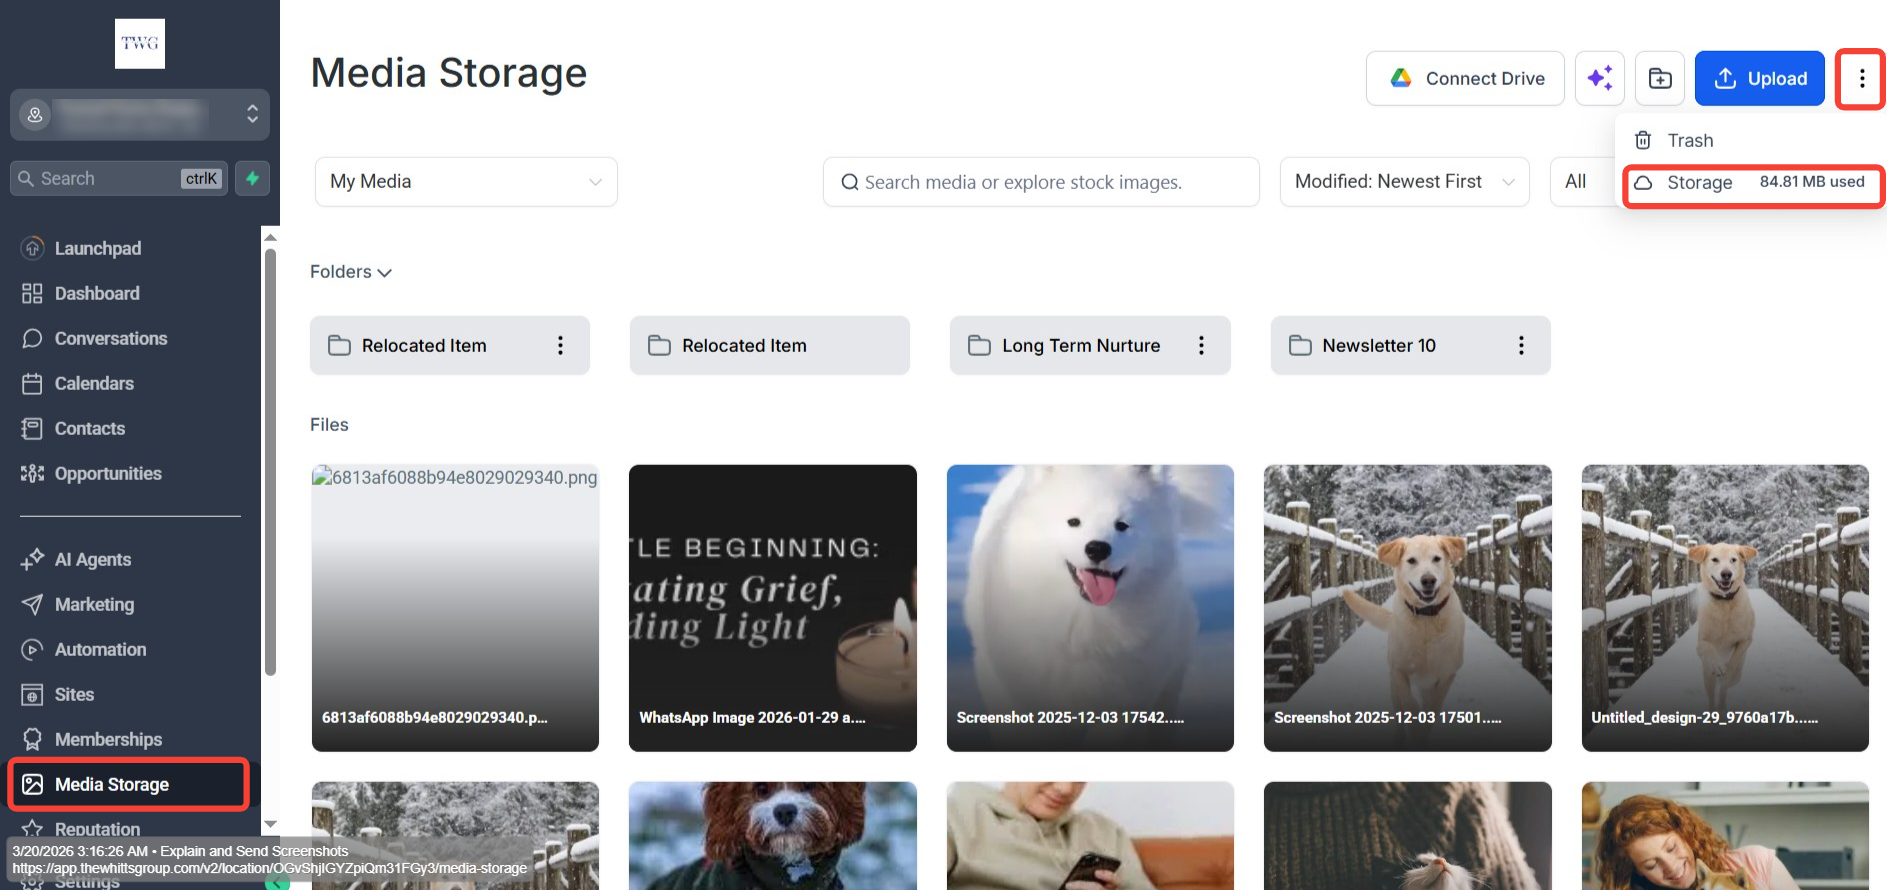
Accessing & Using Media Storage
To access Media Storage, navigate to the left sidebar of your dashboard and click Media Storage.
Uploading Files
Upload files effortlessly via drag-and-drop. Simply drag media from your computer into the Media Storage interface — no buttons required. The improved functionality ensures a faster, more intuitive upload experience.
View Storage Usage with the Media Usage Modal
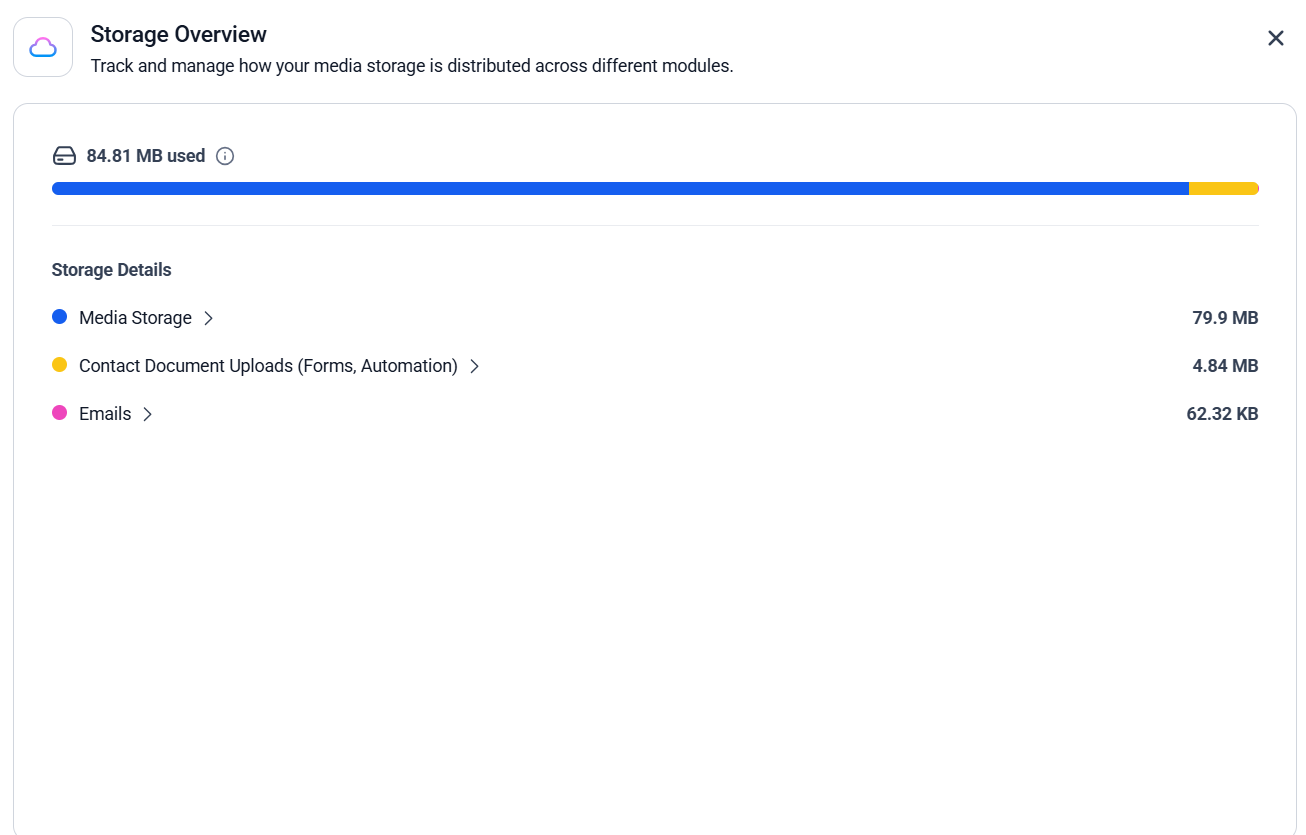
Get a breakdown of how much storage your account is using and where that usage comes from. The modal visualizes total storage with a color-coded bar, shows a per-module breakdown (e.g., Media Library, Conversations, Memberships, Contacts, Calendar), and lets you expand each module to see usage by file type (Images, Videos, Documents, Audio).
- 1
Click the three-dot menu (⋮) and select Storage.
- 2
Click on any module to see usage broken down by file type.
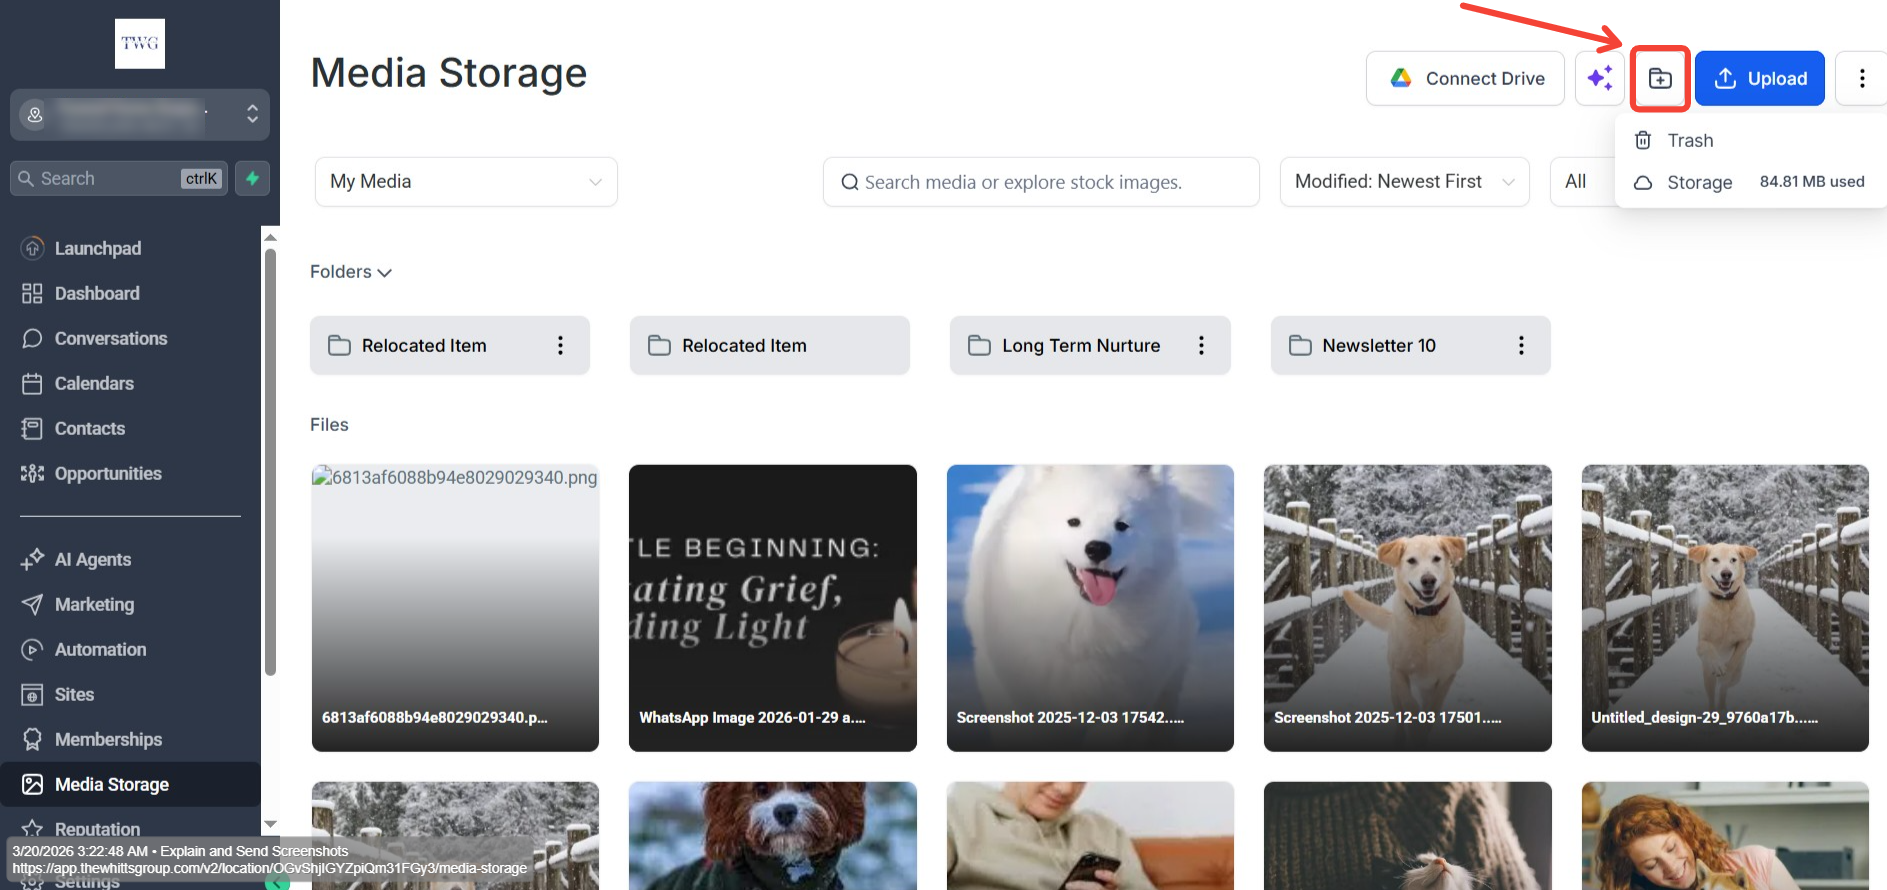
Creating Folders
You can create folders and name them to keep your files and images organized.
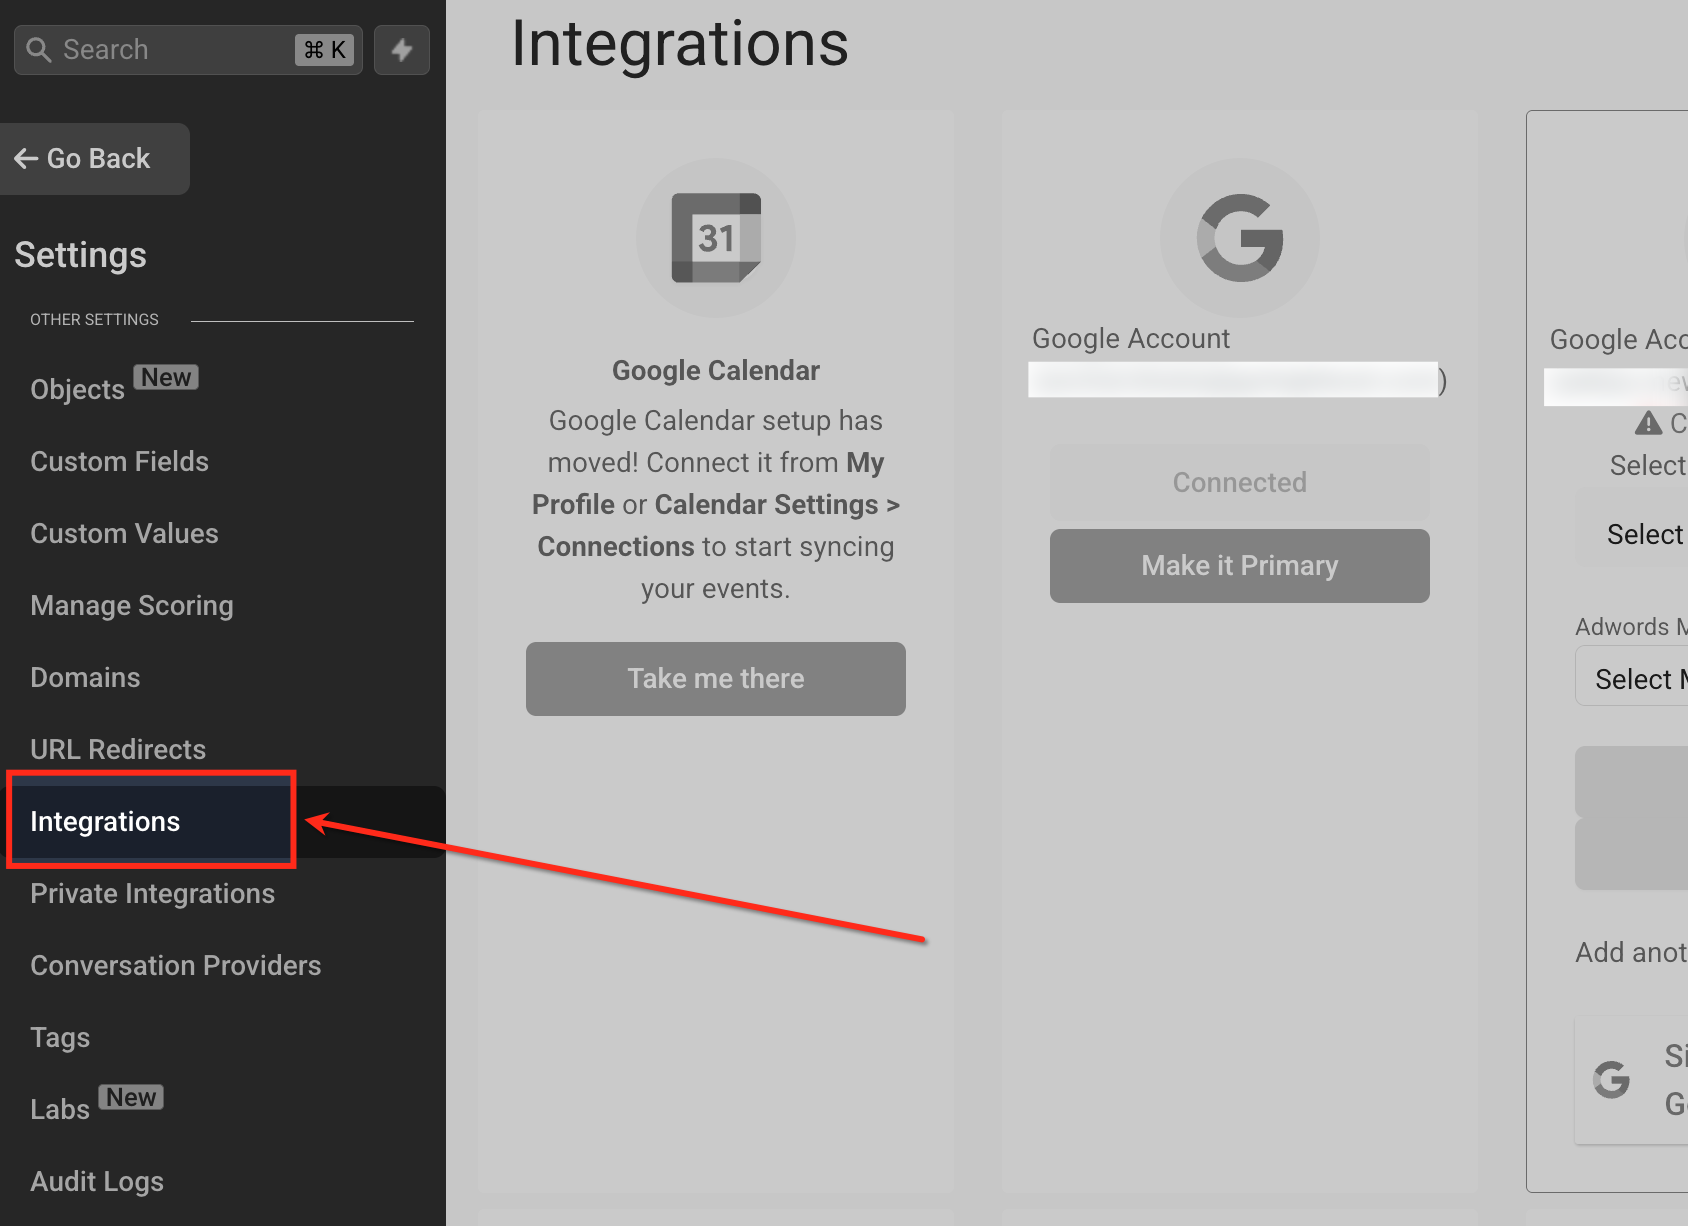
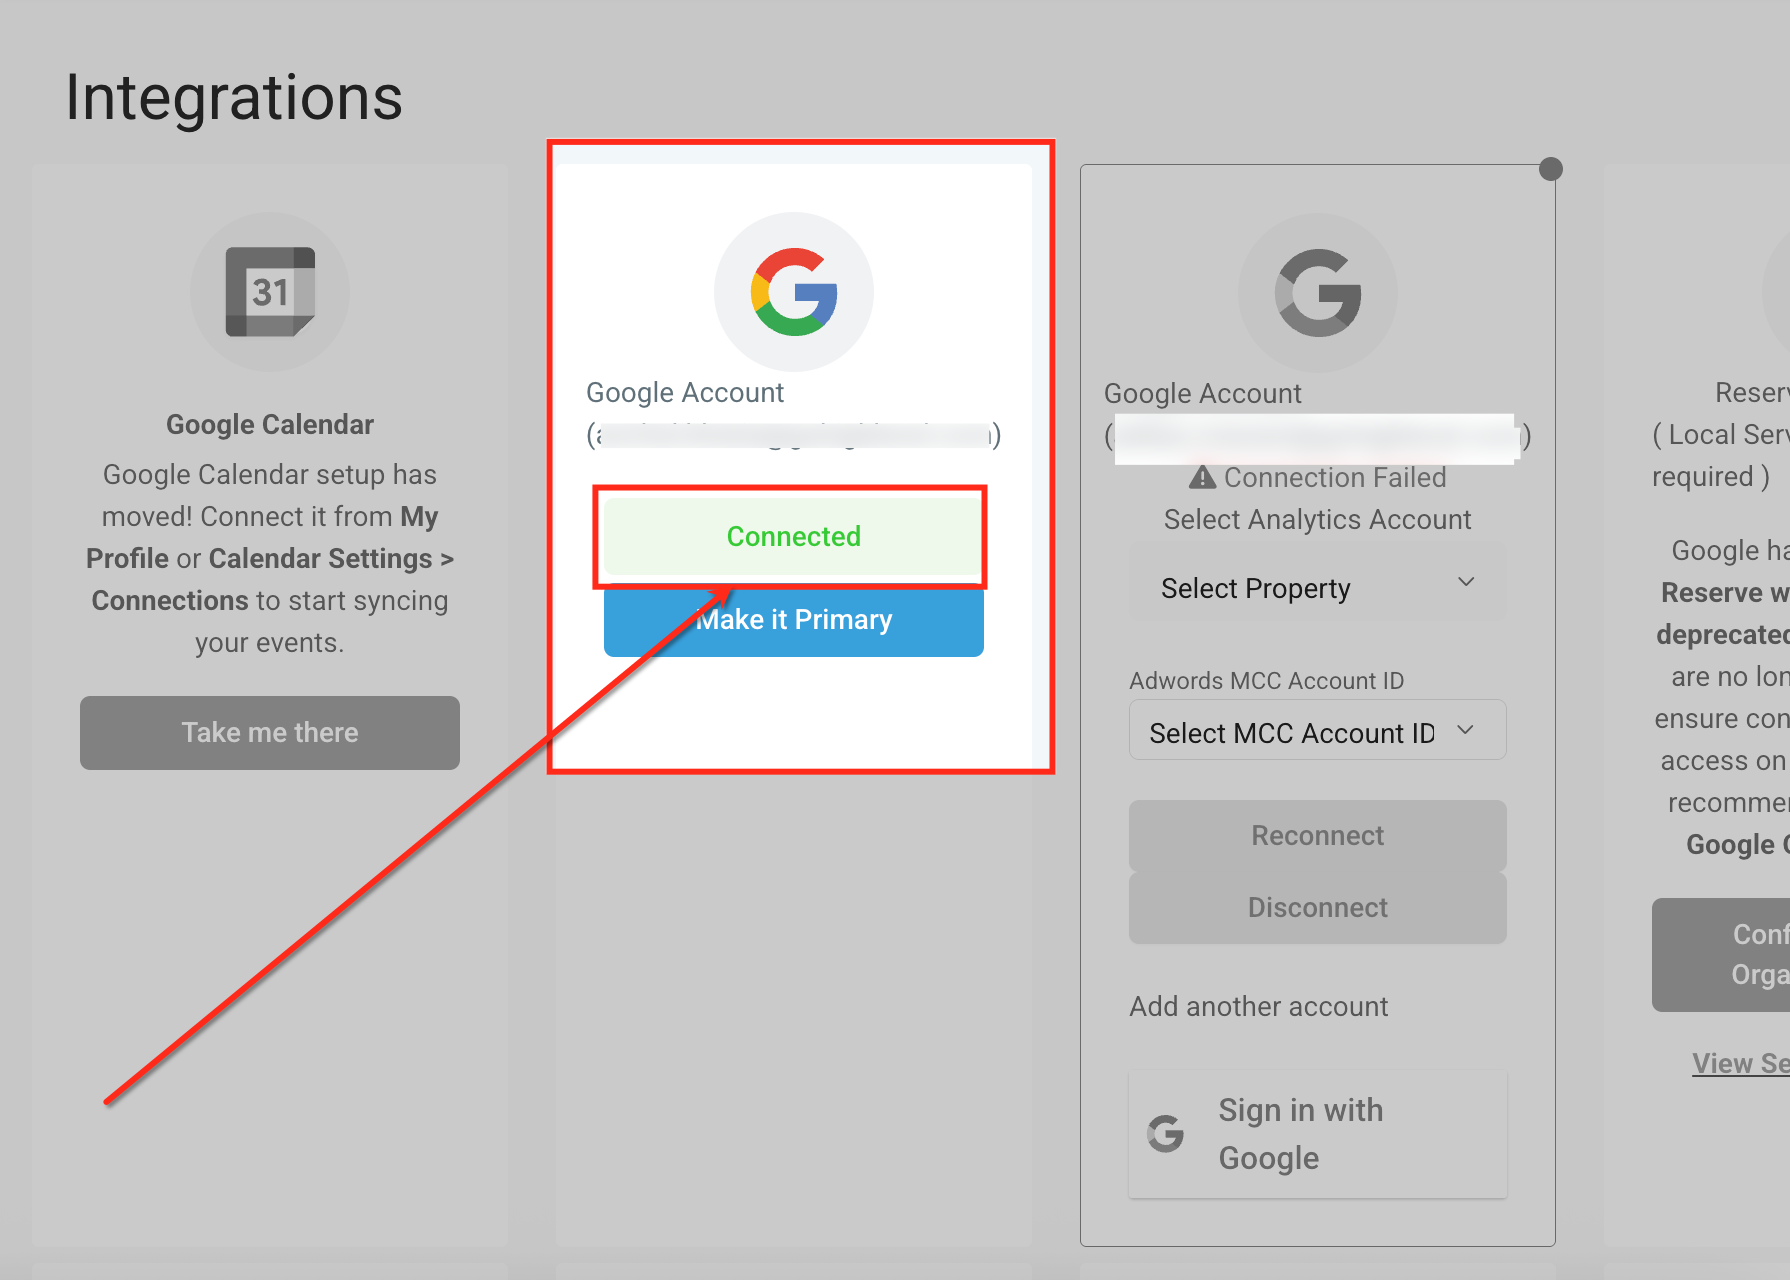
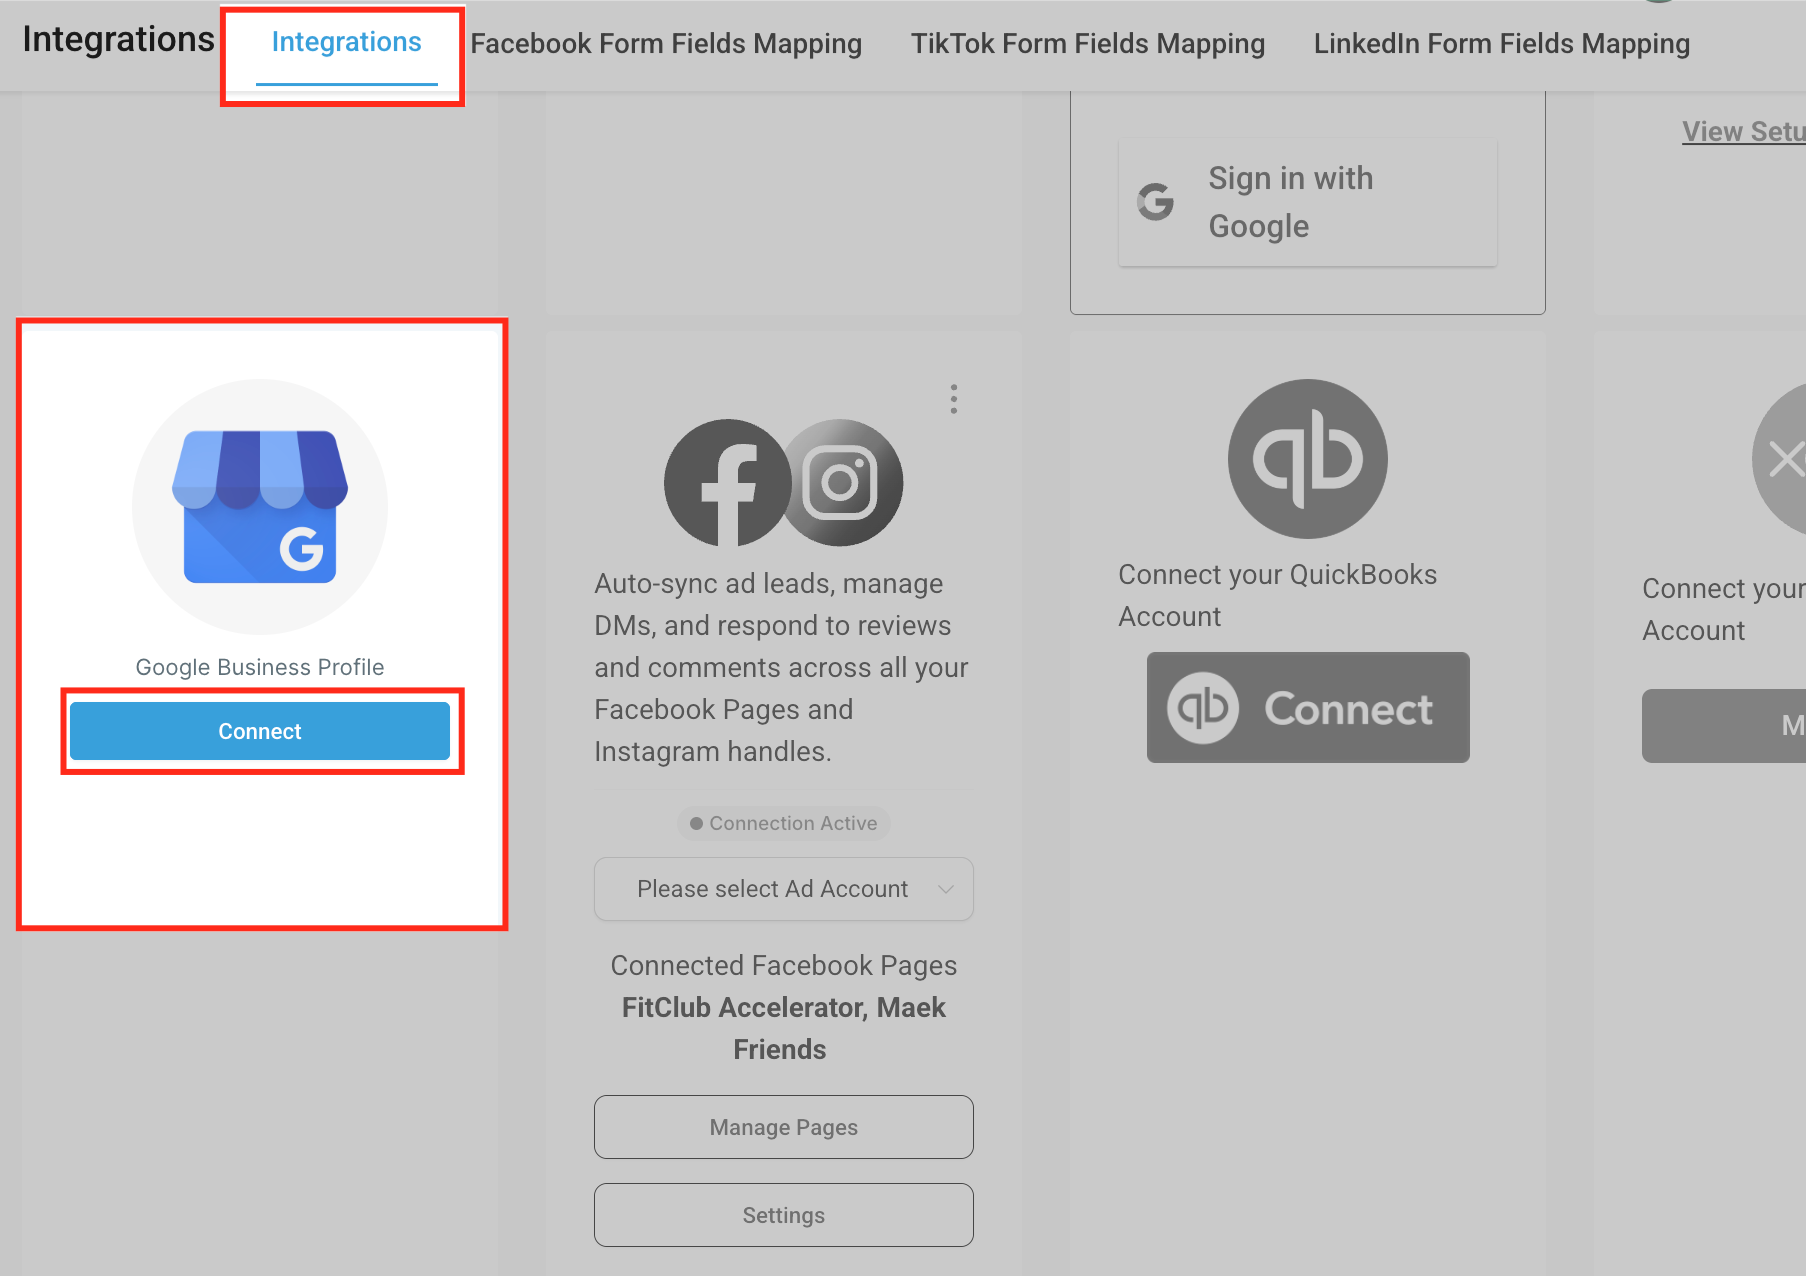
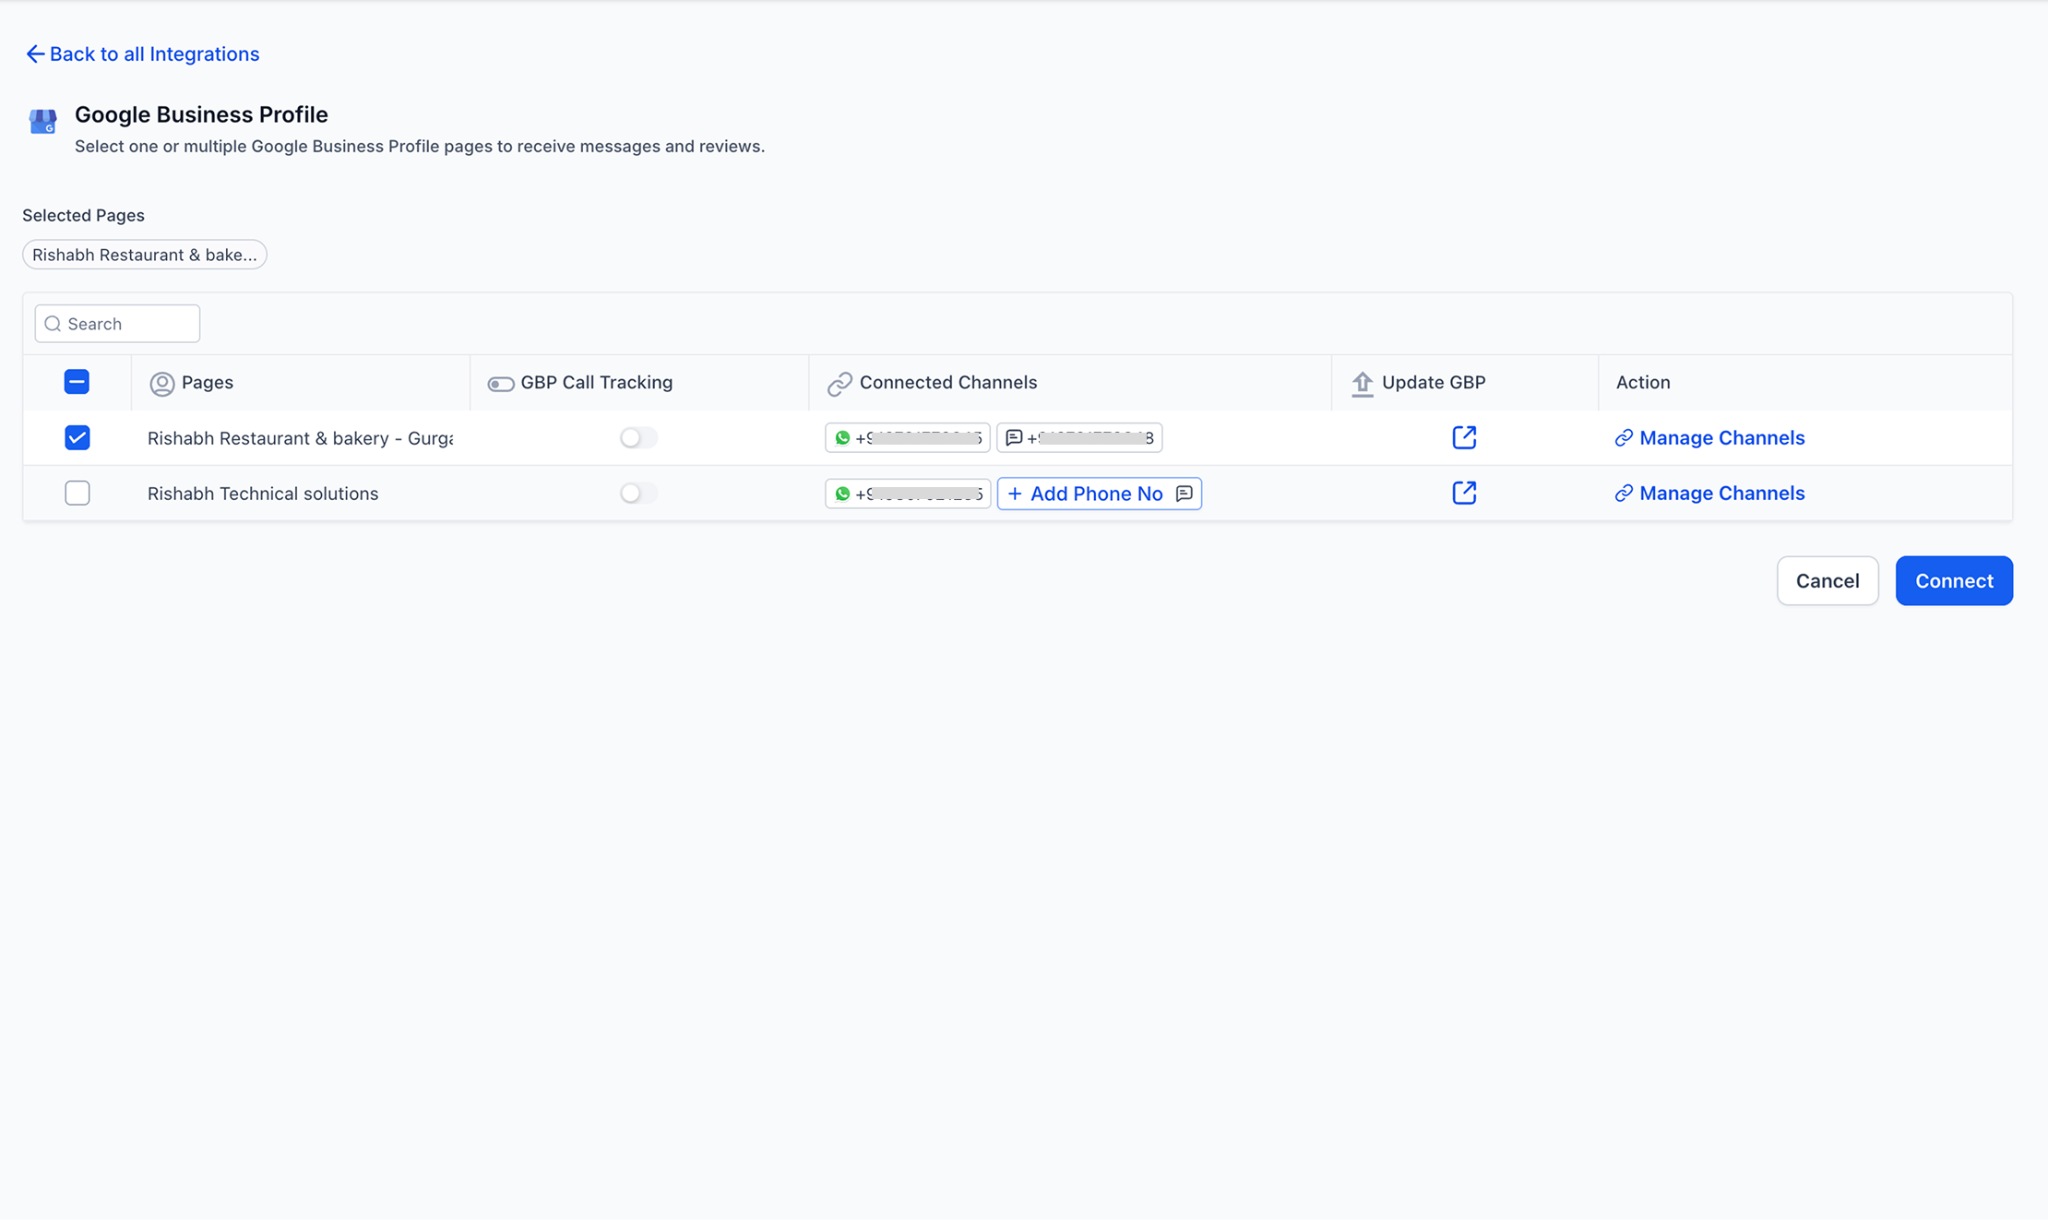
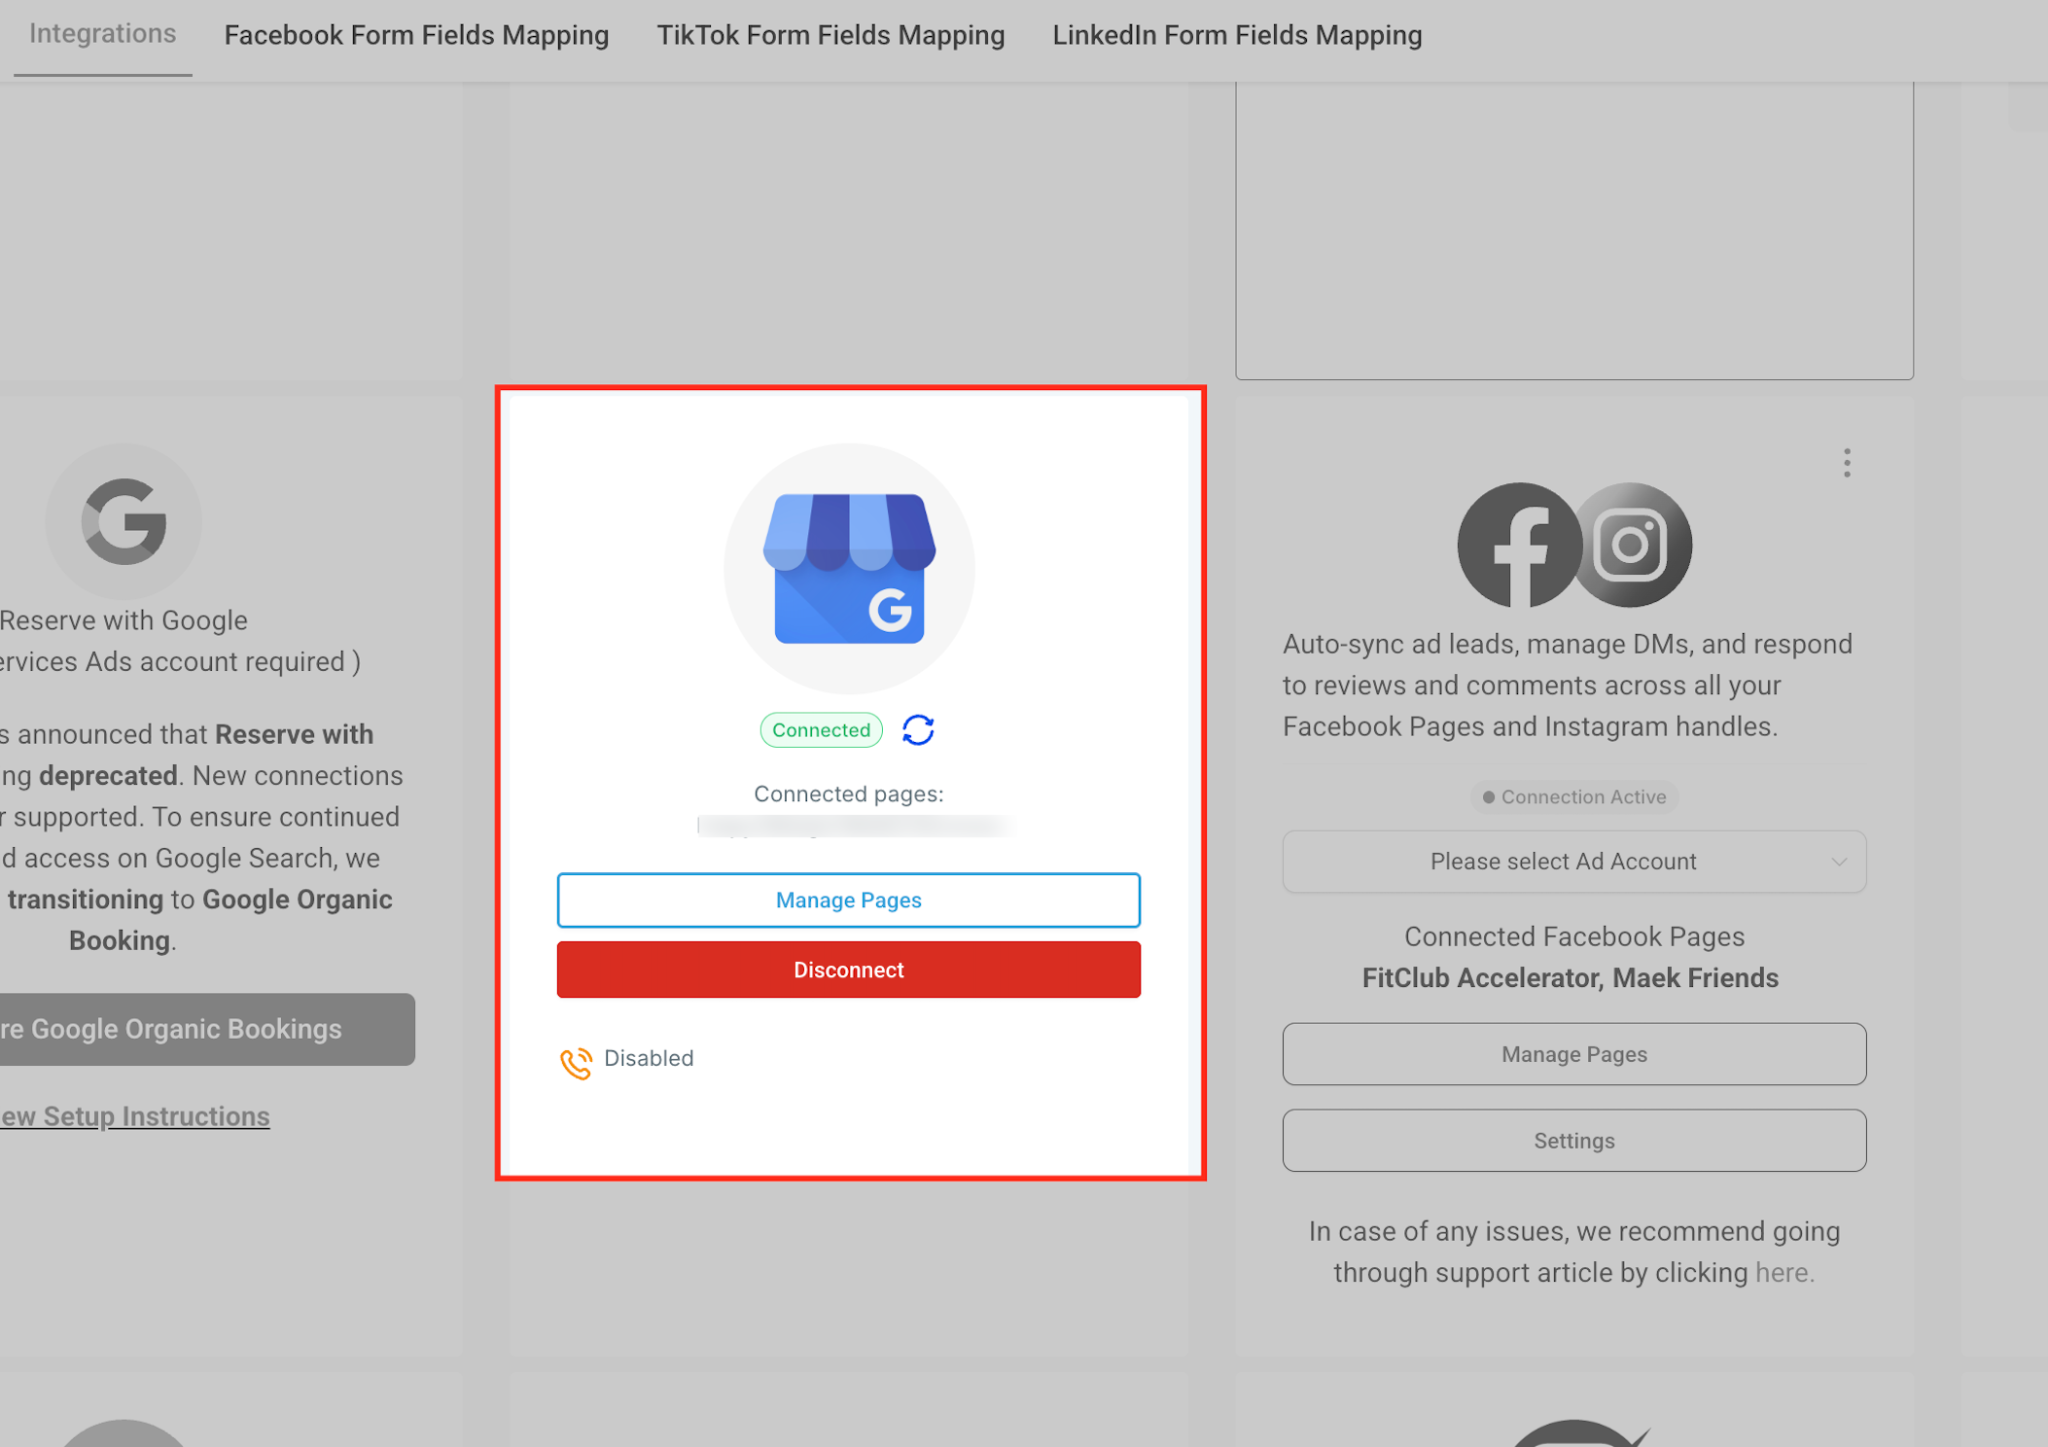
Overview
Google Business Profile Integration
Integrating Google Business Profile (GBP) into TWG CRM goes beyond simply connecting accounts. It enhances how your business communicates with prospects and customers by providing visibility and tools directly in the CRM.
- Centralized Reviews: New Google reviews automatically sync into Conversations, allowing you to reply without leaving TWG CRM.
- Messaging Integration: Communication channels are added and linked to the CRM for syncing messages.
- Reputation Tracking: Monitor and manage reviews inside the Reputation tab.
- Increased Visibility: Keep your business profile active, encouraging customer engagement and better local SEO.
- Streamlined Workflow: Manage Google interactions alongside other CRM integrations like Facebook, Instagram, and SMS.
Getting Started
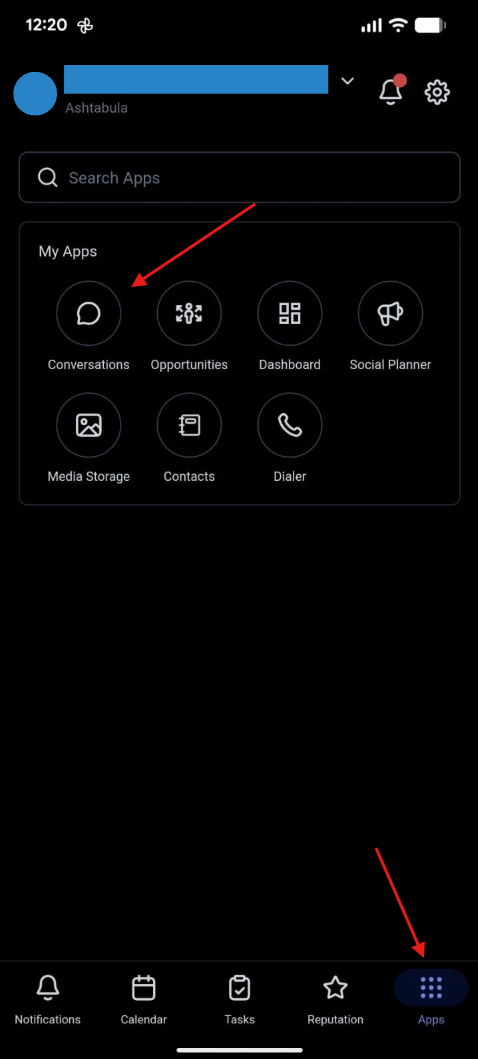
Conversations on the Mobile App
Navigate to the Apps tab on the right bottom of the screen, then click on "Conversations" under "My Apps".
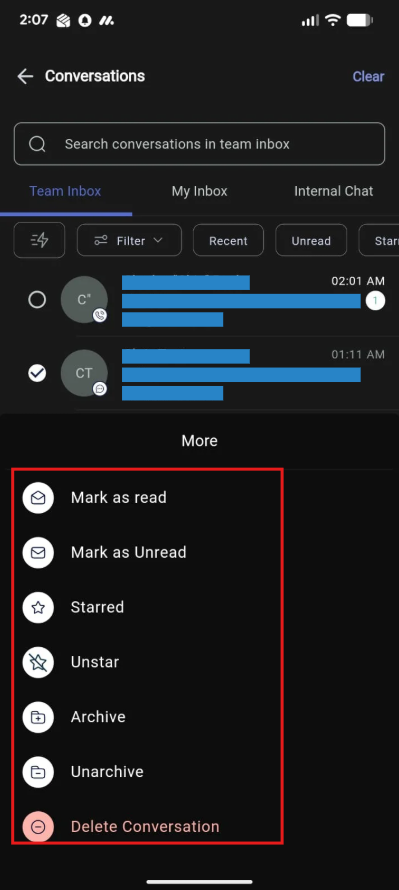
1. Inbox Panel
The Inbox Panel controls which set of conversations you're viewing — personal, team, or internal chat — so you can switch context quickly without changing pages.
- My Inbox: Conversations assigned to you or followed by you.
- Team Inbox: All conversations within the account (requires full data access).
- Internal Chat: Private, team-only discussions separate from customer threads.
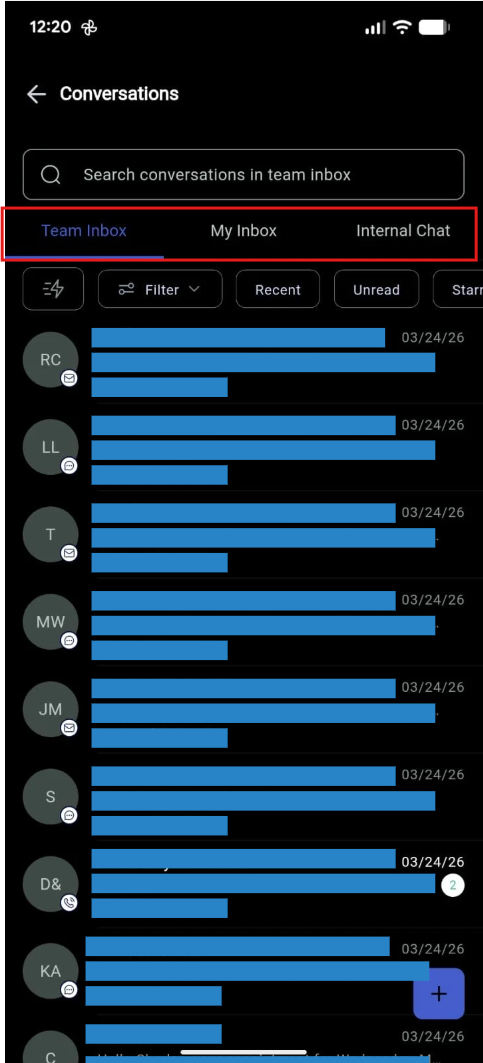
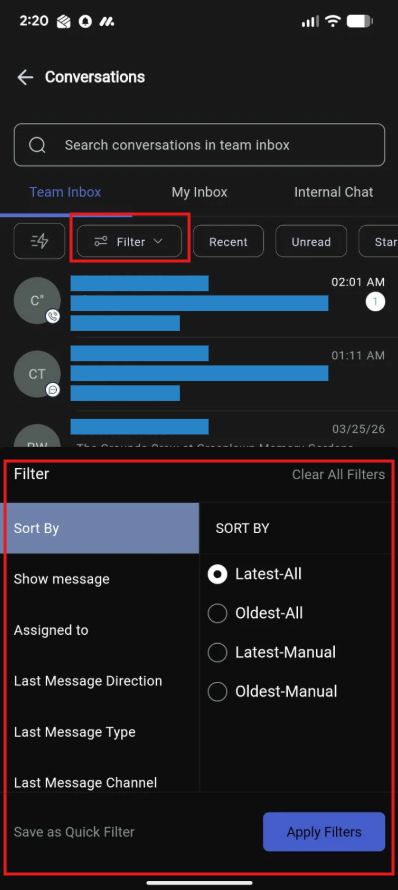
2. Chat List Panel
The Chat List Panel displays a list of all conversations based on the inbox, folder, or filter you've selected from the Inbox Panel.
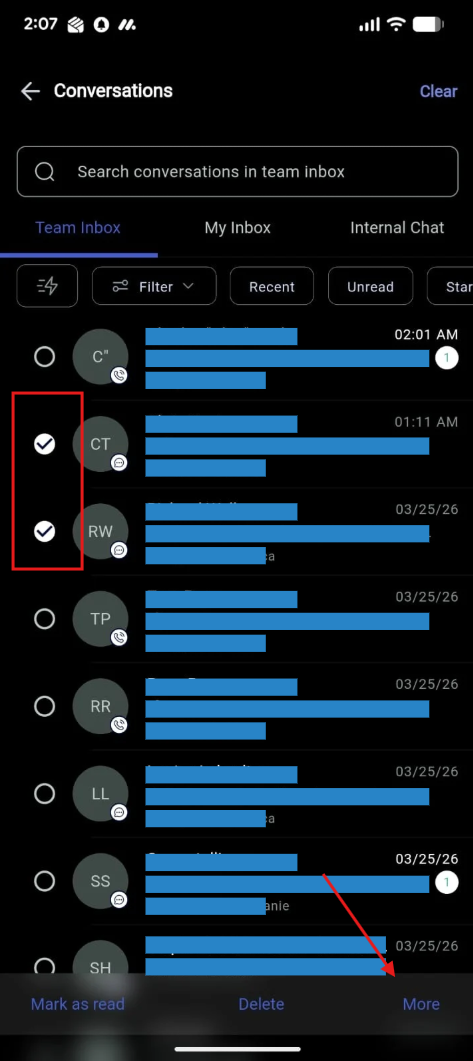
- Hold a contact card to check the select box and enable bulk actions: Mark as Read/Unread, Star/Unstar, Delete.
- Sort by newest or oldest activity.
Use the Filter icon to sort by assigned user, show message type, and many more options.
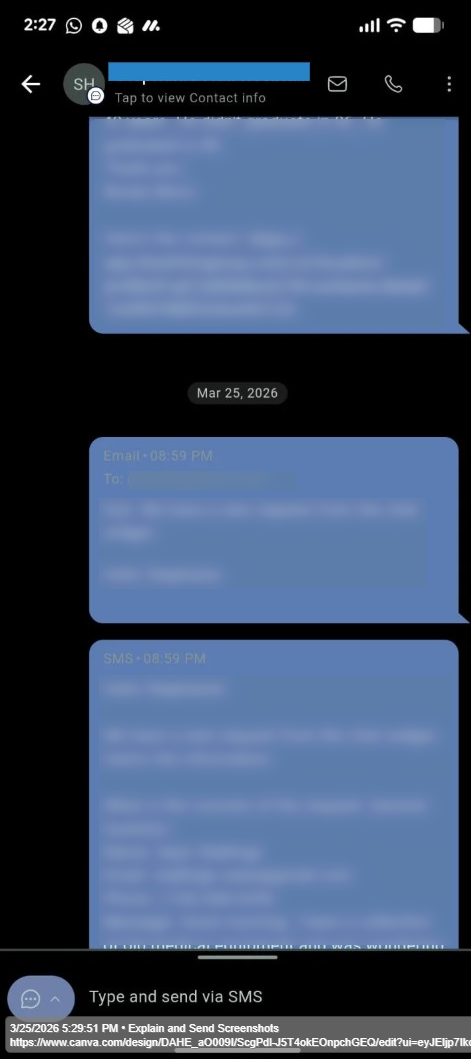
3. Message History
The Message History Panel is your main reading and reply area. It supports multi-channel timelines, quick replies, and message-type filtering to find context fast. Read the full history across Email, SMS, WhatsApp, Facebook/Instagram messages, and Internal Comments.
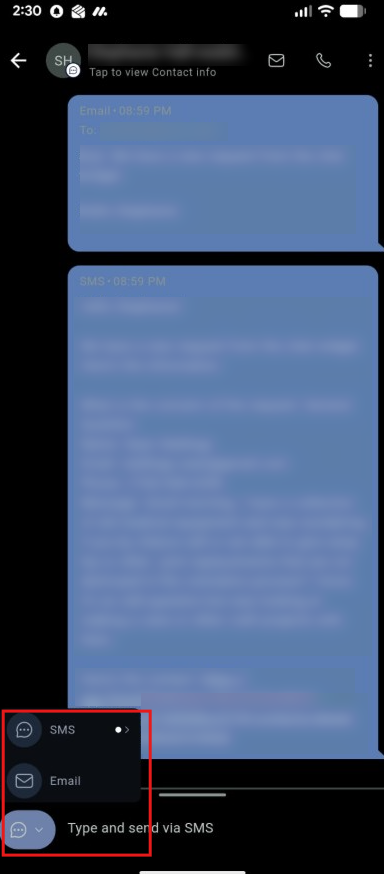
To send a message from a different channel, select from the channel selector here:
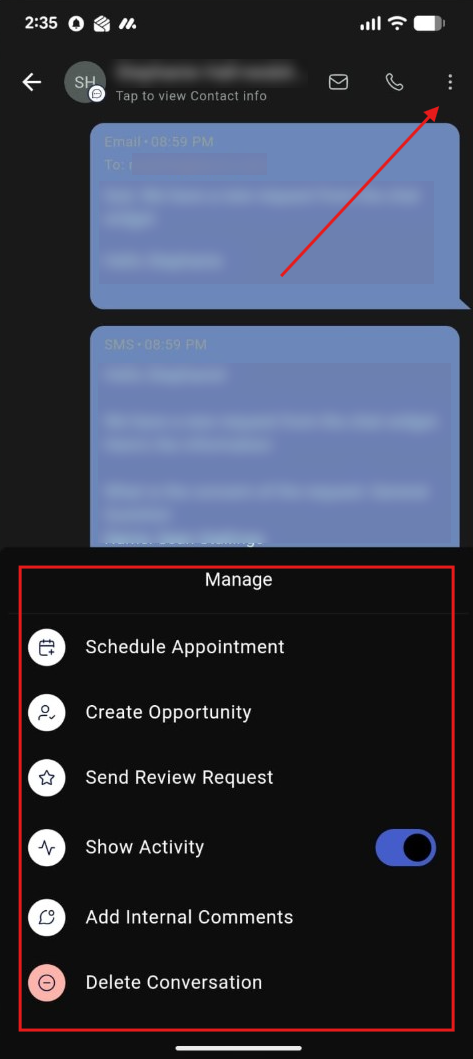
Quick Actions: Click the three-dot menu (⋮) on the top right for options to Schedule an Appointment, Create an Opportunity, Send a Review Request, Show Activity, Add an Internal Comment, or Delete a Conversation.
Getting Started
Contacts on the Mobile App
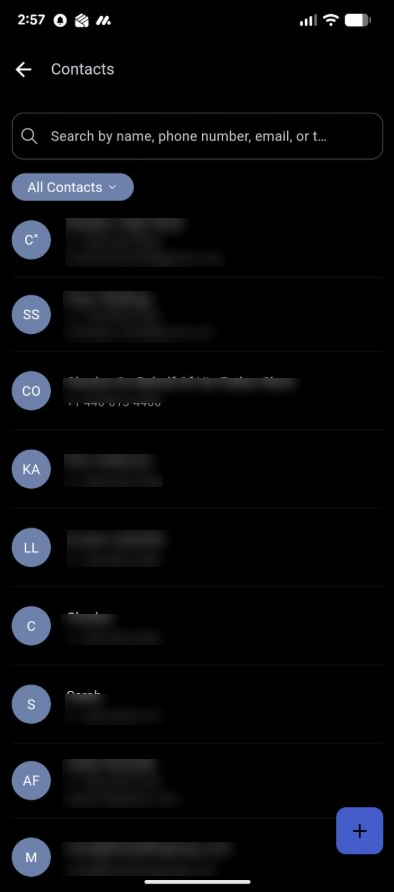
To navigate to the Contacts section, tap Apps on the right bottom corner of your TWG CRM Mobile App.
Here you can see the entire list of contacts in your account.
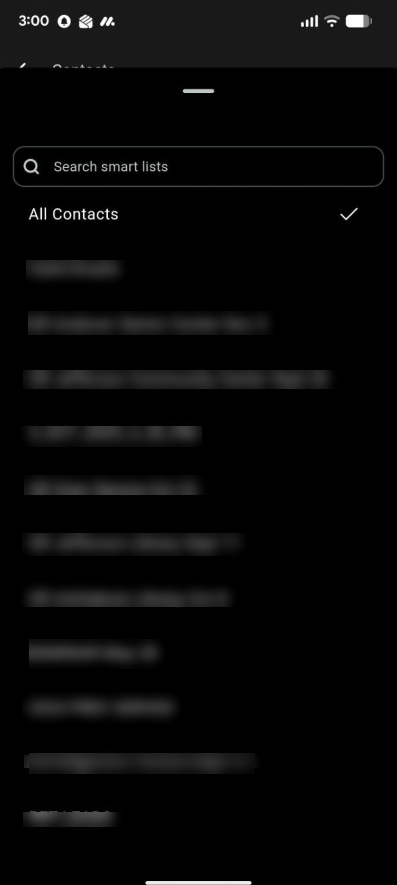
To see your Smart Lists, click on the "All Contacts" drop-down.
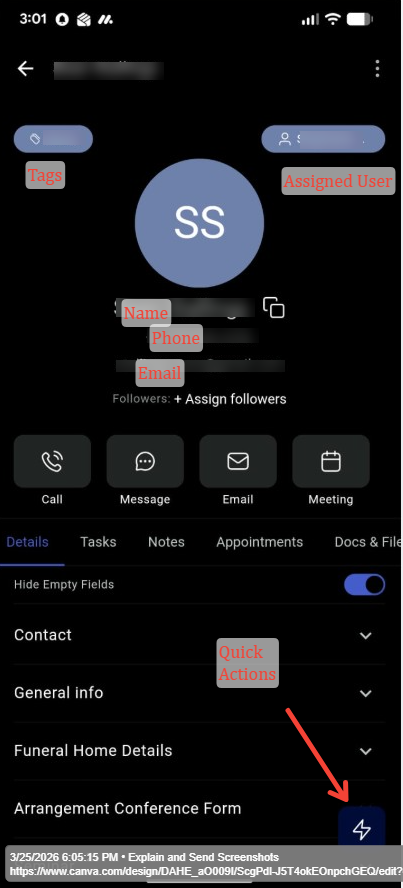
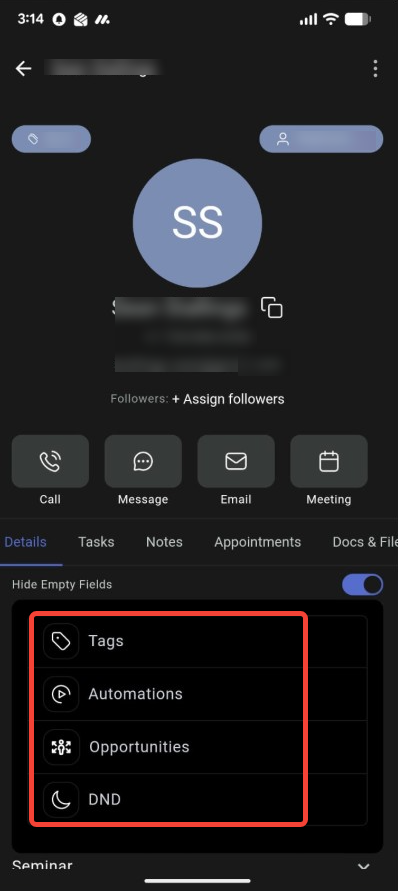
Quick Actions
From the quick actions menu, you can:
- Add or remove tags from the contact.
- See past and active automations.
- View or create an opportunity for that contact.
- Enable or disable DND (Do Not Disturb) for multiple channels.
Getting Started
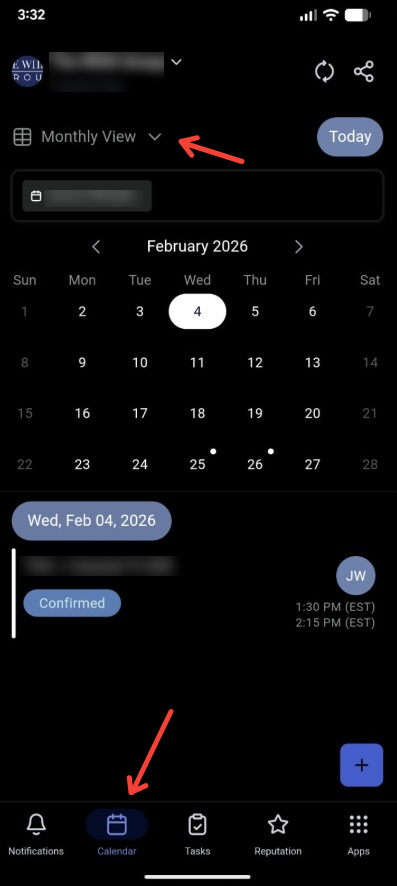
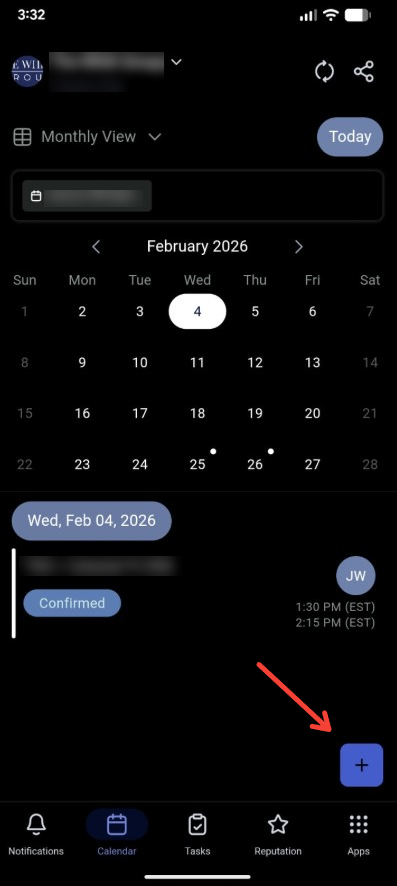
Calendar on the Mobile App
The second tab from the left is Calendar. Tap on it and change the view to Monthly, Weekly, or Daily.
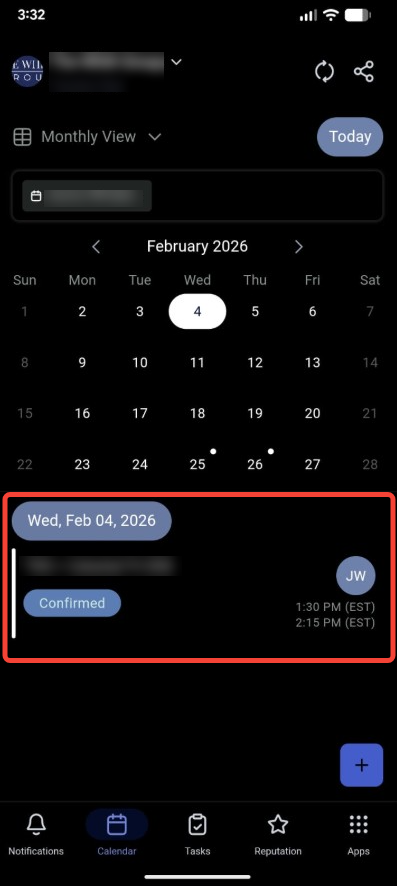
You can see the list of appointments booked on a selected day, including the assigned user.
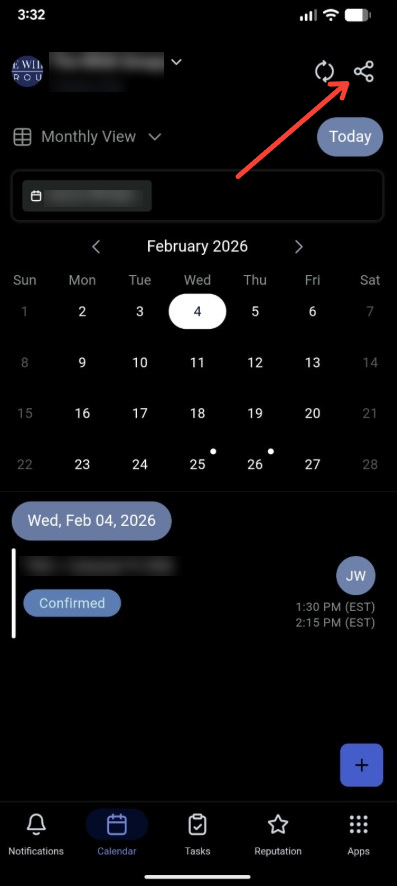
To share the calendar booking link, tap the share icon on the top right and select the calendar you want to share a link for.
To create a new appointment, tap the + icon on the right bottom of the screen.
Getting Started
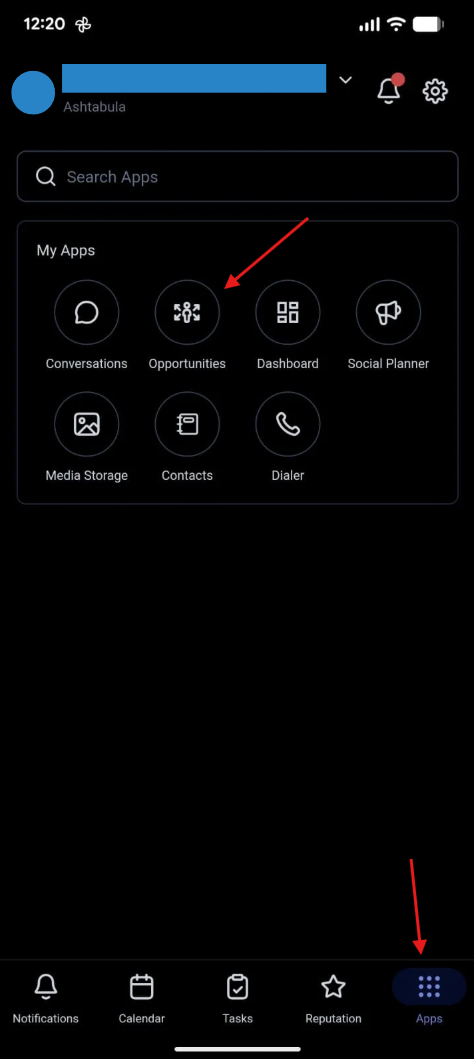
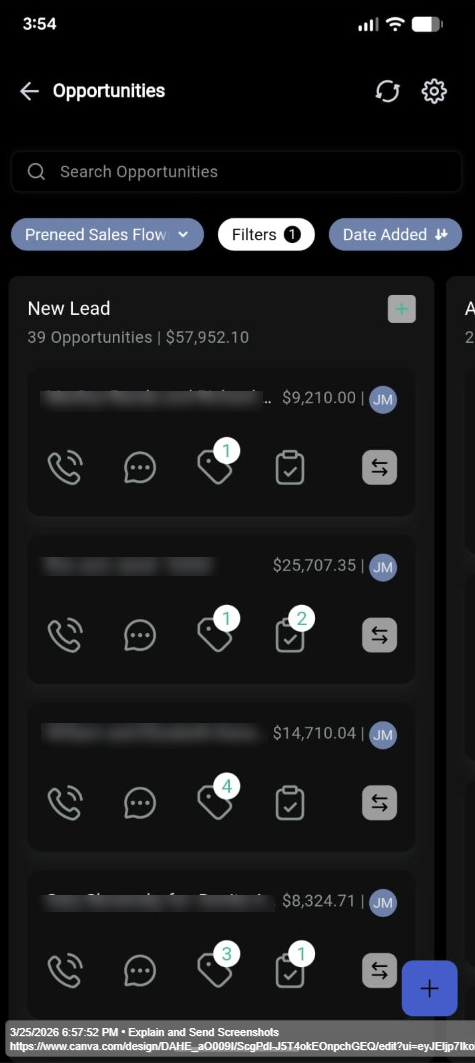
Opportunities on the Mobile App
Navigate to Apps on the right bottom of the screen, then click on "Opportunities" under "My Apps".
From there you'll be able to see all the pipeline stages and the opportunity cards within each stage.
Overview
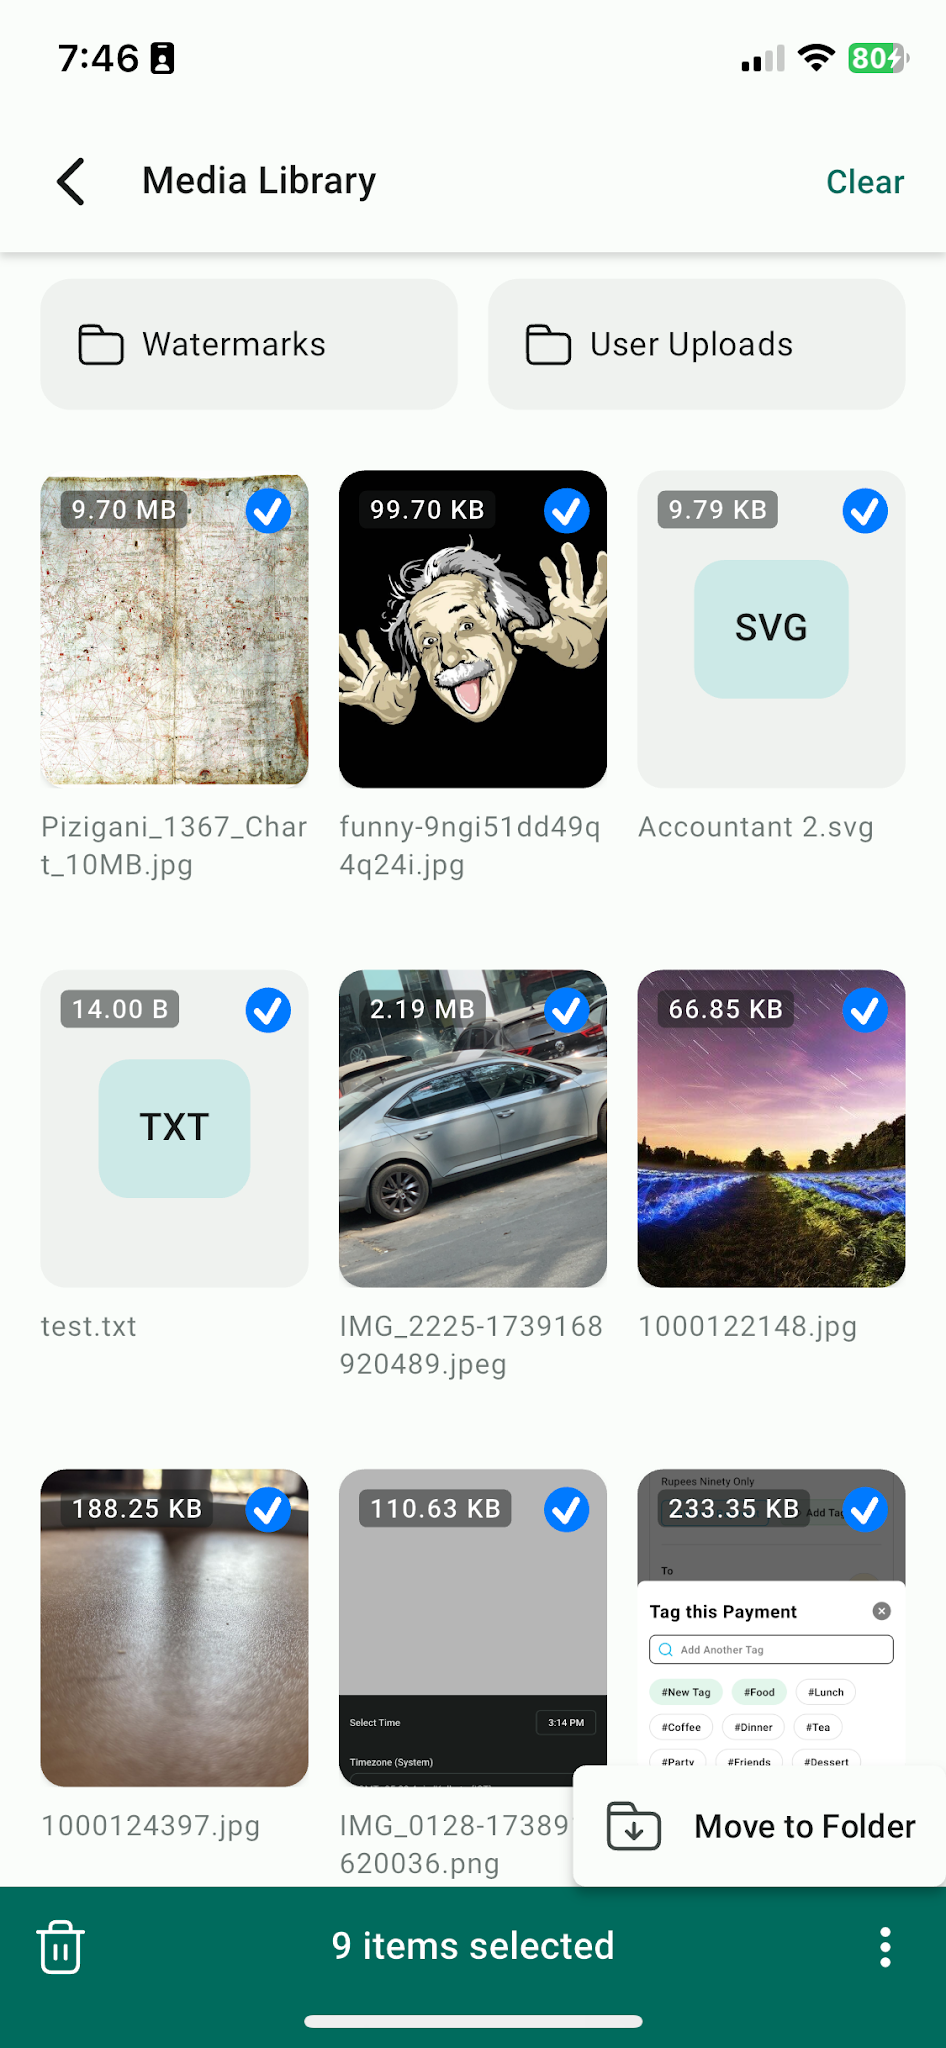
Media Library on the Mobile App
Managing media across conversations, contracts, social planning, and other business operations often becomes challenging when files are scattered across devices or apps. The Media Library in the TWG CRM Mobile App provides a centralized, organized hub for all your media assets. Whether you're working with images, videos, or PDFs, the Media Library makes it easy to upload, organize, and access your files seamlessly — all from one place.
Key Benefits:
- Centralized Media Management — Store images, videos, PDFs, and other file types in one unified location.
- Enhanced Organization — Create folders and manage media without switching between external apps or mixing personal and business files.
- Cross-Module Integration — Use your media directly in features like Social Planner and Conversations for smooth, streamlined workflows.
- Time-Saving Efficiency — Search and filter options make finding specific files quick and effortless.
- Seamless Upload Experience — Upload directly from your gallery, files app, or camera in just a few taps.
Step-by-Step Guide
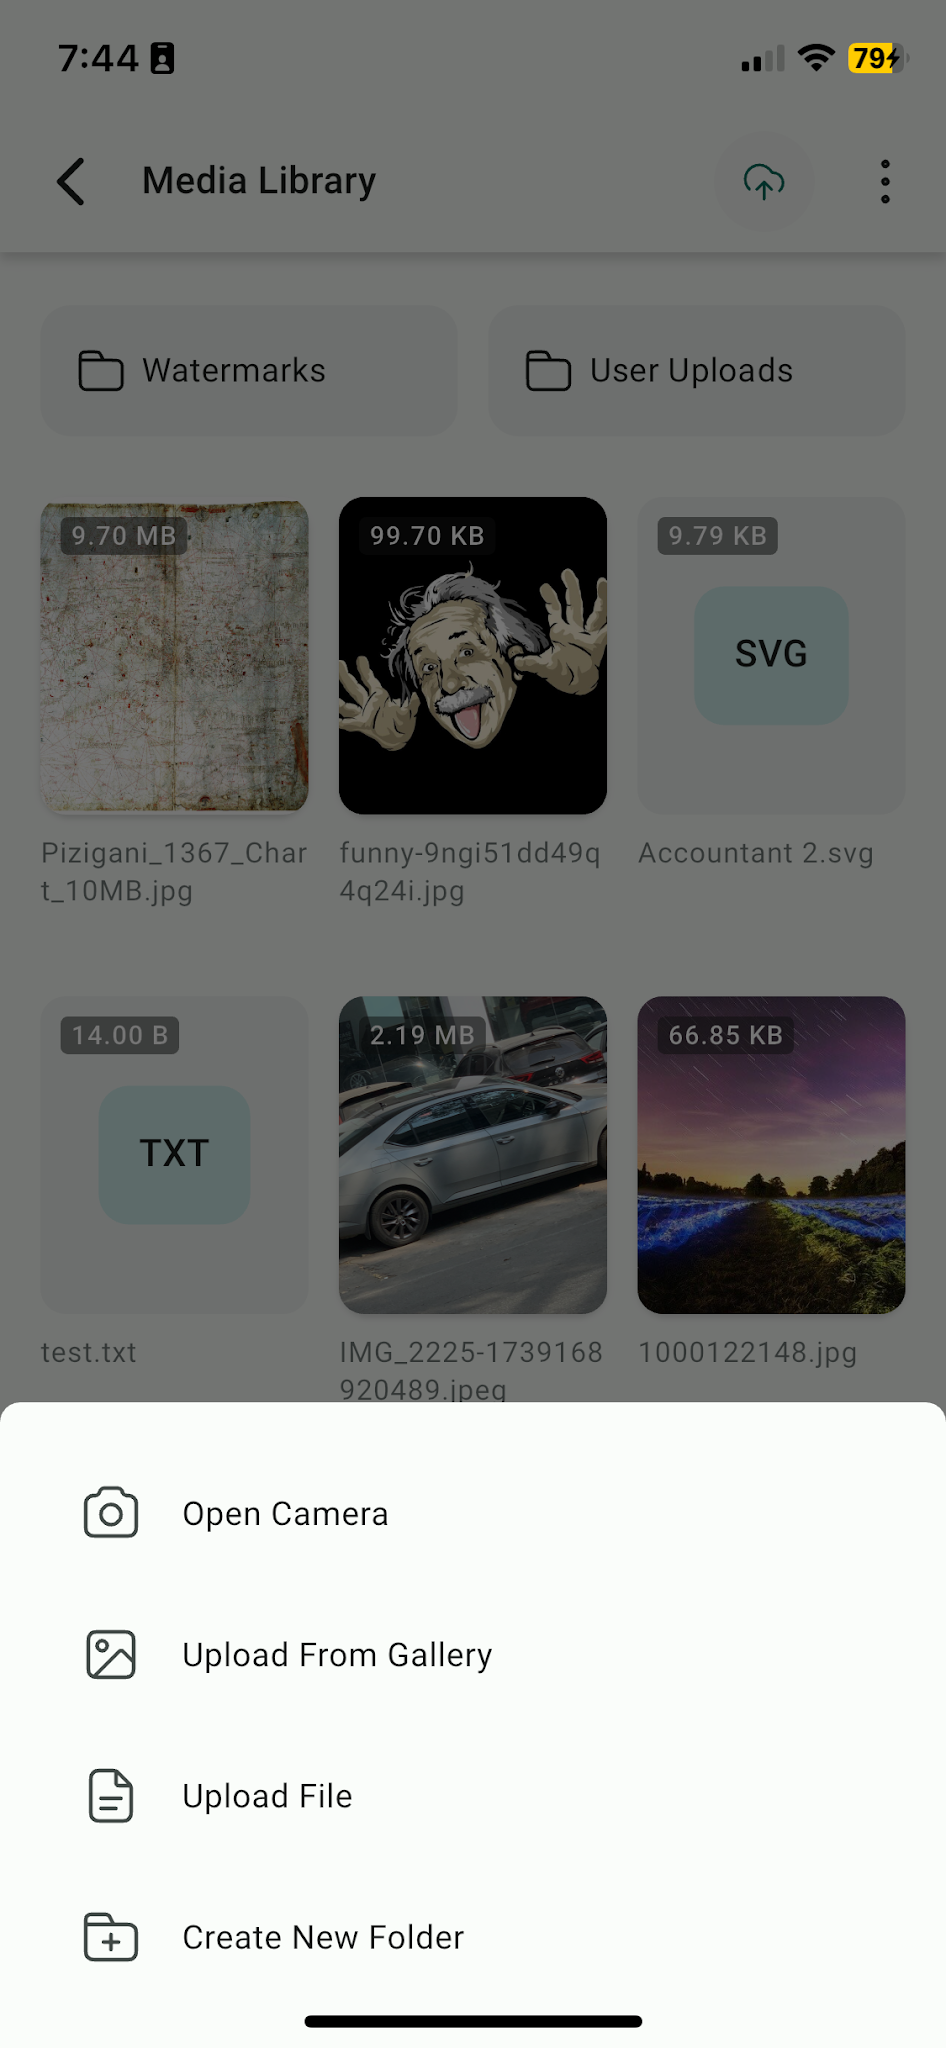
- 1
Access the Media Library — Open the TWG CRM Mobile App, tap the hamburger menu (☰) in the top-left corner, and select Media Library from the menu.
- 2
Upload Media — Tap the Upload button (+) and choose your source: Gallery (existing photos/videos), Camera (capture and upload instantly), or Files App (upload saved files like PDFs).
- 3
Organize Your Media — Tap New Folder to create a folder. Drag and drop (or move) files into folders to keep everything tidy.
- 4
Search & Sort — Use the Search Bar to quickly locate specific media. Apply Sort Options by name, size, or most recent.
- 5
Manage Multiple Files — Tap and hold a file to enable multi-select mode. Select multiple files, then perform bulk actions such as Delete or Move to Folder.